
| Version 48 (modified by , 6 years ago) ( diff ) |
|---|
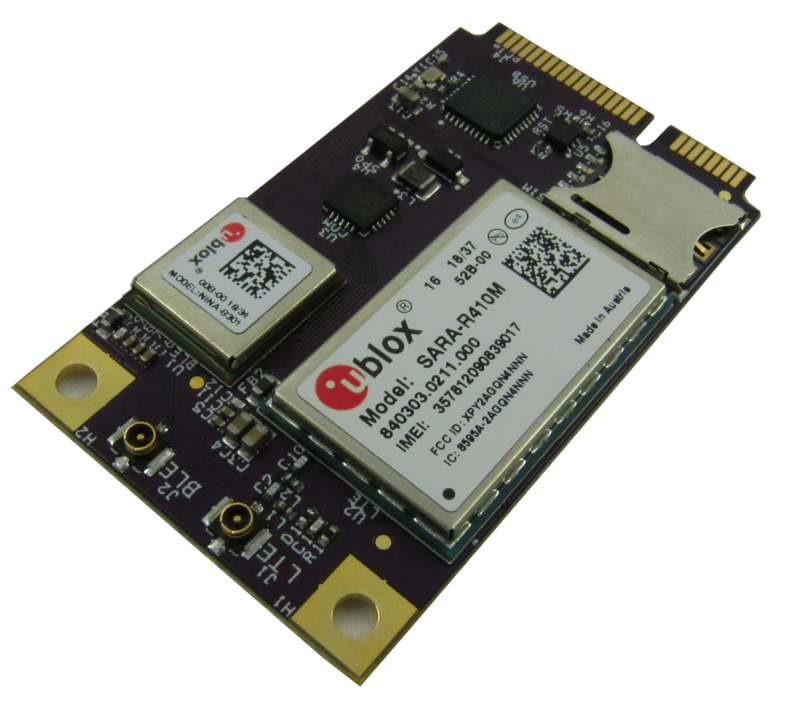
GW16126 miniPCIe BLE / LTE Cat-M1 modem

The GW16126 is a miniPCIe form-factor card that features both a BLE 5.0 radio and a Cat-M1 modem designed for the IoT market.
U-blox Sara-R410M, SARA-R410M-02B and SARA-R410M-52B are all PTCRB certified.
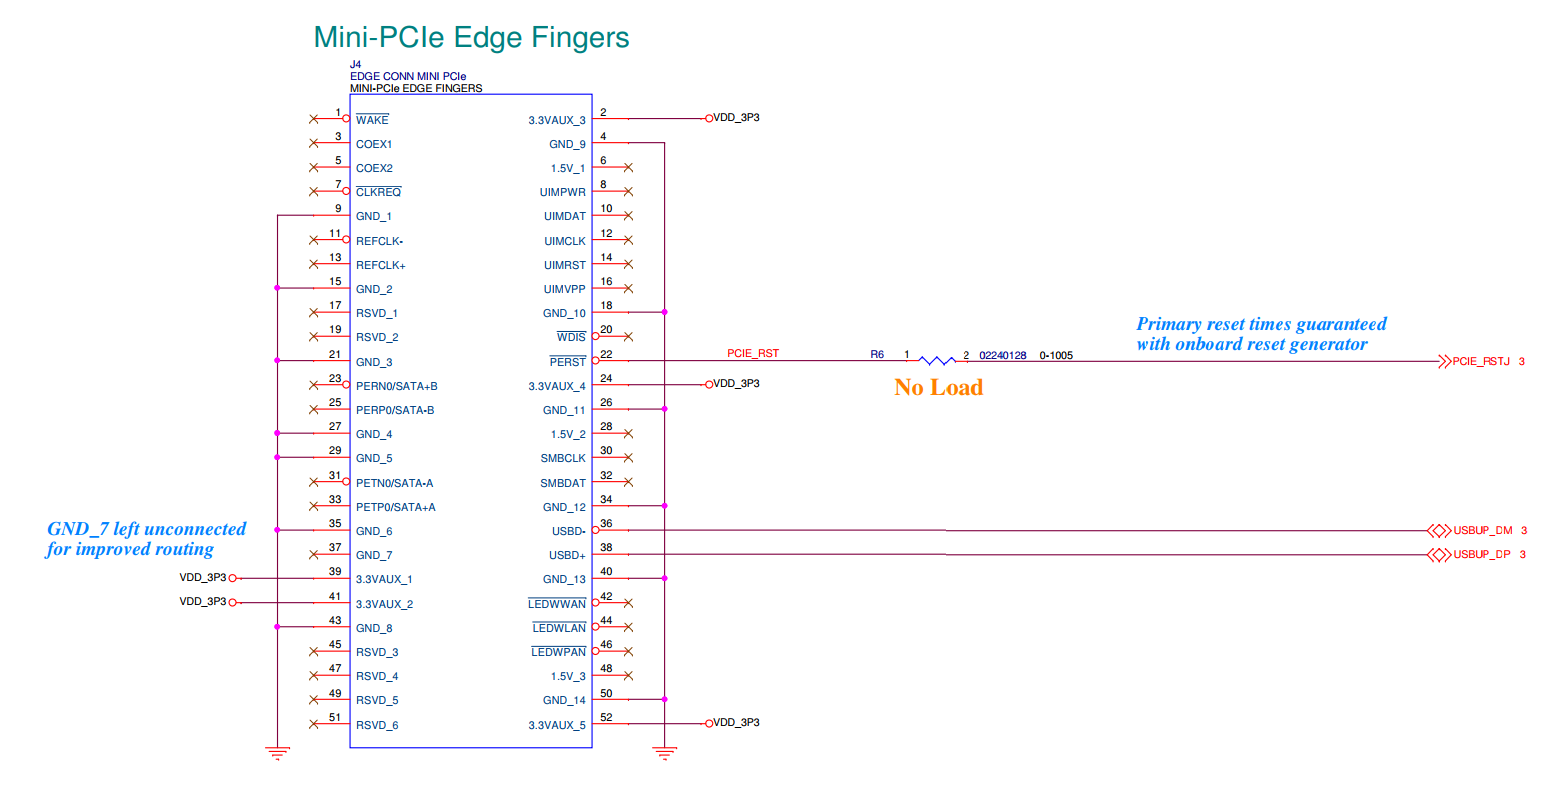
The GW16126 interfaces with a host over USB 2.0 and uses the following pins on the miniPCIe card edge:
- GND: pin 4,9,15,18,21,26,27,29,34,35,40,43,50
- VDD_3P3: pin 2,24,39,41,52
- USB_DM: pin 36
- USB_DP: pin 38
- Diagram

Power draw varies greatly with the activity of the LTE Cat-M1 modem but typically varies between the milliwatt range to a max of around 2W
On the USB bus the following are present:
- USB2514 USB 2.0 2-port HUB
- FT231X USB UART connected to a u-blox NINA-B30x BLE module
- u-blox NINA-B301 BLE module USB 2.0 controller
- u-blox SARA-R4 Cat M1 / NB1 modem with nano-SIM socket
These look like the following with lsusb:
ID 05c6:90b2 Qualcomm, Inc.
ID 0403:6015 Future Technology Devices International, Ltd Bridge(I2C/SPI/UART/FIFO)
ID 0424:2514 Standard Microsystems Corp. USB 2.0 Hub
The following devices will be created by the kernel modules:
- /dev/ttyUSB0 (hci_uart) (CONFIG_BT_HCIUART, CONFIG_BT_HCIUART_H4 hci_uart)
- /dev/ttyUSB1 (qcdm) (CONFIG_USB_SERIAL_OPTION option)
- /dev/ttyUSB2 (at) (CONFIG_USB_SERIAL_OPTION option)
- /dev/cdc-wdm0 (qmi) (CONFIG_USB_NET_QMI_WWAN qmi_wwan)
- /sys/class/net/wwan0 (net) (CONFIG_USB_NET_QMI_WWAN qmi_wwan)
- Note that the 3 tty devices can appear in different order as USB enumeration is not guaranteed to be consistent across boots
The drivers do not add the modem device ID (05c6:90b2) until mainline kernel 4.17.
If for some reason you don't have all the drivers enabled above or have them static, you may find the /dev/ttyUSB devices enumerate in a different order. You can use a variety of ways to determine which device is which:
mmcli -m 0will report details about detected modems and what devices they are onls -d /sys/bus/usb/drivers/ftdi_sio/*/ttyUSB*will tell you which tty is attached to theftdi_siodriver to attach the Bluetooth HCI_UART tols -d /sys/bus/usb/drivers/option/*/ttyUSB*will tell you which tty's are attached to theoptiondriver for the modem.
u-blox SARA-R4 LTE Cat M1 modem
The u-blox SARA-R410M-52B LTE Cat M1 modem supports M1 bands 2,4,5,12,13. For more info on the CATM1 standard and use cases see the following CATM1 Explained Link.
CAT M1 is specifically for low power small data applications. Because of this, there are two items that help to reduce power:
- LTE PSM (Power Saving Mode)
- LTE eDRX (Extended Discontinuous Reception)
- This can be handy to disable if a lot of continuous data is required. It may help to disable eDRX (with the +CEDRXS command). In general, u-blox recommends disabling eDRX, which is currently default enabled in several of the +UMNOPROF profiles.
- More information can be found online about these items, including this article here
The SARA-R4 supports the following types of connections:
- QMI (using /dev/cdc-wdm0 and /sys/class/net/wwan0) (recommended but requires firmware M0.10.00 or later)
- PPP (using the TTY for AT commands and data) (not recommended as this requires dynamic configuration of the tty device due to USB enumeration order not being garunteed as well as configuration of chat scripts and does not allow concurant AT commands and network support)
CAT M1 SIM Support
Note that the CAT M1 modem requires a CATM1 SIM from a carrier. These SIMs are typically different than the standard LTE SIMs (used in your phone) but depends on the provider.
Gateworks has included and recommends a SIM from Hologram. The Hologram SIM does not have to be specific to CATM1.
- Obtain a SIM here: https://hologram.io/
- Activate the included SIM here: https://hologram.io/docs/guide/connect/connect-device/
We have tested this Verizon SIM as well. Note this SIM will not automatically work with the GW16126 because the GW16126 is not end device certified with Verizon. Customers will need to work with their particular cellular carrier to get test SIMs that will work properly with the modem. Certification should also be discussed at the same time.
One may also want to disable system updates that may run in the background on the OS that is being used to avoid any overages on the SIM data plan.
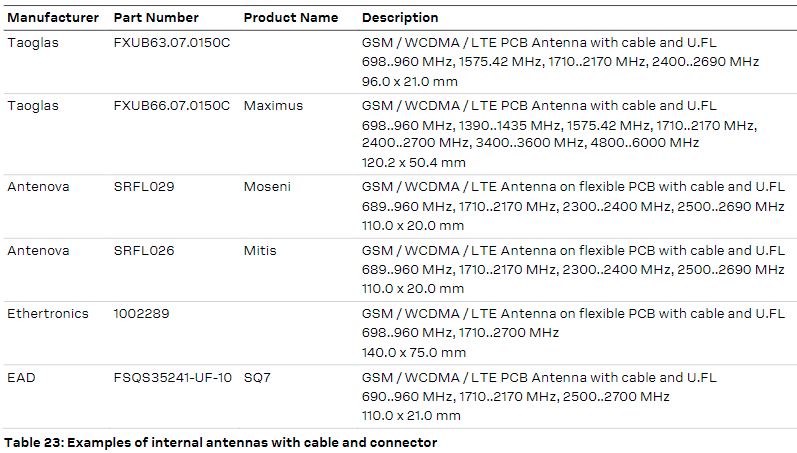
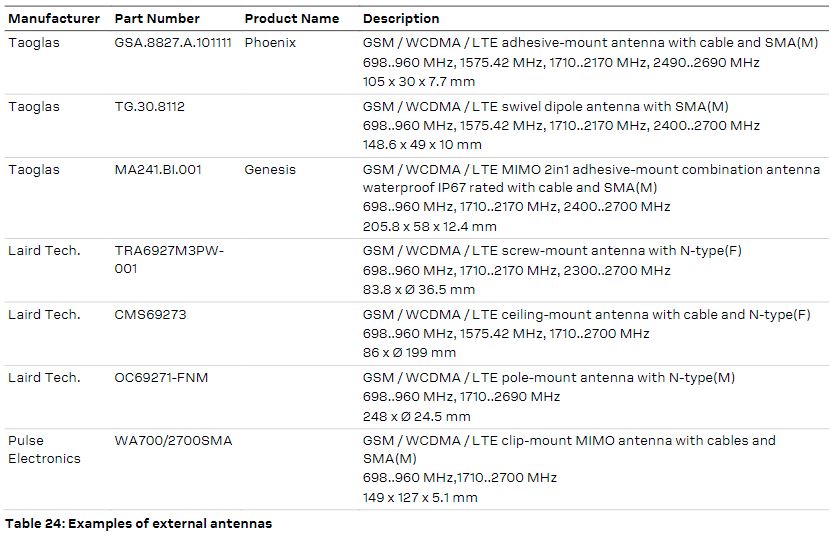
Antenna
The CAT M1 Modem uses specific LTE Bands. There are many bands supported by the radio, primarily to support many different carriers. Each carrier typically only supports one or two bands. If the radio is used in a known area with a known carrier, an antenna should be selected to match that band for the best performance. Known certified carriers and their bands are listed in the SARA-R410M-02B certification and initial production document.
The u-blox SARA-R4/N4 System Integration Manual identifies several antennas that can be used in tables 22, 23 and 24 (pages 63-64). Download the SARA-R4/N4 System Integration Manual.
See the below chart of bands available, sorted by frequency:
| LTE Band | Duplex mode[A 1] | ƒ(MHz) | Common name |
|---|---|---|---|
| 13 | FDD | 700 | Upper SMH[A 7] |
| 28 | FDD | 700 | APT |
| 12 | FDD | 700 | Lower SMH[A 6] |
| 20 | FDD | 800 | Digital Dividend (EU) |
| 19 | FDD | 850 | Upper 800 (Japan) |
| 5 | FDD | 850 | Cellular |
| 18 | FDD | 850 | Lower 800 (Japan) |
| 26 | FDD | 850 | Extended Cellular |
| 8 | FDD | 900 | Extended GSM |
| 4 | FDD | 1700 | AWS‑1[A 4] |
| 3 | FDD | 1800 | DCS |
| 25 | FDD | 1900 | Extended PCS[A 10] |
| 2 | FDD | 1900 | PCS[A 4] |
| 1 | FDD | 2100 | IMT |
Firmware
see UBX-16029218 SARA-R4/N4 series System Integration Manual for firmware update details.
The SARA-R4 Firmware can be updated in the following ways:
- Firmware update Over AT (FOAT): Allows upgrading of the module firmware via binary 'delta' files over the AT interface using AT commands.
- Firmware update Over The Air (uFOTA): Allows upgrading the module firmware via binary 'delta' files over the air interface based on u-blox client/server solution (uFOTA), using Lightweight M2M (LWM2M). This requires the customer creats a campaign with u-blox to identify IMEI's of modems and access to the u-blox uFOTA server
- EasyFlash is a windows application that allows flashing of 'full' firmware images
You can use the ATI command on the AT tty to determine the firmware version (see AT commands below)
Examples:
- FOAT:
apt install lrzsz # X/Y/Zmodem
DEVICE=/dev/$(for i in $(ls -d /sys/bus/usb/drivers/option/*/ttyUSB*); do basename $i; done | tail -n1)
echo "DEVICE=$DEVICE"
stty -F $DEVICE cs8 -parenb -cstopb -ixon
echo -n -e "AT+UFWUPD=3\r" > $DEVICE
sx -kv firmware.bin <$DEVICE >$DEVICE
sleep 1
echo -n -e "AT+UFWINSTALL\r" > $DEVICE
- the actual installation of the firmware takes place when the modem receives the
AT+UFWINSTALLcommand and can take up to 5 minutes to complete. If the binary delta can not apply to your firmware (ie you have a delta for the wrong version) it will fail and your firmware will go un-updated - the update is fault tolerant... in case of power outage etc the modem will boot with the old firmware
- the actual installation of the firmware takes place when the modem receives the
Software Support
In General, the following software is necessary for the GW16126:
- LTE Cat-M1 modem:
- Linux 4.17+ kernel with option driver (CONFIG_USB_SERIAL_OPTION) and qmi driver (CONFIG_USB_NET_QMI_WWAN)
- Linux 4.5+ needed for QMI RAW IP support (unless backported)
- Linux 4.17+ needed for ublox R410M (unless backported)
- Linux 4.17+ kernel with option driver (CONFIG_USB_SERIAL_OPTION) and qmi driver (CONFIG_USB_NET_QMI_WWAN)
Ubuntu:
- LTE Cat-M1 modem: requires network-manager modemmanager libqmi
- BLE HCI: requires bluez
- Fully supported (with the above)
OpenWrt 18.6.x:
- requires kmod-usb-net-opton, kmod-usb-net-qmi-wwan, kmod-usb-serial, kmod-usb-serial-ftdi, kmod-usb-serial-qualcomm, kmod-bluetooth, kmod-crypto-user, kmod-crypto-hash, bluez-daemon, uqmi
- fully supported (with the above)
OpenWrt 16.02:
- will not work without backporting qmi raw-ip support and modem ID's to option1/qmi-wwan driver
The modem features a Qualcomm chipset that uses the 'option' and 'qmi_wwan' Linux drivers providing the following devices:
- /dev/ttyUSB1 (qcdm)
- /dev/ttyUSB2 (AT)
- /dev/cdc-wdm0 (qmi)
- /sys/class/net/wwan0 (net)
The modem is supported by Linux ModemManager and libqmi-utils.
General modem information that should be understood is located on the Gateworks Modem Wiki Page
Note, because this modem uses raw-ip, the IP from the provider will not automatically be applied to the interface. The provider will give an IP and then it must manually be applied to the wwan0 interface.
AT Commands
For a detailed list of all AT commands see:
AT Commands are supported on the second /dev/ttyUSB lines. Because you can't guarantee the order Linux enumerates USB devices use the following to determine the AT tty:
DEVICE=/dev/$(for i in $(ls -d /sys/bus/usb/drivers/option/*/ttyUSB*); do basename $i; done | tail -n1)
Note that you can not use AT commands while using PPP as this uses the same TTY. If using PPP you can kill pppd (ie 'ifdown wwan0'), perform AT commands closing the TTY when done, then re-start pppd (ie 'ifup wwan0'). It is highly recommended you use QMI as that uses a different interface leaving the AT TTY available for use if needed to do things that perhaps are not supported by QMI.
Mobile Network Operator (MNO) Selection
Use the AT+UMNOPROF command to change profiles to a specific Mobile Network Operator (MNO):
- AT+UMNOPROF? - show current profile
- AT+UMNOPROF=? - list supported profiles
- AT+UMNOPROF=<n> - set profile to <n>
Notes:
- Do not modify individual parameters within the profile such as operator selection as that can break compatibility with your operator
- you must de-register from the network before changing the MNO (AT+COPS=2)
- you must issue a reset after changing the MNO (AT+CFUN=15 issues a silent reset with a detach from the network and saving of NVM parameters)
- Setting the profile to the currently set profile does not reset the parameters. To reset the parameters, set a different profile than the current one and then set the the profile back to the original (like 0).
Examples:
- Set MNO to Verizon:
# obtain AT command TTY (the 2nd tty)
DEVICE=/dev/$(for i in $(ls -d /sys/bus/usb/drivers/option/*/ttyUSB*); do basename $i; done | tail -n1)
# configure TTY
stty -F $DEVICE ignbrk -brkint -icrnl -opost -onlcr -isig -icanon -iexten -echo -echoe -echok -echoctl -echoke
# background process to read TTY responses
cat $DEVICE &
at() { echo -n -e "$1\r" > $DEVICE; }
at "AT+COPS=2" # deregister from network
at "AT+UMNOPROF=0" # set MNO to auto
at "AT+UMNOPROF=3" # set MNO to Verizon
at "AT+CFUN=15" # de-register from network, save NVM, and reset modem
- Note that the
AT+CFUN=15will cause the modem to disconnect and re-enumerate on the bus
Connection Examples
The following sections show connection examples for various Operating Environments:
PPPD
This is the recommended method for establishing a connection when using the SARA R410 and Ubuntu.
To configure a connection to the Hologram network execute the following commands:
- Install pppd
apt-get install ppp
- Disable ModemManager
systemctl stop ModemManager
systemctl disable ModemManager
- Create the following four files:
cat <<\EOF > /etc/chatscripts/sara
# Chat script for Hologram Nova using Hologram SIM card
# See hologram.io for more information

ABORT 'BUSY'
ABORT 'NO CARRIER'
ABORT 'VOICE'
ABORT 'NO DIALTONE'
ABORT 'NO DIAL TONE'
ABORT 'NO ANSWER'
ABORT 'DELAYED'
TIMEOUT 12
REPORT CONNECT

"" AT
OK ATH
OK ATZ
OK ATQ0
OK AT+CGDCONT=1,"IP","hologram"
OK ATDT*99***1#
CONNECT ''
EOF
cat <<\EOF > /etc/ppp/peers/sara
# PPP configuration for Hologram Nova modem using Hologram SIM card
# For more information see hologram.io

connect "/usr/sbin/chat -v -f /etc/chatscripts/sara "

# Serial device to which the modem is connected.
/dev/ttyUSB2

# Speed of the serial line.
9600

# Assumes that your IP address is allocated dynamically by the ISP.
noipdefault
# Try to get the name server addresses from the ISP.
usepeerdns
# Use this connection as the default route.
defaultroute

# Makes pppd "dial again" when the connection is lost.
persist

# Do not ask the remote to authenticate.
noauth
EOF
cat <<\EOF > /etc/network/interfaces
# interfaces(5) file used by ifup(8) and ifdown(8)
# Include files from /etc/network/interfaces.d:
source-directory /etc/network/interfaces.d
#allow-hotplug eth0
#auto eth0
iface eth0 inet dhcp

auto ppp0
iface ppp0 inet ppp
provider sara
EOF
cat <<\EOF > /etc/network/if-pre-up.d/sara
#!/bin/sh

if [ "$IFACE" = ppp0 ]; then
        DEVICE=/dev/$(for i in $(ls -d /sys/bus/usb/drivers/option/*/ttyUSB*); do basename $i; done | tail -n1)
        sed -i 's;/dev/ttyUSB[[:digit:]]*;'"$DEVICE"';' /etc/ppp/peers/sara
        echo "ppp0 up"
        echo "AT+COPS=2" > $DEVICE
        echo "AT+UMNOPROF=0" > $DEVICE
        echo "AT+UMNOPROF=3" > $DEVICE
        echo "AT+CFUN=15" > $DEVICE
        sleep 10
fi
EOF
Execute the command "sync", then reboot. If there are no typos or discrepancies the interface "ppp0" should be available with a dhcp assigned address. Files may need to be created using vi because of unicode character issues.
To troubleshoot check that the command below returns the correct device:
echo /dev/$(for i in $(ls -d /sys/bus/usb/drivers/option/*/ttyUSB*); do basename $i; done | tail -n1)
Note: name resolution will need to be configured.
Network Manager (with ModemManager and libqmi)
root@xenial-newport:~# nmcli --version
nmcli tool, version 1.2.6
root@xenial-newport:~# nmcli connection down id 'Wired connection 1' #bring down ethernet to avoid confusion
Connection 'Wired connection 1' successfully deactivated (D-Bus active path: /org/freedesktop/NetworkManager/ActiveConnection/0)
root@xenial-newport:~# nmcli connection add type gsm ifname cdc-wdm0 con-name mymodem apn $APN #add the connection
Connection 'mymodem' (1c6d1b7f-2c89-4e21-93ee-231073605578) successfully added.
root@xenial-newport:~# nmcli connection up id mymodem  #bring up the modem
Connection successfully activated (D-Bus active path: /org/freedesktop/NetworkManager/ActiveConnection/3)
root@xenial-newport:~# ifconfig wwan0 #verify what the ip is
wwan0     Link encap:UNSPEC  HWaddr 00-00-00-00-00-00-00-00-00-00-00-00-00-00-00-00
          inet addr:100.75.76.187  P-t-P:100.75.76.187  Mask:255.255.255.248
          UP POINTOPOINT RUNNING NOARP MULTICAST  MTU:1500  Metric:1
          RX packets:581 errors:0 dropped:0 overruns:0 frame:0
          TX packets:676 errors:0 dropped:0 overruns:0 carrier:0
          collisions:0 txqueuelen:1000
          RX bytes:354005 (354.0 KB)  TX bytes:54090 (54.0 KB)

root@xenial-newport:~# ping -c2 www.google.com #ping for testing
PING www.google.com (216.58.192.196) 56(84) bytes of data.
64 bytes from ord30s25-in-f196.1e100.net (216.58.192.196): icmp_seq=1 ttl=52 time=568 ms
64 bytes from ord30s25-in-f196.1e100.net (216.58.192.196): icmp_seq=2 ttl=52 time=188 ms

--- www.google.com ping statistics ---
2 packets transmitted, 2 received, 0% packet loss, time 1000ms
rtt min/avg/max/mdev = 188.688/378.624/568.561/189.937 ms
ModemManager (!No NetworkManager)
root@xenial-newport:~# mmcli --modem 0 #verify modem is detected

/org/freedesktop/ModemManager1/Modem/0 (device id '5cbc1489609fb1b95308ccf41b45f14e0f57771d')
  -------------------------
  Hardware |   manufacturer: 'u-blox'
           |          model: 'SARA-R410M-52B'
           |       revision: 'L0.0.00.00.06.05  1  [Aug 01 2018 14:05:07]'
           |   H/W revision: '10000'
           |      supported: 'lte'
           |        current: 'lte'
           |   equipment id: '357812090840163'
  -------------------------
  System   |         device: '/sys/devices/platform/soc@0/848000000000.pci/pci0000:00/0000:00:10.0/usb1/1-1/1-1.3/1-1.3.3'
           |        drivers: 'option1, qmi_wwan'
           |         plugin: 'Generic'
           |   primary port: 'cdc-wdm0'
           |          ports: 'ttyUSB0 (qcdm), ttyUSB1 (at), cdc-wdm0 (qmi), wwan0 (net)'
  -------------------------
  Numbers  |           own : '16127498744'
  -------------------------
  Status   |           lock: 'sim-pin2'
           | unlock retries: 'sim-pin (3), sim-pin2 (3), sim-puk (10), sim-puk2 (10)'
           |          state: 'disabled'
           |    power state: 'on'
           |    access tech: 'unknown'
           | signal quality: '0' (cached)
  -------------------------
  Modes    |      supported: 'allowed: 4g; preferred: none'
           |        current: 'allowed: 4g; preferred: none'
  -------------------------
  Bands    |      supported: 'eutran-1, eutran-2, eutran-3, eutran-4, eutran-5, eutran-8, eutran-12, eutran-13, eutran-17, eutran-18, eutran-19, eutran-20, eutran-39'
           |        current: 'eutran-1, eutran-2, eutran-3, eutran-4, eutran-5, eutran-8, eutran-12, eutran-13, eutran-17, eutran-18, eutran-19, eutran-20, eutran-39'
  -------------------------
  IP       |      supported: 'ipv4, ipv6, ipv4v6'
  -------------------------
  3GPP     |           imei: '357812090840163'
           |  enabled locks: 'none'
           |    operator id: 'unknown'
           |  operator name: 'unknown'
           |   subscription: 'unknown'
           |   registration: 'unknown'
           |    EPS UE mode: 'csps-2'
  -------------------------
  SIM      |           path: '/org/freedesktop/ModemManager1/SIM/0'

  -------------------------
  Bearers  |          paths: 'none'

root@xenial-newport:~# mmcli --modem 0 | grep imei #check imei
  3GPP     |           imei: '357812090840163'
root@xenial-newport:~# mmcli --modem 0 --enable #enable the modem
successfully enabled the modem
root@xenial-newport:~# mmcli --modem 0 --simple-connect="apn=$APN" # Actually connect the modem. Note 'CallFailed' is likely an invalid APN
successfully connected the modem
root@xenial-newport:~# mmcli --modem 0 --bearer 0 #get IP address
Bearer '/org/freedesktop/ModemManager1/Bearer/0'
  -------------------------
  Status             |   connected: 'yes'
                     |   suspended: 'no'
                     |   interface: 'wwan0'
                     |  IP timeout: '20'
  -------------------------
  Properties         |         apn: 'NIMBLINK.GW12.VZWENTP'
                     |     roaming: 'allowed'
                     |     IP type: 'none'
                     |        user: 'none'
                     |    password: 'none'
                     |      number: 'none'
                     | Rm protocol: 'unknown'
  -------------------------
  IPv4 configuration |   method: 'static'
                     |  address: '100.75.76.187'
                     |   prefix: '29'
                     |  gateway: '100.75.76.188'
                     |      DNS: '198.224.182.135', '198.224.183.135'
                     |      MTU: '1428'
  -------------------------
  IPv6 configuration |   method: 'unknown'
  -------------------------
  Stats              |          Duration: '0'
                     |    Bytes received: 'N/A'
                     | Bytes transmitted: 'N/A'
root@xenial-newport:~# ifdown eth0 #take down ethernet to avoid confusion
Killed old client process
Internet Systems Consortium DHCP Client 4.3.3
Copyright 2004-2015 Internet Systems Consortium.
All rights reserved.
For info, please visit https://www.isc.org/software/dhcp/

Listening on LPF/eth0/00:d0:12:0f:f5:83
Sending on   LPF/eth0/00:d0:12:0f:f5:83
Sending on   Socket/fallback
DHCPRELEASE on eth0 to 172.24.0.2 port 67 (xid=0x3cab7268)
Restarting ntp (via systemctl): ntp.service.
root@xenial-newport:~# ifconfig wwan0 100.75.76.187/29 #set IP address
root@xenial-newport:~# route add default gw 100.75.76.188 #set route
root@xenial-newport:~# echo "nameserver 198.224.182.135" > /etc/resolv.conf #set nameserver
root@xenial-newport:~# ping -c2 www.google.com #ping google to verify connection
PING www.google.com (216.58.192.196) 56(84) bytes of data.
64 bytes from ord30s25-in-f196.1e100.net (216.58.192.196): icmp_seq=1 ttl=52 time=568 ms
64 bytes from ord30s25-in-f196.1e100.net (216.58.192.196): icmp_seq=2 ttl=52 time=188 ms

--- www.google.com ping statistics ---
2 packets transmitted, 2 received, 0% packet loss, time 1000ms
rtt min/avg/max/mdev = 188.688/378.624/568.561/189.937 ms
libqmi (no NetworkManager or ModemManager)
root@xenial-newport:~# qmicli --version

qmicli 1.20.2
Copyright (C) 2012-2018 Aleksander Morgado
License GPLv2+: GNU GPL version 2 or later <http://gnu.org/licenses/gpl-2.0.html>
This is free software: you are free to change and redistribute it.
There is NO WARRANTY, to the extent permitted by law.

root@xenial-newport:~# systemctl stop NetworkManager # don't conflict with NetworkManager
root@xenial-newport:~# systemctl stop ModemManager # don't conflict with ModemManager
root@xenial-newport:~# ifdown eth0 # bring down eth0 so not confused for WAN/LAN link.
root@xenial-newport:~# cat << EOF > /etc/qmi-network.conf
> APN=$APN
> PROXY=yes
> EOF
root@xenial-newport:~# qmicli -p -d /dev/cdc-wdm0 --wda-set-data-format=raw-ip #set modem for raw-ip
[/dev/cdc-wdm0] Successfully set data format
                        QoS flow header: no
                    Link layer protocol: 'raw-ip'
       Uplink data aggregation protocol: 'disabled'
     Downlink data aggregation protocol: 'disabled'
                          NDP signature: '0'
Downlink data aggregation max datagrams: '0'
     Downlink data aggregation max size: '0'
root@xenial-newport:~# qmicli -p -d /dev/cdc-wdm0 --set-expected-data-format=raw-ip #set modem for raw-ip
[/dev/cdc-wdm0] expected data format set to: raw-ip
root@xenial-newport:~# qmi-network /dev/cdc-wdm0 start #start modem connection
Loading profile at /etc/qmi-network.conf...
    APN: NIMBLINK.GW12.VZWENTP
    APN user: unset
    APN password: unset
    qmi-proxy: yes
Checking data format with 'qmicli -d /dev/cdc-wdm0 --wda-get-data-format --device-open-proxy'...
Device link layer protocol retrieved: raw-ip
Getting expected data format with 'qmicli -d /dev/cdc-wdm0 --get-expected-data-format'...
Expected link layer protocol retrieved: raw-ip
Device and kernel link layer protocol match: raw-ip
Starting network with 'qmicli -d /dev/cdc-wdm0 --wds-start-network=apn='NIMBLINK.GW12.VZWENTP'  --client-no-release-cid --device-open-proxy'...
Saving state at /tmp/qmi-network-state-cdc-wdm0... (CID: 4)
Saving state at /tmp/qmi-network-state-cdc-wdm0... (PDH: 2194536080)
Network started successfully
root@xenial-newport:~# qmicli --device /dev/cdc-wdm0 --wds-get-current-settings #get IP from provider
[/dev/cdc-wdm0] Current settings retrieved:
           IP Family: IPv4
        IPv4 address: 100.75.76.187
    IPv4 subnet mask: 255.255.255.248
IPv4 gateway address: 100.75.76.188
    IPv4 primary DNS: 198.224.182.135
  IPv4 secondary DNS: 198.224.183.135
                 MTU: 1428
             Domains: none
root@xenial-newport:~# ifconfig wwan0 100.22.44.187 netmask 255.255.255.248 # assign IP
root@xenial-newport:~# route add default gw 100.75.76.188 wwan0 # assign route
root@xenial-newport:~# echo "nameserver 198.224.182.135" > /etc/resolv.conf # assign nameserver
OpenWrt
Note that OpenWrt 18.06 or newer has support for this modem.
Example configurations:
- Using QMI, configure the modem in the /etc/config/network file with the following commands (recommended):
# config wan
uci set network.wan=interface
uci set network.wan.ifname=wwan0
uci set network.wan.proto=qmi
uci set network.wan.timeout=300
uci set network.wan.device=/dev/cdc-wdm0
uci commit network
- Notes
- The default registration timeout of 10 seconds may not be enough so in the example above we have set it to 90 seconds or 300 seconds.
- With /etc/config/network configured, one should power cycle the board for the modem to automatically register and come up.
- For development, if a power cycle is not desired as recommended above, it is possible to manually bring up the modem with the following commands to establish a connection:
uqmi -d /dev/cdc-wdm0 --network-scan
uqmi -d /dev/cdc-wdm0 --get-signal-info
uqmi -d /dev/cdc-wdm0 --start-network hologram --autoconnect #"hologram" can represent any APN
ifup wan #brings the interface up
uqmi -d /dev/cdc-wdm0 --get-data-status
Troubleshooting
General Notes:
- if not using PPP make sure you have the latest firmware for proper QMI support - contact support@…
- You must be 'registered' on a provider network before you can connect. This registration occurs based on SIM, IMEI, and Mobile Network Operator selection.
Refer to wireless/modem/libqmi commands for general troubleshooting using libqmi.
Some troubleshooting using qmicli:
- Stop ModemManager if it is running
- Check registration:
root@ventana:~# qmicli -d /dev/cdc-wdm0 --nas-get-serving-system
[/dev/cdc-wdm0] Successfully got serving system:
        Registration state: 'registered'
        CS: 'detached'
        PS: 'attached'
        Selected network: '3gpp'
        Radio interfaces: '1'
                [0]: 'lte'
        Roaming status: 'off'
        Data service capabilities: '1'
                [0]: 'lte'
        Current PLMN:
                MCC: '311'
                MNC: '480'
                Description: 'VZW'
        Roaming indicators: '1'
                [0]: 'off' (lte)
        3GPP location area code: '65534'
        3GPP cell ID: '8550402'
        Detailed status:
                Status: 'available'
                Capability: 'ps'
                HDR Status: 'none'
                HDR Hybrid: 'no'
                Forbidden: 'no'
        LTE tracking area code: '8450'
        Full operator code info:
                MCC: '311'
                MNC: '480'
                MNC with PCS digit: 'yes'
- Note
Registration state: 'registered'above indicating you are registered and 'Current PLMN' of VZW indicating you are registered with Verizon
- Note
- Check system info:
root@bionic-armhf:~# qmicli -d /dev/cdc-wdm0 --nas-get-system-info
[/dev/cdc-wdm0] Successfully got system info:
        LTE service:
                Status: 'limited'
                True Status: 'limited-regional'
                Preferred data path: 'yes'
                Domain: 'unknown'
                Service capability: 'ps'
                Forbidden: 'no'
                Cell ID: '194368016'
                MCC: '310'
                MNC: '410'
        SIM reject info: 'available'
- Note above the 'True Status' states 'limited-regional'. That usually means the device is registered for emergency services only. This must occur before you can 'connect' using an APN (thus has nothing to do with the APN being wrong). Refer to your Provider if you have difficulty getting registered on the network.
- Get home network information
root@bionic-armhf:~# qmicli -d /dev/cdc-wdm0 --nas-get-home-network
[/dev/cdc-wdm0] Successfully got home network:
        Home network:
                MCC: '311'
                MNC: '270'
                Description: '311 270'
- Get signal info
root@bionic-armhf:~# qmicli -d /dev/cdc-wdm0 --nas-get-signal-info
[/dev/cdc-wdm0] Successfully got signal info
LTE:
	RSSI: '-52 dBm'
	RSRQ: '-14 dB'
	RSRP: '-83 dBm'
	SNR: '19.8 dB'
- Get signal strength
root@bionic-armhf:~# qmicli -d /dev/cdc-wdm0 --nas-get-signal-strength
[/dev/cdc-wdm0] Successfully got signal strength
Current:
	Network 'lte': '-56 dBm'
RSSI:
	Network 'lte': '-56 dBm'
ECIO:
	Network 'lte': '-31.5 dBm'
IO: '-106 dBm'
SINR (8): '9.0 dB'
RSRQ:
	Network 'lte': '-11 dB'
SNR:
	Network 'lte': '22.0 dB'
RSRP:
	Network 'lte': '-82 dBm'
- Get serving system
root@bionic-armhf:~# qmicli -d /dev/cdc-wdm0 --nas-get-serving-system
[/dev/cdc-wdm0] Successfully got serving system:
	Registration state: 'not-registered'
	CS: 'detached'
	PS: 'detached'
	Selected network: '3gpp'
	Radio interfaces: '1'
		[0]: 'lte'
	Data service capabilities: '0'
	Current PLMN:
		MCC: '310'
		MNC: '410'
		Description: ''
	Detailed status:
		Status: 'limited'
		Capability: 'ps'
		HDR Status: 'none'
		HDR Hybrid: 'no'
		Forbidden: 'no'
	Full operator code info:
		MCC: '310'
		MNC: '410'
		MNC with PCS digit: 'yes'
Note that all of the above has to be good before you can obtain a data connection with your provider via the 'qmi-network start' command which is the step that requires a proper APN that your provider supports.
Additional Notes for Improving Stability
- ublox SARA-R4 Firmware 06.08 resolves MTU issues that caused QMI to fail (pings work as they are 64byte packets but IP wouldn't work on old firmware). Both the older and newer firmware versions are reliable with pppd but when using pppd you must take it down to use AT commands which means your can create a lapse of IP. To update the firmware you must use the ublox Windows EasyFlash utility.
- The default wget timeout in OpenWrt (uclient-fetch) has a 30sec timeout by default. Be aware of this if using this for testing as you may want to increase that timeout depending on your situation.
- Boot failures can occasionally occur where the wan interface is not up in OpenWrt if the modem registration takes longer than OpenWrt's default timeout of 10 seconds. This can be set with the 'timeout' option in the QMI config (see config below).
- Configuring the modem via profiles works much better than trying to specify the items within the parameters manually. An example profile is:
DEVICE=/dev/$(for i in $(ls -d /sys/bus/usb/drivers/option/*/ttyUSB*);
do basename $i; done | tail -n1)
stty -F $DEVICE ignbrk -brkint -icrnl -opost -onlcr -isig -icanon
-iexten -echo -echoe -echok -echoctl -echoke
cat $DEVICE &
pid=$!
at() { echo -n -e "$1\r" > $DEVICE; }
at "AT+CGMI" # u-blox
at "AT+CGMM" # SARA-R410M-52B
at "AT+CSQ" # signal quality
at "AT+COPS=2" # disconnect from network
at "AT+UMNOPROF=0" # set to auto
at "AT+UMNOPROF=3" # set to VZW
at "AT+CFUN=15" # reset modem which will re-enumerate
Show quoted text
set it to 0 first so that it re-configured everything in the profile

Gateworks OpenWrt configuration:
- OpenWrt 18.06.02 (sha a02809f61bf9fda0387d37bd05d0bcfe8397e25d)
TARGET_imx6=y
TARGET_MULTI_PROFILE=y
TARGET_DEVICE_imx6_DEVICE_ventana-large=y
TARGET_DEVICE_imx6_DEVICE_ventana-normal=y
CONFIG_BUSYBOX_CONFIG_STTY=y
PACKAGE_uqmi=y
PACKAGE_kmod-usb-net-qmi-wwan=y
uci set network.lan=
Show quoted text
uci set network.wan=interface
uci set network.wan.ifname=wwan0
uci set network.wan.proto=qmi
uci set network.wan.device=/dev/cdc-wdm0
uci set network.wan.timeout=30
uci commit network
u-blox NINA-B301 BLE module
The u-blox NINA-B301 stand-alone Bluetooth 5 low engery module contains an open Nordic nRF52840 multiprotocol SoC.
Antenna for NINA-B301 BLE module
Recommended certified antenna for the module can be found in the NINA-B3 System Integration Manual, Section 5.7 Pre-approved Antenna (pages 53-56).
Bluetooth HCI (GW16126)
The standard GW16126 comes the nRF52840 pre-programmed by Gateworks with Zephyr Project hci_uart offering a bluetooth HCI UART host controller. The Open-Source Zephyr Project provides a small scalable real-time operating system (RTOS) well suited for small ARM processors such as the one in the nRF52840 and its hci_uart sample code implements a BLE HCI via the H4 UART protocol with the following:
- 1mbps baudrate
- 8bits, no parity, 1 stop bit
- hardware flow control required
To use the GW16126 bluetooth HCI with Linux you need the following:
- Linux 4.10+ kernel with the following:
- FTDI UART support (CONFIG_USB_SERIAL_FTDI_SIO)
- HCI UART with H4 (CONFIG_BT_HCIUART and CONFIG_BT_HCIUART_H4) in order to provide a bluetooth HCI over UART
- crypto userspace API (CONFIG_CRYPTO_USER, CONFIG_CRYPTO_USER_API_AEAD, CONFIG_CRYPTO_USER_API_HASH, CONFIG_CRYPTO_USER_API_RNG, CONFIG_CRYPTO_USER_API_SKCIPHER, CONFIG_CRYPTO_USER_API*) in order to generate a random Bluetooth MAC (BDADDR)
- Bluetooth stack such as BlueZ (4.45+ with Experimental support (-E param on bluetoothd))
The following shows how you would interact with the BLE controller via BlueZ on Ubuntu bionic:
apt-get install bluez
# configure bluez to run expirimental features
sed -i '/^ExecStart=/ s/$/ -E/' /lib/systemd/system/bluetooth.service
# restart bluetoothd
sudo systemctl daemon-reload
sudo systemctl restart bluetooth
# attach HCI UART
dev=$(basename $(ls -d /sys/bus/usb/drivers/ftdi_sio/*/ttyUSB*))
modprobe hci_uart
btattach -B /dev/$dev -S 1000000 -P h4 &
# scan for BLE devices
hcitool -i hci0 lescan
Example:
root@bionic-newport:~# echo 8 > /proc/sys/kernel/printk
root@bionic-newport:~# dev=$(basename $(ls -d /sys/bus/usb/drivers/ftdi_sio/*/ttyUSB*))
root@bionic-newport:~# modprobe hci_uart
[   35.314383] Bluetooth: Core ver 2.22
[   35.318121] NET: Registered protocol family 31
[   35.322614] Bluetooth: HCI device and connection manager initialized
[   35.328997] Bluetooth: HCI socket layer initialized
[   35.333904] Bluetooth: L2CAP socket layer initialized
[   35.338983] Bluetooth: SCO socket layer initialized
[   35.350560] Bluetooth: HCI UART driver ver 2.3
[   35.355057] Bluetooth: HCI UART protocol H4 registered
root@bionic-newport:~# btattach -B /dev/$dev -S 1000000 -P h4 &
[1] 2138
Attaching Primary controller to /dev/ttyUSB0
Switched line discipline from 0 to 15
Device index 0 attached
[   57.834717] Bluetooth: BNEP (Ethernet Emulation) ver 1.3
[   57.840137] Bluetooth: BNEP socket layer initialized
root@bionic-newport:~# hciconfig
hci0:   Type: Primary  Bus: UART
        BD Address: 00:00:00:00:00:00  ACL MTU: 27:7  SCO MTU: 0:0
        UP RUNNING
        RX bytes:527 acl:0 sco:0 events:41 errors:0
        TX bytes:258 acl:0 sco:0 commands:41 errors:0

root@bionic-newport:~# hcitool -i hci0 lescan
LE Scan ...
3C:A3:08:10:51:FE (unknown)
FC:B4:88:8E:32:61 (unknown)
FC:B4:88:8E:32:61 (unknown)
3C:A3:08:10:51:FE LEDBlue-081051FE
Zephyr Project Firmware
While the nRF52840 comes pre-programmed with firmware to make it a fully featured Bluetooth HCI you could develop your own firmware and re-program it if desired.
The Zephyr Project is a scaleable real-time operating system (RTOS) supporting multiple hardware architectures, optimized for resource constrained devices, and built with security in mind. The Zephyr Project supports the Nordic nRF58240 within the u-blox NINA-B3 BLE module and can be modified to give it a personality of its own. Some examples within the Zephyr Project that are suited for the GW16126 out of the box are:
- HCI uart
- BLE beacon
Gateworks has added GW16126 board support to Zephyr here via commit ba5f00ad
Examples:
- Install Zephyr source
git clone https://github.com/Gateworks/zephyr.git
cd ~/zephyr  # or to your directory where zephyr is cloned
# install more requirements via pip
pip3 install --user -r scripts/requirements.txt
- Build HCI UART (what Gateworks pre-programms into the GW16126):
# setup shell for building Zephyr
source zephyr-env.sh:
cd $ZEPHYR_BASE/samples/bluetooth/hci_uart
mkdir -p build/gw16126 && cd build/gw16126
cmake -DBOARD=nrf52840_gw16126 ../..
make
ls zephyr/zephyr.hex
- Build Bluetooth Beacon:
# setup shell for building Zephyr
source zephyr-env.sh:
cd $ZEPHYR_BASE/samples/bluetooth/beacon
mkdir -p build/gw16126 && cd build/gw16126
cmake -DBOARD=nrf52840_gw16126 ../..
make
ls zephyr/zephyr.hex
References:
- https://www.zephyrproject.org/ Zephyr Project
- https://github.com/Gateworks/zephyr.git - Gateworks Zephyr repo
- https://elixir.bootlin.com/zephyr/latest/source - LXR Cross-Reference tool for Zephyr source
Programming the nRF58240
While the nRF52840 comes pre-programmed with firmware to make it a fully featured Bluetooth HCI you could develop your own firmware and re-program it if desired. The device can be programmed via SWD using the FT231X CBUS pins as follows:
- CBUS1 - SWDIO
- CBUS2 - SWDCLK
To program you can use OpenOCD with the sysfsgpio interface as long as you have a kernel that supports GPIO in the ftdi-sio driver (Linux 4.20+).
Note that the OpenOCD package from Ubuntu lacks the necessary nRF52840 support so we must either build OpenOCD from source manually or use the Gateworks Ubuntu PPA:
- Installing from Gateworks Ubuntu PPA:
sudo add-apt-repository ppa:gateworks-software/packages
apt update
apt install openocd
- Building from source:
apt install build-essential libusb-1.0-0-dev autoconf libtool pkg-config git
git clone git://git.code.sf.net/p/openocd/code openocd
cd openocd
./bootstrap
./configure --enable-sysfsgpio
make install
Next you will need a gw16126.cfg OpenOCD interface file specifying SWD and mapping the SWCLK/SWDIO pins to the FT231X CBUS2/CBUS1 pins:
base=$(for i in $(ls -1d /sys/class/gpio/gpiochip*); do [ "ftdi-cbus" = "$(cat $i/label)" ] && cat $i/base; done)
[ "$base" ] || { echo "Error: could not find ftdi-cbus device - Linux 4.20+ required"; }
cat << EOF > gw16126.cfg
interface sysfsgpio
transport select swd
sysfsgpio_swd_nums $((base + 2)) $((base + 1))
EOF
Now you can program an Intel HEX file with OpenOCD:
openocd -f gw16126.cfg -f target/nrf52.cfg \
 -c init -c "reset init" -c halt -c "nrf5 mass_erase" -c "program zephyr_uart_hci.hex verify" -c reset -c exit
Open On-Chip Debugger 0.10.0+dev-00563-gda4b2d5b (2018-10-20-01:03)
Licensed under GNU GPL v2
For bug reports, read
        http://openocd.org/doc/doxygen/bugs.html
SysfsGPIO nums: swclk = 462, swdio = 461
adapter speed: 1000 kHz
cortex_m reset_config sysresetreq
Info : SysfsGPIO JTAG/SWD bitbang driver
Info : SWD only mode enabled (specify tck, tms, tdi and tdo gpios to add JTAG mode)
Info : This adapter doesn't support configurable speed
Info : SWD DPIDR 0x2ba01477
Info : nrf52.cpu: hardware has 6 breakpoints, 4 watchpoints
Info : Listening on port 3333 for gdb connections
target halted due to debug-request, current mode: Thread
xPSR: 0x01000000 pc: 0xfffffffe msp: 0xfffffffc
Info : nRF52840-QIAA(build code: C0) 1024kB Flash
target halted due to debug-request, current mode: Thread
xPSR: 0x01000000 pc: 0xfffffffe msp: 0xfffffffc
** Programming Started **
auto erase enabled
Warn : using fast async flash loader. This is currently supported
Warn : only with ST-Link and CMSIS-DAP. If you have issues, add
Warn : "set WORKAREASIZE 0" before sourcing nrf51.cfg/nrf52.cfg to disable it
wrote 49152 bytes from file zephyr.hex in 117.544823s (0.408 KiB/s)
** Programming Finished **
** Verify Started **
verified 47036 bytes in 2.723827s (16.864 KiB/s)
** Verified OK **
u-blox Connectivity Software (GW16126-SP399)
The GW16126-SP399 comes with the nRF52840 pre-programmed (and locked) by u-blox with the u-blox Connectivity Software.
Connection parameters:
- 115200baud, 8 data bits no stop bit
Protocol details:
- UBX-14044127 u-blox Short Range Modules - AT Commands Manual
- UBX-18022394 NINA-B31 series Stand-alone Bluetooth 5 low energy modules Getting Started
Examples:
- Serial port interaction
# query configured role
AT+UBTLE?
+UBTLE:2
OK

# set to central
AT+UBTLE=1
OK

# store and power cycle
AT&W
OK
AT+CPWROFF
OK

+STARTUP

# report scan results
AT+UBTD

+UBTD:FCB4888E3261r,-76,"",2,0201061AFF4C0002156445C351577C4DA9AE12E57657E78C6F0000000000
+UBTD:FCB4888E3261r,-77,"",1,
OK
- command line usage:
dev=$(basename $(ls -d /sys/bus/usb/drivers/ftdi_sio/*/ttyUSB*))
stty -F $dev 115200 ignbrk -brkint -icrnl -opost -onlcr -isig -icanon -iexten -echo -echoe -echok -echoctl -echoke
cat $dev & # continually display responses from tty in background
# request manufactuer identify
printf 'AT+GMI\r\n' > $dev
# request model
printf 'AT+GMM\r\n' > $dev
# request serial number
printf 'AT+GSN\r\n' > $dev
# request misc details
printf 'AT+ATI0\r\n' > $dev
# change role to central, write nvram, and reset
printf 'AT+UBTLE=1\r\n' > $dev
printf 'AT&W\r\n' > $dev
printf 'AT+CPWROFF\r\n' > $dev
# scan for BLE devices
sleep 1
printf 'AT+UBTD\r\n' > $dev
See also ublox s-center software for use on Windows
Attachments (4)
- GW16126.png (499.5 KB ) - added by 8 years ago.
- gw16126pinout.png (117.5 KB ) - added by 7 years ago.
-
IntAnt.JPG
(86.6 KB
) - added by 6 years ago.
Internal Antenna for SARA-R4
-
ExtAnt.JPG
(87.3 KB
) - added by 6 years ago.
External Antenna for SARA-R4
Download all attachments as: .zip