
| Version 3 (modified by , 6 years ago) ( diff ) |
|---|
Ventana Splash Screen
![]()
For devices that have a display, customers may often want to present a splash-screen as soon as possible. This provides a sense of responsiveness for those expecting a visual effect on power up while at the same time providing an avenue for the prominent display of a vendor logo. All for minimal impact on overall system boot time. This page covers the various splash screen options available to Ventana products as well as instructions for customization.
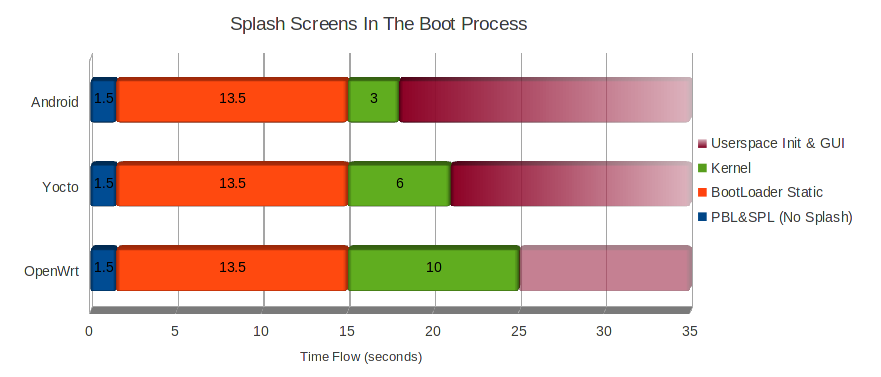
For each step in the typical boot process, a splash screen can usually be configured for the duration of its operation. For example, the IMX6 processor used on Ventana boards starts with a Primary Boot Loader (PBL) (this is firmware inside the IMX6 which can not be modified), a Secondary Program Loader (SPL) which configures DRAM and loads the main bootloader, then the OS kernel itself. The first place a splash screen can be configured is the bootloader where typically a static splash is displayed. This image can be switched out or left in place by the kernel. Finally, depending on the operating system, a dynamic animated splash may be enabled in early userspace init which leads to a GUI if available once init is complete.

- Note: Times will vary depending based on hardware, OS, and configuration. Times shown are for the default development configuration without boot speed tuning.
From the above timelines you can see where it may be most useful to implement a splash screen. For example:
- if your intention is to provide feedback within the first second of power-up then you must do this in the bootloader (but be aware it will not persist for more than 1.5 seconds or so
- if your intention is to provide feedback within the first 2 seconds then you'll get the most bang-for-your buck using a kernel splash
- if your intention is to have a splash up until the moment that you can interact with the Android GUI then you at least have to use a userspace spash (for Android this is best done via the bootanimation.zip)
- if you want visual feedback all along the way you may want to implement a bootloader splash, a kernel splash, and a userspace splash
U-Boot Bootloader
As previously mentioned, the first opportunity to display a splash screen becomes available at the start of bootloader execution. Being mainly responsible for configuring the DRAM controller and loading/executing the OS kernel, the bootloader's support for displays is rudimentary. However, there currently exists a small number of methods to configure the bootloader's splash screen.
The methods available to Ventana's U-boot are as follows:
- Create a custom BMP logo (recommended)
- Modify the default linux "Tux" logo
- Load BMP from storage using environment
Bootloader Splash Screen Method Comparison:
| Feature | Create Custom BMP Logo | Modify Default Linux Logo | Load From Storage |
|---|---|---|---|
| Dynamic Placement | X | X | |
| Immediate Display | X | X | |
| Minimal Boot Speed Impact | X | X | |
| Easy to Implement | X | ||
| Modifiable in Environment | X | ||
| No Color Limitations | X |
In order to implement any of the aforementioned you will need access to a U-Boot build system. For more information see the ventana/bootloader wiki.
By default, the Ventana bootloader has the following splash screen related configs defined in u-boot-imx6/include/configs/gw_ventana.h.
#define CONFIG_CFB_CONSOLE
              - Enables console device for a color framebuffer.
#define CONFIG_VIDEO
              - Define this to enable video support (for output to video).
#define CONFIG_VIDEO_LOGO
              - Enable support for display of Linux logo in upper left corner.
Before continuing, ensure that they are defined otherwise the following methods will not function as intended. For those wishing to suppress any sort of splash screen, removing these configs will disable all U-Boot video support.
Create Custom BMP Logo Method
This method simply involves creating a custom BMP image and placing it within the U-Boot build system where it will automatically be configured to be used as a splash screen image. All things considered, this is the recommended option for most users and is the default behavior for the latest Ventana bootloader.
Start by first completing a source compile of the Gateworks bootloader shown here
- Begin by adding the following configs (omitting descriptions) to
u-boot-imx6/include/configs/gw_ventana.h:#define CONFIG_VIDEO_LOGO - Enable support for display of Linux logo in upper left corner. #define CONFIG_VIDEO_BMP_LOGO - Use bmp_logo.h instead of linux_logo.h for logo. Requires CONFIG_VIDEO_LOGO. #define CONFIG_SPLASH_SCREEN_ALIGN - If this option is set the splash image (or bmp logo) can be freely positioned on the screen. Environment variable "splashpos" specifies the position as "x,y". If a positive number is given it is used as number of pixel from left/top. If a negative number is given it is used as number of pixel from right/bottom. You can also specify 'm' as x and/or y to center the image.
- Note that this is already done in the current Gateworks bootloader source
- Download and install the opensource photo editing software GIMP
- Launch GIMP and open the logo to be used
File > Open... - Scale your image to the size of your target display
Image > Scale Image.... The width of your image *must* be equal to or less than the resolution of your display or the image will become distorted and may even hang the bootloader. Height values larger than your display will simply crop the image.- If you plan on supporting multiple displays of different resolutions, a good approach is to scale your image to be compatible with your smallest display and set its background color to black so when centered it will look clean on your larger displays. You can quickly change the background color of your image in GIMP by using color select on your background color
Select > By Color, then using the bucket toolTools > Painting Tools > Bucket Fillto fill the desired areas with black.
- If you plan on supporting multiple displays of different resolutions, a good approach is to scale your image to be compatible with your smallest display and set its background color to black so when centered it will look clean on your larger displays. You can quickly change the background color of your image in GIMP by using color select on your background color
- Convert the image to index mode
Image > Mode > Indexed.... Select theGenerate optimum paletteoption and set your maximum number of colors to 224. - Open the export dialogue window
File > Export As.... Set the save location tou-boot-imx6/tools/logos/gateworks.bmp. Open theSelect File Type (By Extension)menu located in the bottom left of the dialogue and select the Windows BMP Image (.bmp) extension. SelectExport, and underCompatability OptionsselectDo not write color space informationbefore finally selectingExportagain.- Note that if your u-boot-imx6/board/gateworks/gw_ventana/Kconfig has BOARD or VENDOR changed from the defaults, rename the .bmp file to the value of BOARD or VENDOR otherwise the U-Boot Makefile will not generate the necessary files for your image.
- Navigate to your U-Boot build directory and kick off a
makecommand. For information on compiling the bootloader, please see this page. - Update your device's bootloader with the new binaries via
run updateubootfrom the bootloader or JTAG flashing. To see more information, please visit this page. - Break into your device's bootloader and set splashpos via
setenv splashpos m,mthensaveenv.- If you wish for this to be a part of your default environment, add it to your
CONFIG_EXTRA_ENV_SETTINGS_COMMONdefine statement.
- If you wish for this to be a part of your default environment, add it to your
Upon reset and provided a display, the bootloader will now display your custom logo in the middle of your display.
Modify Default Linux Logo Method
A secondary approach is to directly modify the file responsible for displaying the default linux "Tux" logo that comes standard on stock releases of U-Boot. While this is a somewhat straightforward concept, acquiring and using the dated tools to produce a header file in a similar format to u-boot-imx6/include/linux_logo.h can be problematic. This also has the same 224 color limitation, and using an image with dimensions other that 80x80 requires further editing of video driver source files. Therefore this method is discouraged.
For those seeking further information and steps regardless, see this page.
Displaying the default "Tux" logo (or your custom image) is enabled by adding the following config (omitting description) to u-boot-imx6/include/configs/gw_ventana.h:
#define CONFIG_VIDEO_LOGO
              - Enable support for display of Linux logo in upper left corner.
BMP From Storage Method
The final method for implementing a splash screen in U-Boot is by pulling a image from a storage medium at the beginning of the boot script using environment variables. This has the advantage of being able to change the splash screen image by using the bootloader environment or even within userspace by replacing the designated file. However this method still requires an initial editing of the bootloader source and is only recommended if the client wishes to have the ability to change the splash screen image frequently. It also has the added disadvantage of losing at least a few seconds of display time depending on your configuration. This occurs because of the need to first mount your storage medium which occurs after the boot delay during the bootcmd script.
This method can only use RBG (uncompressed) BMP images. As a result, no color limitation exists as is the case in previous methods. The steps are as follows:
- Begin by adding the following configs (omitting descriptions) to
u-boot-imx6/include/configs/gw_ventana.h:#define CONFIG_CMD_BMP - Adds support for displaying raw bmp images. #define CONFIG_SPLASH_SCREEN_ALIGN - If this option is set the splash image (or bmp logo) can be freely positioned on the screen. Environment variable "splashpos" specifies the position as "x,y". If a positive number is given it is used as number of pixel from left/top. If a negative number is given it is used as number of pixel from right/bottom. You can also specify 'm' as x and/or y to center the image.
- Make the below bootloader environment edits in the bootloader itself or in the
CONFIG_EXTRA_ENV_SETTINGS_COMMONdefinition ingw_ventana.h:setenv splash GWLogo.bmp setenv splashpos m,m setenv show_splash '${fsload} ${loadaddr} ${bootdir}/${splash}; bmp d ${loadaddr}' setenv flash_boot 'setenv fsload ubifsload; ubi part rootfs; if ubi check boot; \ then ubifsmount ubi0:boot; setenv root ubi0:rootfs ubi.mtd=2 rootfstype=squashfs,ubifs; \ setenv bootdir; elif ubi check rootfs; then ubifsmount ubi0:rootfs; \ setenv root ubi0:rootfs ubi.mtd=2 rootfstype=ubifs; fi; setenv dtype nand; \ run show_splash; run loadscript; if ${fsload} ${loadaddr} ${bootdir}/${uimage}; \ then setenv bootargs console=${console},${baudrate} root=${root} ${video} ${extra}; \ if run loadfdt; then ubifsumount; bootm ${loadaddr} - ${fdt_addr}; \ else ubifsumount; bootm; fi; fi'
- Note that the added run show_splash must be after the ubi mounting and before the loadscript execution as shown.
- Open the linux/ubi wiki and follow the example "Mounting UBI NAND FLASH volume" (replace rootfs with boot)
- Place your BMP image in your boot volume under the same name as your
splashenvironment variable.
Related Source Files
For those interested in seeing the primary source code related to the displaying of splash screens in U-boot the following list has been created for your convenience.
- Within the include folder:
- bmp_layout.h - defines a bmp image header
- bmp_logo_data.h - the data contents of a bmp logo
- bmp_logo.h - the metadata of a bmp logo (dimensions etc)
- linux_logo.h - default linux logo (sitting penguin aka tux)
- Within the tools folder:
- bmp_logo.c - c tool that converts a raw bmp image into data headers used for logos in bootloader
- bmp_logo - executable of bmp_logo.c
- Within the doc folder:
- README.displaying-bmps - discusses memory alignment issues when using BMP from storage
- README.splashprepare - discusses possibility of custom preprocessing for BMP images
- Within the common folder:
- lcd.c - responsible for displaying BMPs from storage
- Within the drivers/video/ folder:
- cfb_console.c - responsible for displaying BMPs injected at compile time (first two methods)
- fbcon.c - file to change hardcoded dimension values in if modifying default linux logo
- board/gateworks/gw_ventana/Kconfig - contains the config targets to define BOARD and VENDOR
Suppressing U-Boot Version
After following one of the above methods to change your bootloader's splash image, you may have noticed that editing the image alone still leaves the U-Boot version string displayed on the right side of the image (or overflowed onto the image itself). While some clients may want this information present, for those that do not we have implemented a small code change in our latest bootloader to add the ability of hiding this U-Boot version information.
We added the ability to the Gateworks bootloader to disable this via CONFIG_HIDE_LOGO_VERSION which is defined in u-boot-imx6/include/configs/gw_ventana.h:
#define CONFIG_HIDE_LOGO_VERSION
              - Custom config to hide U-boot version when CONFIG_VIDEO_LOGO
                or CONFIG_VIDEO_BMP_LOGO is defined
If you want the see the version info, undefine this to bring it back
For those using a different bootloader version that would like to implement this behavior themselves, see the following git diff and apply it as a patch or make the manual edits yourself:
diff --git a/drivers/video/cfb_console.c b/drivers/video/cfb_console.c
index a81affa..60a44e6 100644
--- a/drivers/video/cfb_console.c
+++ b/drivers/video/cfb_console.c
@@ -1986,7 +1986,6 @@ static void plot_logo_or_black(void *screen, int width, int x, int y, int black)
 static void *video_logo(void)
 {
        char info[128];
-       int space, len;
        __maybe_unused int y_off = 0;
        __maybe_unused ulong addr;
        __maybe_unused char *s;
@@ -2036,6 +2035,8 @@ static void *video_logo(void)

        sprintf(info, " %s", version_string);

+#ifndef CONFIG_HIDE_LOGO_VERSION
+       int space, len;
        space = (VIDEO_LINE_LEN / 2 - VIDEO_INFO_X) / VIDEO_FONT_WIDTH;
        len = strlen(info);

@@ -2048,6 +2049,7 @@ static void *video_logo(void)
                y_off = 1;
        } else
                video_drawstring(VIDEO_INFO_X, VIDEO_INFO_Y, (uchar *) info);
+#endif

 #ifdef CONFIG_CONSOLE_EXTRA_INFO
        {
Linux Kernel
Additionally, the Linux kernel has static splash-screen support. This is also very rudimentary however kernel code changes can be made to specify the graphic that is displayed.
- Begin by following the steps at the linux/kernel to set up a development environment for the linux kernel.
- Download and install the opensource photo editing software GIMP if you have not done so already.
- Launch GIMP and open the logo or image to be used File > Open...
- Open the export dialogue window
File > Export As.... Set the save location to your kernel working directory. Open theSelect File Type (By Extension)menu located in the bottom left of the dialogue and select the PNM Image (.pnm) extension. SelectExport, ensure that the Data Formatting type isRawthen selectExportagain to finish. - Convert to 224 color pnm using
ppmquant:ppmquant 224 <gimp_export_file>.pnm > logo_linux_clut224.ppm - Convert to plain ppm and copy to kernel logo directory:
pnmtoplainpnm logo_linux_clut224.ppm > drivers/video/logo/logo_linux_clut224.ppm
- Build and deploy new kernel.
Further Kernel Options
While there is some severe limitations to the capabilities of splash screen support in the linux kernel, there does exist some possible improvements/modifications that require editing the kernel source.
Some modifications with accompanying links for those looking to investigate further:
- Using bootloader framebuffer
One potential work around for the limitations inherent to the built in splash capabilities of the linux kernel is by using the same framebuffer that the bootloader prepared. This has been implemented by another developer via the CONFIG_FB_PRE_INIT_FB config option and can be seen in drivers/video/mb862xx/mb862xxfbdrv.c. Further information about this config can be seen here and here.
A similar method utilizing the bootloader's prepared framebuffer involves saving the contents of the framebuffer device after the splash has been presented and then directly writing that saved file to the framebuffer within the kernel. More information here.
- Fix backlight flickering
During the kernel boot process a number of different drivers go through a cycle of registering display hardware which includes a pwm controlled backlight if present. This results in what appears to be a "flickering" display where varying driver defaults cause rapid changes to the backlight intensity. A potential solution would be to edit said pwm driver defaults so they all hold the same value, or remove the assignment alltogether. Further information on linux core PWM drivers can be found here.
- Disable flashing framebuffer cursor
For some kernel splash implementations a flashing console cursor can appear during boot which may overwrite a portion of the framebuffer that was originally displaying a splash image. If this situation applies, you can disable the cursor by editing the drivers/video/console/fbcon.c driver and removing all of the logic in the static void fbcon_cursor(...) function.
PSplash
Both the Yocto and OpenWrt BSPs currently have built in support for kernel splash editing via PSplash.
PSplash is a userspace graphical boot splash screen for mainly embedded Linux devices supporting a 16bpp or 32bpp framebuffer. It has few dependencies (just libc), supports basic images and text and handles rotation. An early init script kicks off the psplash daemon and further init scripts use the psplash-write app to send single argument commands to advance the progress bar and finally exit the daemon.
Example usage:
psplash &                      # run daemon in background
psplash-write MSG "my message" # display message
psplash-write PROGRESS <n>     # set progress bar (from 0 to 100%)
psplash-write QUIT             # remove splash and exit daemon
To modify the image displayed when the daemon is running, begin by following the set up instructions specific to your BSP
Yocto Set Up
For demonstration purposes we will simply replace the header file in the psplash directory sources/poky/meta/recipes-core/psplash/files/psplash-poky-img.h that is acts as the source for the default splash image. However, if you are managing your own layer, the recommended method for customizing a logo is to mimic what meta-yocto does in its layer (i.e. copy the meta-yocto/recipes-core/psplash directory into your own layer and overwrite that header file) rather than changing the default psplash-poky-img.h.
- Begin by following the instructions at Yocto/Building to set up a working environment.
- If you do not have one already, create a JPEG (jpg, jpeg, jpe) logo that will fit the dimensions of your display.
- If planning to support multiple displays, scale your JPEG logo to a size that will fit your smallest display and fill the image with a grey background (HTML color is specifically #EFEFE7). PSplash will automatically center your image against its own background, making a single image look clean on multiple displays of varying dimensions. For steps on creating a logo, or filling the background color, refer to the above section.
- Use the make-image-header.sh shell script to create the header file that will be used during compile time. This script is located within the PSplash package and can be found via a find <BUILD_DIR> -name "make-image-header.sh".
An example result of this find command would be
<BUILD_DIR>/build/tmp/work/cortexa9hf-vfp-neon-poky-linux-gnueabi/psplash/0.1+gitAUTOINC+14c8f7b705-r15/git/make-image-header.sh, however your directory may be different depending on architecture/versions etc.
Example usage:
./make-image-header.sh /<PATH>/<IMAGE>.jpg POKY
- Copy the resulting header to the psplash recipe header under the recipe's "files" directory:
Alternatively, you could also use the fact that 'MACHINE' is inserted into the files search path and just add a new file to the ventana directory:
cp <IMAGE>.h <BUILD_DIR>/sources/poky/meta-yocto/recipes-core/psplash/files/psplash-poky-img.h
mkdir poky/meta-yocto/recipes-core/psplash/files/ventana
cp psplash-poky-img.h poky/meta-yocto/recipes-core/psplash/files/ventana/
- Rebuild the PSplash package.
If unfamiliar with package rebuilding you can use the following rebuild shell script and execute via
./rebuild psplashwhile within your build directory.#!/bin/bash # $1 is the recipe to install install() { local recipe="$@" bitbake -f -c clean "${recipe}" && bitbake --no-setscene "${recipe}" && bitbake package-index } runme() { case "$1" in all) install gateworks-image-minimal install gateworks-image-test install gateworks-image-multimedia install gateworks-image-gui ;; *) install "$@";; esac } [ "$1" ] || exit 1 echo "Note, this will hard-rebuild" time runme "$@"
You can verify the success of the custom image insertion by comparing your generated image header file against the one located in the work directory that PSplash was built in. To locate said directory, you can use the example find command from step 3. The directory should follow the pattern: build/tmp/work/<ARCHITECTURE_VERSION>/psplash/<GIT_VERSION>/git/
- Rebuild the BSP.
. ./setup-environment build        # activate a bitbake shell if not already done
bitbake gateworks-image-multimedia # replace argument with desired target
- Deploy the resulting .ubi files located under
<BUILD_DIR>/tmp/deploy/images/ventana/to target machine.
OpenWrt Set Up
Although OpenWrt has built in support for PSplash, it is not included in our default configuration for the BSP. It can be added by adding the oldpackages feed. Otherwise the OpenWrt steps are very similar to the Yocto process.
Note that due to differences in the boot process of OpenWrt, the progress bar functionality of PSplash is disabled. For the related patch see package/feeds/oldpackages/psplash/patches/001-hide-msgfield-and-progressbar.patch after step 5.
- Follow the steps at the OpenWrt/building wiki to set up an OpenWrt development environment.
- The rest of the steps here assume your present working directory is the top level OpenWrt folder.
- Edit
./feeds.conf.defaultand uncomment the "oldpackages" feed. - Update all package feeds:
./scripts/feeds update - Install PSplash and default it to yes (enabled):
./scripts/feeds install -dy psplash - Execute a top level build to create the tools necessary for making a custom logo header file:
make -j1 V=s - If you do not have one already, create a JPEG (jpg, jpeg, jpe) logo that will fit the dimensions of your display.
- If planning to support multiple displays, scale your JPEG logo to a size that will fit your smallest display and fill the image with a blue background (HTML color is specifically #192A65). PSplash will automatically center your image against its own background, making a single image look clean on multiple displays of varying dimensions. For steps on creating a logo, or filling the background color, refer to the above section.
- See the patch located at
package/feeds/oldpackages/psplash/patches/000-adjust-for-openwrt.patchfor information on changing the background PSplash color.
- Use the
make-image-header.shshell script to create the header file that will be used during compile time. This script is located within the PSplash package and can be found via a find <BUILD_DIR> -name "make-image-header.sh".
An example result of this find command would be build_dir/target-arm_cortex-a9+neon_musl-1.1.12_eabi/psplash-0.1/make-image-header.sh, however your directory may be different depending on architecture/versions etc.
Example usage:
./make-image-header.sh /<PATH>/<IMAGE>.jpg
- Use the resulting header file to replace the one located at
package/feeds/oldpackages/psplash/files/image_generic.h
9.Clean the psplash package make package/feeds/oldpackages/psplash/clean
- Install the psplash package
make package/feeds/oldpackages/psplash/install - Perform a top level make once again
make -j1 V=s. This should only need to rebuild the psplash package. - Deploy the images created under
bin/imx6/to target boards.
Android
There currently exists two separate processes in Android that display graphics during the boot process. The first uses an image named initlogo.rle which lasts between 1-2 seconds and displays immediately after the kernel has finished booting and passed control to the Android userspace. The second uses a zip folder containing an animation that is named bootanimation.zip which then lasts until booting has finished (~15 seconds). Both of these image sources can be modified to display custom graphics.
Before attempting to modify either of these sources, follow the steps at Android/Building if you have not set up a working source directory.
The following examples were written for Android KitKat 4.4.
Init Logo - Requires Building of Android Source Code
To modify the initlogo.rle source:
- Make a copy of or create a logo that is smaller than your display and convert it if necessary to a BMP. The BMP should be 16bit with no run length encoding.
- Install
imagemagick:sudo apt-get install imagemagick
- Convert the BMP to PNG:
convert initlogo.bmp initlogo.png
- Convert the resulting PNG to RAW RGB:
convert -depth 16 initlogo.png rgb:initlogo.raw - Use the pre-compiled rgb2565 tool to convert the RAW RGB to RLE and place in the /system directory:
./out/host/linux-x86/bin/rgb2565 < initlogo.raw > <BUILD_DIR>/system/initlogo.rle
If the rgb2565 executable does not exist run the following commands:
export JAVA_HOME=/usr/lib/jvm/java-7-openjdk-amd64
source build/envsetup.sh
lunch ventana-eng
mmm <BUILD_DIR>build/tools/rgb2565/ # replace <BUILD_DIR> with the path to Android source
Build and deploy the new Android image.
Boot Animation - Does not Require Building Android Source
A boot animation consists of several parts contained in bootanimation.zip located in either the /system/media/ or /data/local/ directories of an Android system. In the root of a boot animation zip archive, there are usually a number of folders conventionally named part0, part1, etc, and a file called desc.txt.
To modify the bootanimation.zip source:
- Construct the
desc.txtfile specific to your animation that follows this format:<width> <height> <frames per second> p <times to repeat> <end of animation pause time> <folder containing .png animations>
An exampledesc.txtdescribing an animation with the first part executing once, then the second part looping until boot (a times to repeat value of 0):640 480 30 p 1 0 part0 p 0 0 part1
For a static image, an example would be:
640 480 1
p 0 0 part0
- Name your animation PNGs in such a way that they are in alphabetically ordered in the same order you wish for them to be displayed. Conventionally files are named in the format of
<height>_<width>_<sequence number>.png.- Note, Gateworks has only tested with PNG image file format.
An example list of files in the part folders:
+bootanimation.zip
| | +part0
| | 480_640_00000.png
| | 480_640_00001.png
| | 480_640_00002.png
| | 480_640_00003.png
| | 480_640_00004.png
| | 480_640_00005.png
| +------------------
| +part1
| | 480_640_00000.png
| | 480_640_00001.png
| | 480_640_00002.png
| | 480_640_00003.png
| +------------------
| desc.txt
+--------------------
- Package your zip:
zip -r0 bootanimation.zip desc.txt part0 part1
- Note that this applies a "store only" compression on the files and is required to properly display the boot animation. If you have a different number of part folders make sure they are all listed.
- Copy the zip to either the
/system/media/or/data/local/directories.
Already complete SD Card: Copy the zip to either the /SYSTEM/media/ or /DATA/local/ directories.
- Build and deploy the new Android image.
- NOTE: Not required if copying .zip file to an already in use Android SD Card.
Disabling the Boot Animation
The boot animation can be disabled via setprop debug.sf.nobootanimation 1 in either the boot section of init.rc or adding to the setprop list in /system/bin/init.sh.
Attachments (2)
- SplashScreensInTheBootProcess.png (26.5 KB ) - added by 6 years ago.
- lcd_gateworks_logo.png (241.9 KB ) - added by 3 years ago.
Download all attachments as: .zip