
| Version 78 (modified by , 4 years ago) ( diff ) |
|---|
fn
Cellular Modems (GSM/GPRS/EDGE/UMTS/HSPA/LTE)
-
Cellular Modems (GSM/GPRS/EDGE/UMTS/HSPA/LTE)
- W_DISABLE# pin (MiniPCIe and M.2 Sockets)
- Recommended Modems
- 5G Modems
- Carrier Approval / Certification
- Mobile Termination
- Pin Signal and Voltage Conflicts
- USB 3.0 Support
- Modem Firmware
- Modem Terminology
- Modem Control
- Linux Drivers
- Ubuntu Cellular Modem Support (libqmi/libmbim/modemmanager)
- OpenWrt Cellular Modem Support
- USB Routing Notes for Gateworks products
- Sending a SMS / Text Message
- Specific Modem Notes
- Troubleshooting
- SIM Card use on PCI Express form-factor modems
- Other Helpful Links
- USB to Mini-PCIe Modem Adapters
- Mini-PCIe to M.2 Modem Adapters
M2M Cellular modems allow embedded systems to communicate and connect to the network in places that may not have other standard connections such as WiFi or Ethernet. Embedded systems are being deployed in more remote locations that still require and mandate an internet connection. Gateworks boards have Mini-PCI-Express slots that allow for a wide range of cellular modems to be connected.
This wiki page is created for use on Gateworks Rugged and Industrial Single Board Computers Made in the USA.
You will find below examples and setup instructions for many devices Gateworks has qualified.
Please check with Sierra Wireless for availability and EOL status.
M2M cellular modems operate as a point-to-point serial device. Typically they are used as IP network interfaces by initiating a connection to a cellular carrier using standard AT modem commands then running pppd which performs CHAP authentication and implements the PPP protocol. The pppd daemon uses the chat application for AT command scripts and creates a network interface once authentication succeeds. Some devices expose more than one serial interface for things like AT commands, proprietary API's, NMEA data from optional GPS etc can be used while the network is connected.
As a general rule, you need to have obtained the following from your Service Provider to use M2M devices in Linux:
- (4G) LTE and (3G) GSM modems:
- A SIM card and the following details:
- APN - Access Point Name
- unlocked - or you need the PIN to unlock it (the SIM must not be locked to another device)
- username - often optional but may be required by your provider
- password - often optional but may be required by your provider
- A SIM card and the following details:
- (3G) UMTS modems:
- A modem that has been previously 'activated' by your provider. This involves providing the provider with the IMEI (unique identifier on the modem/module), the provider adding it to their system, and you 'activating' the module (which usually requires a Windows PC and application if not already done by the provider of the module)
This information has been tested and created for use on the Gateworks Single Board Computers (SBCs), specifically the Ventana family that utilizes the Freescale i.MX6 processors.
Gateworks SBCs can be viewed at the following link: http://www.gateworks.com

W_DISABLE# pin (MiniPCIe and M.2 Sockets)
Note that MiniPCIe and M.2 sockets have 'W_DISABLE#' pins that are intended to disable all RF transmission on a wireless device.
Typically these signals are either driven high by default or pulled up with a pull-up resistor on-card and thus only need to be manipulated if you want to disable RF.
See gpio/w_disable# for more details
Recommended Modems
Many modems work well on the Gateworks SBCs. However, it can be difficult to suggest modems because of pin signal and voltage conflicts caused by modem manufacturers listed here . These conflicts often can be resolved.
The following modems can be recommended:
- U-Blox Toby L2 - 4G LTE CAT4 (GW17046)
- Gateworks GW16126/GW16132 - LTE CAT M1
- Telit FN980m 5G Modem
Be sure to read through the following article about how to select a cellular modem:

5G Modems
5G is a new and improved standard that increases the bandwidth for modems.
There are 2 frequency ranges:
- FR1 Frequency Range 1, Utilizes a lot of what 4G was using.
- FR2 Frequency Range 2, Shorter Range but Higher Bandwidth. Millimeter waves (mmWave).
Read more about the frequency ranges here
Many 5G cards are in the M.2 form factor and a size of 3052 (30mm wide by 52mm long).
Some of the common 5G modems that could be used on Gateworks Industrial SBCs:
- Telit FN980/FN980m (3052)
- Quectel RM500Q (3052)
- Sierra Wireless EM9190 (3052)
- Note, many of these modems are very expensive ($250-500) and they are not readily available.
- Note, many of these modems are M.2, which requires an adapter if inserting in a Mini-PCIe slot. Gateworks makes a M.2 adapter for 3042 size M.2 cards. Link Here
Consult the user manual for the exact Gateworks SBC you will be using to ensure pin compatibility.
Contact support@… for more information.
Carrier Approval / Certification
Production hardware needs to be Carrier Approved - a process that the end-customer needs to work through with the Cellular provider on the finished device. Part of the carrier approval also includes FCC testing of the fully integrated device.
The approval effort is greatly reduced if PTCRB-certified modules are used. By using PTCRB-certified modules, the majority of tests have already been completed and the only additional testing is for the SIM, power and antenna interfaces.
The Gateworks GW16126 uses the u-blox SARA module which is pre-certified. See the following link to look up the certification on specific devices: https://www.ptcrb.com/certified-devices
Gateworks recommends contacting the network provider of choice for more information.
Additional links:
- AT&T Certification White Paper - A very informative read for AT&T Network
Mobile Termination
The Cellular Carrier dictates if your plan provides 'mobile termination' (the ability to accept connections from the Internet) and the IP address provisioning (IP class, static vs dynamic, IP range). For GSM Carriers this is based on the APN. Check with the specific carrier for different options and costs.
Pin Signal and Voltage Conflicts
Mini-PCIe modems will use USB signals on the Mini-PCIe slot to communicate with the single board computer (SBC).
Many modems do not follow the Mini-PCIe pin specification.
Gateworks designs the Mini-PCIe slots to strictly adhere to the formal specification by PCI SIG.
Most of the Mini-PCIe slots on Gateworks SBCs have PCIe signalling routed to them which can cause conflicts for modems but are required for regular WiFi cards (802.11a/b/g/n/ac). However, there are some slots that do not have PCIe signalling and USB only. Typically these USB only slots are ideal for modems. These exist on some products such as the GW5220, GW6400, among others. Consult the white silkscreen lettering on the PCB board next to the Mini-PCIe slot to see what signalling is routed.
Thus Gateworks typically find pin conflicts (signal mismatch or voltage differences) on the following pins:
- Pin 11 (REFCLK-)
- Pin 13 (REFCLK+)
- Pin 19 (RSVD) (Often not connected, may be used for GPS_PPS)
- Pin 20 (WDIS#)
- Pin 22 (PERST#)
- Pin 31 (PETN0)
- Pin 33 (PETP0)
- Pin 49 (RSVD) (But may be used for GPS_PPS)
Mini-PCIe pinout can be found in the user manual
Please compare the modem pinout to the Gateworks pinout to ensure compatibility.
Some Gateworks SBCs have special resistor loading to eliminate some of these conflicts. Please contact Gateworks support (support at gateworks.com) to learn more. See an example image below depicting resistors that can be unloaded to disconnect certain signals:

For prototype testing, conflicting pins on the modem can be blocked with masking tape (see below picture). Once validated, resistor loading can sometimes be adjusted to eliminate the conflicting signals. Contact Gateworks to discuss unloading these resistors. Removing resistors outside of the Gateworks factory voids any remaining warranty on the board.

Specific Modems With Known Conflicts
- Huawei MU609
- Sierra Wireless MC7455
- Sierra Wireless HL7588
- Sierra Wireless MC7354
- Quectel EC25-A
- Telit LM940
If one of these modems must be used, email Gateworks support (support at gateworks.com) to learn more about resistor loading that may eliminate these conflicts.
USB 3.0 Support
Some modems now support USB 3.0 for faster speeds required for Cat6.
Gateworks routes USB 3.0 to select Mini-PCIe slots on the Newport GW62xx, GW63xx and GW64xx (the GW61xx only has USB 2.0). The Laguna and Ventana families do not support USB 3.0.
USB 3.0 is typically routed through a Multiplexer shared with PCIe so proper configuration must happen at the bootloader layer described newport/bootloader
USB 3.0 pins on the miniPCIe connector are:
- 23 - USB3.0_TX-
- 25 - USB3.0_TX+
- 31 - USB3.0_RX-
- 33 - USB3.0_RX+
Many of these devices support USB 2.0 as a fallback. To verify proper USB 3.0 link for a device look for that particular device with a 5000mbps speed as opposed to a 480mbps speed. For example:
root@xenial-newport:~# lsusb -t
/:  Bus 04.Port 1: Dev 1, Class=root_hub, Driver=xhci_hcd/1p, 5000M
    |__ Port 1: Dev 2, If 0, Class=Vendor Specific Class, Driver=option, 5000M
    |__ Port 1: Dev 2, If 1, Class=Vendor Specific Class, Driver=, 5000M
    |__ Port 1: Dev 2, If 2, Class=Vendor Specific Class, Driver=qmi_wwan, 5000M
    |__ Port 1: Dev 2, If 3, Class=Vendor Specific Class, Driver=option, 5000M
    |__ Port 1: Dev 2, If 4, Class=Vendor Specific Class, Driver=option, 5000M
    |__ Port 1: Dev 2, If 5, Class=Vendor Specific Class, Driver=option, 5000M
    |__ Port 1: Dev 2, If 6, Class=Vendor Specific Class, Driver=option, 5000M
/:  Bus 03.Port 1: Dev 1, Class=root_hub, Driver=xhci_hcd/1p, 480M
/:  Bus 02.Port 1: Dev 1, Class=root_hub, Driver=xhci_hcd/1p, 5000M
    |__ Port 1: Dev 2, If 0, Class=Hub, Driver=hub/4p, 5000M
/:  Bus 01.Port 1: Dev 1, Class=root_hub, Driver=xhci_hcd/1p, 480M
    |__ Port 1: Dev 2, If 0, Class=Hub, Driver=hub/5p, 480M
        |__ Port 5: Dev 3, If 0, Class=Vendor Specific Class, Driver=, 480M
- Note above the 'qmi_wwan' device shows a 5000mbps link
Modem Firmware
Modems typically require non-volatile firmware that gets flashed onto the device. This firmware is available from the modem manufacturer and/or carrier. Often you will need a different firmware version for different carriers and the firmware can also drastically change the behavior and control protocol the modem uses.
Often vendor/carriers support only a Windows utility to update the firmware in which case you will need a miniPcie-to-USB adapter to put the modem on a PC.
Qualcomm's QMI based modems can update their firmware using libqmi-firmware
Modem Terminology
- 3G : 3G has an average speed of around 1Mb/s
- 4G : 4th Generation of mobile communications technology meeting requirements defined by ITU (International Telecommunications Union) in IMT Advanced. LTE or WiMax.
- LTE : (Long Term Evolution) - Considered 4G.
- HSPA+ :High Speed Packet Access Plus - Considered 3G. theoretical top speed of 21Mb/s. Average is around 4Mb/s.
- Frequency Bands - Many carriers and technologies utilize different radio frequencies. Confirming the cellular radio operates on the same frequencies as the targeted provider is required for proper operation.
- Reference Links
Modem Control
Unlike typical ethernet network interfaces, modem's require additional configuration and control to perform the following types of details before moving on to configuring a network interface:
- Dialing - in the old days for dial-up modems
- SIM pin control and unlocking (security)
- Network provider registration
- Data Protocol selection
Once all of the above is complete a modem driver will provide a network interface to the Linux OS:
- IP over ethernet
- raw IP
- IP over serial (sometimes via PPP daemon)
And once you finally have an IP networking interface up and running from the modem, you can use the standard IP configuration tools within Linux (like NetworkManager or the lower-level tools such as ip, route, ifconfig, etc)
Over the years various different modem control protocols have been developed:
- AT commands (text commands and responses typically preceded by 'AT' and terminated with a CR (carriage return or 0x0d)
- QMI - Qualcomm Modem Interface (A binary protocol used for modern Qualcomm based modems)
- MBIM - Mobile Interface Broadband Model (A new standard by the USB Implementers Forum specifying a new MBIM USB device model with multiple IP connections over a single USB interface without the need of 802.3 frames and a new MBIM control protocol
AT commands
If your modem/firmware/driver provides an AT command control interface you will have a serial device which you send AT commands and receive responses. While many modems share common AT commands, each modem/manufacturer typically has their own set of extensions.
You can use any typical terminal program such as 'screen', 'minicom', 'picocom' or even simply stty/echo/cat to communicate. Be aware of translations that may occur based on your terminal and/or configuration of these terminal programs. For example, modem AT interpreters expect to receive commands terminated by a CR (carriage return, hex 0x0d code) and will not respond if your terminal program is translating CR's to LF's (beware of using screen within a screen session for example, which will do this).
Modems should auto-baud meaning they should support a variety of baudrates. Typical settings would be 57600baud, 8 data bits, 1 stop bit, no parity (8N1).
Some examples (assuming /dev/ttyUSB0 is your modem's control interface)
- picocom (recommended)
picocom /dev/ttyUSB -b 9600 --omap lfcr
- minicom
minicom --device /dev/ttyUSB0 --baudrate 57600
- screen
- NOTE: a screen session for AT commands within another screen session may
screen /dev/ttyUSB0 57600
- NOTE: a screen session for AT commands within another screen session may
- stty/cat/echo:
stty -F /dev/ttyUSB0 ignbrk -brkint -icrnl -opost -onlcr -isig -icanon -iexten -echo -echoe -echok -echoctl -echoke
cat /dev/ttyUSB0 &
echo -n -e "ATI\r" > /dev/ttyUSB0
Mobile Interface Broadband Model (MBIM)
Mobile Interface Broadband Model (MBIM) is a new standard by the USB Implemented Forum. It specifies a new MBIM USB device model providing multiple IP connections over a single USB interface without the need of 802.3 frames (which was the case for ECM and NCM) and a new MBIM control protocol to talk to modem devices.
See also:
Qualcomm MSM Interface (QMI)
The Qualcomm MSM Interface (QMI) is a modem control protocol that appears in many modern Qualcomm based modems.
QMI defines different services:
- DMS: Device Management - load device info
- NAS: Network Access - register in the network
- WDS: - request data connections
- PDS: - setup GPS location reporting
- UIM: - manage internals of the user identity module
See also:
Link Protocols
QMI modems support multiple link protocols:
- 802-3: wraps IP packets within Ethernet frames (similar to an Ethernet device) like traditional modems
- raw-ip: does away with the Ethernet layer and provides raw IP frames which is more efficient and allows higher throughput, but disallows things that rely on 802-3 such as DHCP
Some QMI modem/firmware/SIM combinations support 802-3 only, others support raw-ip only, and some support both. It is important to make sure the driver and the network device are configured to use the same link protocol.
IP Family
QMI modem/firmware/SIM combinations can support IPv4, IPv6, or both IP families. If you are trying to connect and receive an error related to IP family check that your asking for something supported.
Client ID
To use QMI services you need a 'Client ID' or CID. The CID's can be created then released when they are no longer needed. When working with sessions the CID is what allows QMI services to be operated on the right session. Both libqmi and uqmi userspace applications allow you to issue QMI commands by using an existing specified CID and to not release CID upon completion. It is important to use this when configuring and starting connections. For example, you can have an ipv4 session concurrent with an ipv6 session, each must have their own CID that is not released (until the connection is closed) and must be used when referring to those sessions.
When using qmicli you do this with the --client-cid=<cid> and the --client-no-release-cid options.
When using uqmi you obtain a client-id with the --get-client-id option and use an existing one with the --get-client-id option and release a CID with the --release-client-id option.
Gateworks BSP Support
Gateworks supports multiple Board Support Packages. The following table shows details on modem support for each:
| BSP | Product Families | AT | QMI | MBIM | Drivers | Notes |
|---|---|---|---|---|---|---|
| Android | Ventana | No | No | No | None | See Freescale information |
| Yocto | Ventana | manual | No | No | Minimal | |
| OpenWrt | All | comgt | uqmi | umbim | Many | |
| Ubuntu | Ventana | ModemManager | libqmi | libmbim | Many | https://wiki.ubuntu.com/ConnMan/Hardware/3G |
| Debian | Ventana | ModemManager | libqmi | libmbim | Many | https://wiki.debian.org/Modem/3G |
If you are looking for additional support please contact support@…
Linux Drivers
There are several Linux kernel drivers used for modem technology. You should enable all of these depending on your device needs:
- qcserial / USB_SIERIAL_QUALCOMM - Provides serial tty devices for Qualcomm modems
- sierra / USB_SERIAL_SIERRAWIRELESS - Provides serial tty devices for Sierra Wireless modems
- option / USB_SERIAL_OPTION - USB driver for GSM and CDMA modems with built-in OHCI-USB adapter (Option, Huawei, Audiovox, Novatel, Anydata)
- sierra_net / USB_SIERRA_NET - USB-to-WWAN driver for Sierra Wireless modems
- cdc-acm / USB_ACM - USB Modem (CDC ACM) support
- qmi_wwan / USB_NET_QMI_WWAN - QMI WWAN driver for Qualcomm modems based on QMI (Qualcomm Messaging Interface)
- cdc_mbim / USB_NET_CDC_MBIM - CDC MBIM support: Provides support for CDC MBIM (Mobile Broadband Interface modem) devices.
These all depend on the following Kernel features:
- NETDEVICES=y
- USB_NET_DRIVERS=y
- USB_USBNET=y
- USB_SERIAL
Ubuntu Cellular Modem Support (libqmi/libmbim/modemmanager)
Ubuntu Linux systems utilize the following opensource projects for modem control and management:
- libmbim
- libqmi
- modemmanager
- networkmanager
Installing pre-built latest stable libqmi/libmbim/modemmanager via PPA
Aleksander Morgado (https://aleksander.es), a key developer behind the ModemManager, libqmi, and libmbim projects that provide modem support on Ubuntu provides up-to-date Ubuntu PPA's for Ubuntu. Instructions on how to add the PPA feeds and update the packages exist there:
- modemmanager/libqmi/libmbim PPA focal
- modemmanager/libqmi/libmbim PPA bionic
- modemmanager/libqmi/libmbim PPA xenial
- modemmanager/libqmi/libmbim PPA trusty
Bionic:
apt-get install software-properties-common # contains add-apt-repository
add-apt-repository ppa:aleksander-m/modemmanager-bionic
apt-get update
apt-get install modemmanager libqmi-utils libmbim-utils policykit-1
Xenial:
apt-get install software-properties-common # contains add-apt-repository
add-apt-repository ppa:aleksander-m/modemmanager-xenial
apt-get update
apt-get install modemmanager libqmi-utils libmbim-utils policykit-1
Trusty:
add-apt-repository ppa:aleksander-m/modemmanager-trusty
apt-get update
apt-get install modemmanager libqmi-utils libmbim-utils policykit-1
see below for details on how to build even more up to date versions from source if needed.
libmbim
The libmbim library is a protocol support library much like libqmi is for QMI and has a mbimcli and mbim-network as well. Since libqmi-1.16.0 and libmbim-1.14.0 there is support for QMI-over-MBIM as well but not clear what is using this. ModemManager is using libmbim directly as that is what vendors expect/test
Useful Examples:
- show status (useful for verifying SIM):
mbimcli --device /dev/cdc-wdm0 --query-subscriber-ready-status # should show "Ready state: 'initialized'" - radio state (should show 'on')
mbimcli --device /dev/cdc-wdm0 --query-radio-state # should show on- if not use '--set-radio-state=on'
- enable FCCAuth (required on many Sierra Wireless devices)
qmicli --device /dev/cdc-wdm0 --device-open-proxy --device-open-mbim --dms-set-fcc-authentication
- verify signal state:
mbimcli --device /dev/cdc-wdm0 --device-open-proxy --query-signal-state # RSSI=99 is no signal
- Network
mbimcli --device /dev/cdc-wdm0 --device-open-proxy --query-preferred-providers
mbimcli --device /dev/cdc-wdm0 --device-open-proxy --query-home-provider
mbimcli --device /dev/cdc-wdm0 --device-open-proxy --query-visible-providers
mbimcli --device /dev/cdc-wdm0 --device-open-proxy --query-registration-state
[/dev/cdc-wdm0] Registration status:
                 Network error: 'unknown'
                Register state: 'home'
                 Register mode: 'automatic'
        Available data classes: 'lte'
        Current cellular class: 'gsm'
                   Provider ID: '310260'
                 Provider name: 'Project Fi'
                  Roaming text: 'unknown'
            Registration flags: 'packet-service-automatic-attach'
- connect:
- using mbim-network
root@ventana:~# echo "APN=h2g2" > /etc/mbim-network.conf # specify APN
root@ventana:~# echo "PROXY=yes" >> /etc/mbim-network.conf # allow ports to be shared by multiple libmbim apps
root@ventana:~# mbim-network /dev/cdc-wdm0 start
Loading profile at /etc/mbim-network.conf...
    APN: h2g2
    APN auth protocol: unset
    APN user: unset
    APN password: unset
    mbim-proxy: no
Querying subscriber ready status 'mbimcli -d /dev/cdc-wdm0 --query-subscriber-ready-status --no-close '...
[/dev/cdc-wdm0] Subscriber ready status retrieved: Ready state: 'initialized' Subscriber ID: '310260970524563' SIM ICCID: '8901260971105245631' Ready info: 'unknown' Telephone numbers: (1) '15309030245' [/dev/cdc-wdm0] Session not closed: TRID: '3'
Saving state at /tmp/mbim-network-state-cdc-wdm0... (TRID: 3)
Querying registration state 'mbimcli -d /dev/cdc-wdm0 --query-registration-state --no-open=3 --no-close '...
[/dev/cdc-wdm0] Registration status: Network error: 'unknown' Register state: 'home' Register mode: 'automatic' Available data classes: 'lte' Current cellular class: 'gsm' Provider ID: '310260' Provider name: 'Project Fi' Roaming text: 'unknown' Registration flags: 'packet-service-automatic-attach' [/dev/cdc-wdm0] Session not closed: TRID: '4'
Saving state at /tmp/mbim-network-state-cdc-wdm0... (TRID: 4)
Attaching to packet service with 'mbimcli -d /dev/cdc-wdm0 --attach-packet-service --no-open=4 --no-close '...
Saving state at /tmp/mbim-network-state-cdc-wdm0... (TRID: 5)
Starting network with 'mbimcli -d /dev/cdc-wdm0 --connect=apn='h2g2' --no-open=5 --no-close '...
Network started successfully
Saving state at /tmp/mbim-network-state-cdc-wdm0... (TRID: 7)
- or manually
mbimcli --device /dev/cdc-wdm0 --device-open-proxy --connect=apn='h2g2' --no-open=5 --no-close
- using mbim-network
Notes:
- MBIM modems do not implement DHCP shim functionality. You need to get the IP details for the interface with 'mbimcli --query-ip-configuration=<session id>' and apply those to the interface and update routing manually
References:
libqmi
The libqmi library is a protocol support library much like libmbim is for MBIM and has a qmicli and qmi-network command-line tool as well. Since libqmi-1.16.0 and libmbim-1.14.0 there is support for QMI-over-MBIM as well but not clear what is using this. ModemManager is using libqmi to control QMI based modems.
Command Line Examples
If not using a higher level manager which utilizes libqmi such as ModemManager, you can use libqmi directly with the aforementioned tools (make sure ModemManager is not installed or running if using libqmi directly!):
- SIM details (UIM service):
root@ventana:~# qmicli -d /dev/cdc-wdm0 --uim-get-card-status
[/dev/cdc-wdm0] Successfully got card status
Provisioning applications:
        Primary GW:   slot '0', application '0'
        Primary 1X:   session doesn't exist
        Secondary GW: session doesn't exist
        Secondary 1X: session doesn't exist
Card [0]:
        Card state: 'present'
        UPIN state: 'not-initialized'
                UPIN retries: '0'
                UPUK retries: '0'
        Application [0]:
                Application type:  'usim (2)'
                Application state: 'ready'
                Application ID:
                        A0:00:00:00:87:10:02:FF:FF:FF:FF:89:06:19:00:00
                Personalization state: 'ready'
                UPIN replaces PIN1: 'no'
                PIN1 state: 'disabled'
                        PIN1 retries: '3'
                        PUK1 retries: '10'
                PIN2 state: 'enabled-not-verified'
                        PIN2 retries: '10'
                        PUK2 retries: '10'
        Application [1]:
                Application type:  'isim (5)'
                Application state: 'detected'
                Application ID:
                        A0:00:00:00:87:10:04:FF:FF:FF:FF:89:07:03:00:00
                Personalization state: 'unknown'
                UPIN replaces PIN1: 'no'
                PIN1 state: 'disabled'
                        PIN1 retries: '3'
                        PUK1 retries: '10'
                PIN2 state: 'not-initialized'
                        PIN2 retries: '0'
                        PUK2 retries: '0'
- look for
Card state: 'present'which tells you the SIM is present and could be read
- look for
- Signal strength:
root@ventana:~# qmicli -d /dev/cdc-wdm0 --nas-get-signal-info
[/dev/cdc-wdm0] Successfully got signal info
WCDMA:
        RSSI: '-96 dBm'
        ECIO: '-12.0 dBm'
root@ventana:~# qmicli -d /dev/cdc-wdm0 --nas-get-signal-strength
[/dev/cdc-wdm0] Successfully got signal strength
Current:
        Network 'umts': '-96 dBm'
RSSI:
        Network 'umts': '-96 dBm'
ECIO:
        Network 'umts': '-11.0 dBm'
IO: '-106 dBm'
SINR (8): '9.0 dB'
- Network details (NAS service):
root@ventana:~# qmicli -d /dev/cdc-wdm0 --nas-get-system-selection-preference
[/dev/cdc-wdm0] Successfully got system selection preference
        Emergency mode: 'no'
        Mode preference: 'umts, lte'
        Band preference: 'wcdma-2100, wcdma-pcs-1900, wcdma-dcs-1800, wcdma-1700-us, wcdma-850-us, wcdma-900'
        LTE band preference: '1, 2, 3, 4, 5, 7, 8, 12, 13, 20, 25, 41'
        TD-SCDMA band preference: '(null)'
        Roaming preference: 'any'
        Network selection preference: 'automatic'
        Service domain preference: 'cs-ps'
        Service selection preference: 'automatic'
root@ventana:~# qmicli -d /dev/cdc-wdm0 --nas-network-scan
[/dev/cdc-wdm0] Successfully scanned networks
Network [0]:
        MCC: '310'
        MNC: '260'
        Status: 'available, home, not-forbidden, preferred'
        Description: 'T-Mobile'
Network [1]:
        MCC: '310'
        MNC: '260'
        Status: 'current-serving, home, not-forbidden, preferred'
        Description: 'Project F'
Network [2]:
        MCC: '312'
        MNC: '770'
        Status: 'available, roaming, not-forbidden, not-preferred'
        Description: '312 770'
Network [3]:
        MCC: '310'
        MNC: '410'
        Status: 'available, roaming, not-forbidden, not-preferred'
        Description: 'AT&T'
Network [4]:
        MCC: '310'
        MNC: '410'
        Status: 'available, roaming, not-forbidden, not-preferred'
        Description: 'AT&T'
Network [5]:
        MCC: '311'
        MNC: '480'
        Status: 'available, roaming, forbidden, not-preferred'
        Description: 'Verizon'
Network [0]:
        MCC: '310'
        MNC: '260'
        RAT: 'lte'
Network [1]:
        MCC: '310'
        MNC: '260'
        RAT: 'umts'
Network [2]:
        MCC: '312'
        MNC: '770'
        RAT: 'lte'
Network [3]:
        MCC: '310'
        MNC: '410'
        RAT: 'lte'
Network [4]:
        MCC: '310'
        MNC: '410'
        RAT: 'umts'
Network [5]:
        MCC: '311'
        MNC: '480'
        RAT: 'lte'
Network [0]:
        MCC: '310'
        MNC: '260'
        MCC with PCS digit: 'yes'
Network [1]:
        MCC: '310'
        MNC: '260'
        MCC with PCS digit: 'yes'
Network [2]:
        MCC: '312'
        MNC: '770'
        MCC with PCS digit: 'yes'
Network [3]:
        MCC: '310'
        MNC: '410'
        MCC with PCS digit: 'yes'
Network [4]:
        MCC: '310'
        MNC: '410'
        MCC with PCS digit: 'yes'
Network [5]:
        MCC: '311'
        MNC: '480'
        MCC with PCS digit: 'yes'
root@ventana:~# qmicli -d /dev/cdc-wdm0 --nas-get-operator-name
[/dev/cdc-wdm0] Successfully got operator name data
PLMN List:
        MCC/MNC: '310-DDD' LAC Range: 0->65279  PNN Record: 1
        MCC/MNC: '311-DDD' LAC Range: 0->65279  PNN Record: 1
        MCC/MNC: '312-DDD' LAC Range: 0->65279  PNN Record: 1
        MCC/MNC: '313-DDD' LAC Range: 0->65279  PNN Record: 1
        MCC/MNC: '314-DDD' LAC Range: 0->65279  PNN Record: 1
        MCC/MNC: '315-DDD' LAC Range: 0->65279  PNN Record: 1
        MCC/MNC: '316-DDD' LAC Range: 0->65279  PNN Record: 1
PLMN Names:
        0: 'Project Fi' ('Project Fi')          Country: 'initials-do-not-add'
root@ventana:~# qmicli -d /dev/cdc-wdm0 --nas-get-serving-system
[/dev/cdc-wdm0] Successfully got serving system:
        Registration state: 'registered'
        CS: 'attached'
        PS: 'attached'
        Selected network: '3gpp'
        Radio interfaces: '1'
                [0]: 'umts'
        Roaming status: 'off'
        Data service capabilities: '3'
                [0]: 'hsdpa'
                [1]: 'hsupa'
                [2]: 'wcdma'
        Current PLMN:
                MCC: '310'
                MNC: '260'
                Description: 'Project Fi'
        Roaming indicators: '1'
                [0]: 'off' (umts)
        3GPP location area code: '26289'
        3GPP cell ID: '85367600'
        Detailed status:
                Status: 'available'
                Capability: 'cs-ps'
                HDR Status: 'none'
                HDR Hybrid: 'no'
                Forbidden: 'no'
        Call barring status:
                Circuit switched: 'all-calls'
                Packet switched: 'all-calls'
        UMTS primary scrambling code: '61'
        Full operator code info:
                MCC: '310'
                MNC: '260'
                MNC with PCS digit: 'yes'
root@ventana:~# qmicli -d /dev/cdc-wdm0 --nas-get-home-network
[/dev/cdc-wdm0] Successfully got home network:
        Home network:
                MCC: '310'
                MNC: '260'
                Description: 'Project F'
root@ventana:~# qmicli -d /dev/cdc-wdm0 --nas-get-system-info
[/dev/cdc-wdm0] Successfully got system info:
        WCDMA service:
                Status: 'available'
                True Status: 'available'
                Preferred data path: 'no'
                Domain: 'cs-ps'
                Service capability: 'cs-ps'
                Roaming status: 'off'
                Forbidden: 'no'
                Location Area Code: '26289'
                Cell ID: '85367600'
                MCC: '310'
                MNC: '260'
                HS call status: 'hsdpa-hsupa-unsupported'
                HS service: 'hsdpa-hsupa-supported'
                Primary scrambling code: '61'
                Cell broadcast support: 'off'
                Call barring status (CS): 'all-calls'
                Call barring status (PS): 'all-calls'
                Cipher Domain: 'none'
        LTE service:
                Status: 'none'
                True Status: 'none'
                Preferred data path: 'no'
        SIM reject info: 'available'
- look for
Registration state: 'registered'from --nas-get-serving-system above to verify that you are registered on a network. The output also tells you what tower (PLMN) you are registered on.
- look for
- Configure Link Protocol:
root@ventana:~# qmicli -p -d /dev/cdc-wdm0 --wda-set-data-format=802-3 # set data format (raw-ip/802-3)
root@ventana:~# qmicli -p -d /dev/cdc-wdm0 --set-expected-data-format=802-3 # set expected format, should match above
- Make sure you choose a link protocol (802-3 or raw-ip) that is compatible with your modem/firmware/SIM
- Connect to Google Fi network (WDS service):
root@ventana:~# echo "APN=h2g2" > /etc/qmi-network.conf # specify APN
root@ventana:~# echo "PROXY=yes" >> /etc/qmi-network.conf # allow ports to be shared by multiple libqmi apps
root@ventana:~# qmi-network /dev/cdc-wdm0 start
Loading profile at /etc/qmi-network.conf...
    APN: h2g2
    APN user: unset
    APN password: unset
    qmi-proxy: no
Checking data format with 'qmicli -d /dev/cdc-wdm0 --wda-get-data-format --device-open-proxy'...
Device link layer protocol retrieved: raw-ip
Getting expected data format with 'qmicli -d /dev/cdc-wdm0 --get-expected-data-format'...
Expected link layer protocol retrieved: 802-3
Updating kernel link layer protocol with 'qmicli -d /dev/cdc-wdm0 --set-expected-data-format=raw-ip'...
Kernel link layer protocol updated
Starting network with 'qmicli -d /dev/cdc-wdm0 --wds-start-network=apn='h2g2'  --client-no-release-cid '...
Saving state at /tmp/qmi-network-state-cdc-wdm0... (CID: 35)
Saving state at /tmp/qmi-network-state-cdc-wdm0... (PDH: 62482624)
Network started successfully
- Configuring IP:
- If your modem/firmware/SIM combination supports
802-3link protocol and is configured to do so, you can use DHCP:root@ventana:~# dhclient wwan0
- or, you can use
-wds-get-current-settingsto obtain the settings provided to the conneciton from the carrier and configure them manually. Take care to use the sameclient-cidthat was returned from the-wds-start-networkcommand and to not release the client-id:root@ventana:~# qmicli --device /dev/cdc-wdm0 --client-no-release-cid --client-cid=35 --wds-get-current-settings [/dev/cdc-wdm0] Current settings retrieved: IP Family: IPv4 IPv4 address: 100.69.157.123 IPv4 subnet mask: 255.255.255.248 IPv4 gateway address: 100.69.157.124 IPv4 primary DNS: 10.177.0.34 IPv4 secondary DNS: 10.177.0.210 MTU: 1500 Domains: none [/dev/cdc-wdm0] Client ID not released: Service: 'wds' CID: '35' root@ventana:~# ifconfig wwan0 100.69.157.123 netmask 255.255.255.248 root@ventana:~# route add default gw 100.69.157.124 wwan0 root@ventana:~# echo "nameserver 10.177.0.34" > /etc/resolv.conf root@ventana:~# echo "nameserver 10.177.0.210" >> /etc/resolv.conf root@ventana:~# ping www.google.com
- If your modem/firmware/SIM combination supports
Troubleshooting QMI connection issues:
- make sure you are using a Link Protocol compatible with your modem/firmware/SIM
- make sure you are using an IP Family compatible with your modem/firmware/SIM
- don't use DHCP if its not supported by your carrier or if your not using the 802-3 link protocol - instead use 'wds-get-current-settings' and manually configure the interface
- make sure you are not releasing the Client ID when connecting to the network
Firmware related commands:
- Show firmware versions
root@ventana:~# qmicli -d /dev/cdc-wdm0 --dms-get-firmware-preference
firmware preference successfully retrieved:
[image 0]
        Image type: 'modem'
        Unique ID:  '005.010_001'
        Build ID:   '05.05.16.02_ATT'
[image 1]
        Image type: 'pri'
        Unique ID:  '005.010_001'
        Build ID:   '05.05.16.02_ATT'
- update firmware:
root@ventana:~/mc7354/firmware# qmi-firmware-update --update -d 1199:68c0 9999999_9902196_SWI9X15C_05.05.58.00_00_ATT_005.026_000-field.spk
loading device information before the update...
setting firmware preference:
  firmware version: '05.05.58.00'
  config version:   '005.026_000'
  carrier:          'ATT'
rebooting in download mode...
download mode detected
downloading cwe image: 9999999_9902196_SWI9X15C_05.05.58.00_00_ATT_005.026_000-field.spk (34.8 MB)...
finalizing download... (may take more than one minute, be patient)
successfully downloaded in 11.31s (3.1 MB/s)
rebooting in normal mode...
normal mode detected

------------------------------------------------------------------------
    NOTE: in order to validate which is the firmware running in the
    module, the program will wait for a complete boot; this process
    may take some time and several retries.
------------------------------------------------------------------------

waiting some time for the device to boot...
loading device information after the update (1/12)...
waiting some time for the device to boot...
loading device information after the update (2/12)...
waiting some time for the device to boot...
loading device information after the update (3/12)...

------------------------------------------------------------------------

   original firmware revision was:
      SWI9X15C_05.05.16.02 r21040 carmd-fwbuild1 2014/03/17 23:49:48
   original running firmware details:
      Model: MC7354
      Boot version: SWI9X15C_05.05.16.02 r21040 carmd-fwbuild1 2014/03/17 23:49:48
      AMSS version: SWI9X15C_05.05.16.02 r21040 carmd-fwbuild1 2014/03/17 23:49:48
      SKU ID: 1102016
      Package ID: 1102016_9903211_SWI9X15C_05.05.16.02_00_Generic_005.006_000
      Carrier ID: 4
   original firmware preference details:
      image 'modem': unique id '005.010_001', build id '05.05.16.02_ATT'
      image 'pri': unique id '005.010_001', build id '05.05.16.02_ATT'

   new firmware revision is:
      SWI9X15C_05.05.58.00 r27038 carmd-fwbuild1 2015/03/04 21:30:23
   new running firmware details:
      Model: MC7354
      Boot version: SWI9X15C_05.05.58.00 r27038 carmd-fwbuild1 2015/03/04 18:38:46
      AMSS version: SWI9X15C_05.05.58.00 r27038 carmd-fwbuild1 2015/03/04 21:30:23
      SKU ID: 1102016
      Package ID: 1102016_9903211_SWI9X15C_05.05.16.02_00_Generic_005.006_000
      Carrier ID: 4
   new firmware preference details:
      image 'modem': unique id '005.026_000', build id '05.05.58.00_ATT'
      image 'pri': unique id '005.026_000', build id '05.05.58.00_ATT'

   NOTE: this device supports firmware preference management
   with qmicli operations:
      --dms-get-firmware-preference
      --dms-set-firmware-preference

------------------------------------------------------------------------

firmware update operation finished successfully
References:
- libqmi - http://www.freedesktop.org/wiki/Software/libqmi/
- An introduction to libqmi - http://sigquit.wordpress.com/2012/08/20/an-introduction-to- *
ModemManager
ModemManager is a package containing a background service/daemon and a command-line-interfalce (mmcli) that can be used to configure and connect modems.
Note that after starting the service (if manually started) it does take 20 to 30 seconds to finish modem detection.
Example usage:
- List detected modems
root@ventana:~# mmcli --list-modems

No modems were found

root@ventana:~# mmcli --list-modems

Found 1 modems:
        /org/freedesktop/ModemManager1/Modem/0 [Sierra Wireless, Incorporated] MC7455
- Show details for the first modem:
root@ventana:~# mmcli --modem 0

/org/freedesktop/ModemManager1/Modem/0 (device id '86bde2905ff6f63bbefcfa457fe8f9221b76e968')
  -------------------------
  Hardware |   manufacturer: 'Sierra Wireless, Incorporated'
           |          model: 'MC7455'
           |       revision: 'SWI9X30C_02.08.02.00 r5428 CARMD-EV-FRMWR2 2016/01/06 20:38:53'
           |      supported: 'gsm-umts
           |                  lte
           |                  gsm-umts, lte'
           |        current: 'gsm-umts, lte'
           |   equipment id: '359072060290422'
  -------------------------
  System   |         device: '/sys/devices/soc0/soc/2100000.aips-bus/2184200.usb/ci_hdrc.1/usb1/1-1/1-1.2'
           |        drivers: 'qmi_wwan, qcserial'
           |         plugin: 'Sierra'
           |   primary port: 'cdc-wdm0'
           |          ports: 'ttyUSB0 (qcdm), ttyUSB2 (at), cdc-wdm0 (qmi), wwan0 (net), wwan1 (net), cdc-wdm1 (qmi)'
  -------------------------
  Numbers  |           own : '18057812000'
  -------------------------
  Status   |           lock: 'sim-pin2'
           | unlock retries: 'sim-pin (3), sim-pin2 (10), sim-puk (10), sim-puk2 (10)'
           |          state: 'disabled'
           |    power state: 'on'
           |    access tech: 'unknown'
           | signal quality: '0' (cached)
  -------------------------
  Modes    |      supported: 'allowed: 2g, 3g, 4g; preferred: none'
           |        current: 'allowed: 2g, 3g, 4g; preferred: none'
  -------------------------
  Bands    |      supported: 'u2100, u1800, u1900, u17iv, u850, u900, eutran-i, eutran-ii, eutran-iii, eutran-iv, eutran-v, eutran-vii, eutran-viii, eutran-xii, eutran-xiii, eutran-xx, eutran-xxv, eutran-xli'
           |        current: 'u2100, u1800, u1900, u17iv, u850, u900, eutran-i, eutran-ii, eutran-iii, eutran-iv, eutran-v, eutran-vii, eutran-viii, eutran-xii, eutran-xiii, eutran-xx, eutran-xxv, eutran-xli'
  -------------------------
  IP       |      supported: 'ipv4, ipv6, ipv4v6'
  -------------------------
  3GPP     |           imei: '359072060290555'
           |  enabled locks: 'none'
           |    operator id: 'unknown'
           |  operator name: 'unknown'
           |   subscription: 'unknown'
           |   registration: 'unknown'
  -------------------------
  SIM      |           path: '/org/freedesktop/ModemManager1/SIM/0'

  -------------------------
  Bearers  |          paths: 'none'
- Note the above shows a Sierra Wireless MC7455 modem supporting 'gsm-umts', 'lte' networks, using QMI control protocol (qmi_wwan driver) on /dev/cdc-wdm0, with a SIM that has been read however the radio is disabled
- If the SIM has PIN locking enabled and its state is 'locked' under the Status section above you can enter the SIM pin with
mmcli --pin=<PIN>root@ventana:~# mmcli --pin=1234 successfully sent PIN code to the SIM
- Some additional commands for handling SIM PINs are '--enable-pin', '--disable-pin', '--change-pin=<NEW_PIN>', '--puk=<PUK>' to enable PIN locking, disable PIN locking, changing the PIN, and unlocking a PUK-locked (Personal unblocking code) SIM.
- Enable first modem:
root@ventana:~# mmcli --modem 0 --enable successfully enabled the modem- if you get a failure here, make sure that the status shown by the
mmcli --modem 0above does not show a failure. The modem can not be enabled if there is a failure
- if you get a failure here, make sure that the status shown by the
- Now a status will show the following different info under status
  -------------------------
  Status   |           lock: 'sim-pin2'
           | unlock retries: 'sim-pin (3), sim-pin2 (10), sim-puk (10), sim-puk2 (10)'
           |          state: 'registered'
           |    power state: 'on'
           |    access tech: 'umts'
           | signal quality: '26' (recent)
- Scan available networks:
root@ventana:~# mmcli --modem 0 --3gpp-scan --timeout=300

Found 5 networks:
310410 - AT&T (umts, available)
310410 - AT&T (lte, available)
310260 - T-Mobile (gsm, available)
310260 - Project Fi (umts, current)
310260 - T-Mobile (lte, available)
- Connect modem (example: Google Fi)
root@ventana:~# mmcli --modem 0 --simple-connect="apn=h2g2"
successfully connected the modem
- Get IP Configuration:
root@ventana:~# mmcli --modem 0 | grep Bearers Bearers | paths: '/org/freedesktop/ModemManager1/Bearer/0' root@ventana:~# mmcli --bearer 0 Bearer '/org/freedesktop/ModemManager1/Bearer/0' ------------------------- Status | connected: 'yes' | suspended: 'no' | interface: 'wwan0' | IP timeout: '20' ------------------------- Properties | apn: 'h2g2' | roaming: 'allowed' | IP type: 'none' | user: 'none' | password: 'none' | number: 'none' | Rm protocol: 'unknown' ------------------------- IPv4 configuration | method: 'static' | address: '30.58.51.96' | prefix: '30' | gateway: '30.58.51.97' | DNS: '10.177.0.34', '10.177.0.210' | MTU: '1430' ------------------------- IPv6 configuration | method: 'unknown' ------------------------- Stats | Duration: '30' | Bytes received: 'N/A' | Bytes transmitted: 'N/A' - Configure interface:
root@ventana:~# ifconfig wwan0 30.58.51.96/30
root@ventana:~# route add default gw 30.58.51.97 wwan0
root@ventana:~# echo "nameserver 10.177.0.34" > /etc/resolv.conf
root@ventana:~# echo "nameserver 10.177.0.210" >> /etc/resolv.conf
root@ventana:~# ping www.google.com
- Some modem drivers provide 'raw-ip' instead of 802.3 link layer which DHCP doesn't support requiring you to manually configure as above. If your modem provides an 802.3 channel you can run dhcp via 'dhclient wwan0'
Some modems that support GNSS provide access to global positioning via ModemManager. For example, the Huawei MU609:
# enable GPS based location with NMEA trace info
root@ventana:~# mmcli --modem 0 --location-enable-gps-nmea
successfully setup location gathering
# get GPS NMEA location info
root@ventana:~# mmcli --modem 0 --location-get-gps-nmea

/org/freedesktop/ModemManager1/Modem/0
  -------------------------
  GPS NMEA traces | $GPGGA,153824.0,3515.484477,N,12040.136651,W,1,06,1.3,47.8,M,-31.0,M,,*58
                  | $GPGSA,A,3,05,07,08,09,28,30,,,,,,,2.7,1.3,2.4*39
                  | $GPVTG,,T,0.0,M,0.0,N,0.0,K,A*0D
                  | $GPRMC,153824.0,A,3515.484477,N,12040.136651,W,0.0,,200617,,,A*56
                  | $GPGSV,2,1,07,05,17,289,36,07,60,040,40,08,35,064,32,09,47,154,35*78
                  | $GPGSV,2,2,07,28,54,239,38,30,54,319,39,23,15,146,*43

# enable GPS based location with raw trace info
root@ventana:~# mmcli --modem 0 --location-enable-gps-raw
successfully setup location gathering
root@ventana:~# mmcli --modem 0 --location-get-gps-raw

/org/freedesktop/ModemManager1/Modem/0
  -------------------------
  Raw GPS         |  UTC time: '153938.0'
                  | Longitude: '-120.668886'
                  |  Latitude: '35.258143'
                  |  Altitude: '46.100000'

root@ventana:~# mmcli --modem 0 --location-get

/org/freedesktop/ModemManager1/Modem/0
  -------------------------
  3GPP location   | Mobile country code: '310'
                  | Mobile network code: '410'
                  |  Location area code: '55562'
                  |             Cell ID: '53228154'
  -------------------------
  GPS NMEA traces | $GPGGA,153938.0,3515.488596,N,12040.133136,W,1,06,1.3,46.1,M,-31.0,M,,*5D
                  | $GPGSA,A,3,05,07,08,09,28,30,,,,,,,2.7,1.3,2.3*3E
                  | $GPVTG,,T,0.0,M,0.0,N,0.0,K,A*0D
                  | $GPRMC,153938.0,A,3515.488596,N,12040.133136,W,0.0,,200617,,,A*5B
                  | $GPGSV,2,1,07,05,17,289,35,07,60,042,41,08,35,063,34,09,46,154,35*78
                  | $GPGSV,2,2,07,28,54,240,40,30,55,320,40,23,15,146,*47
  -------------------------
  Raw GPS         |  UTC time: '153938.0'
                  | Longitude: '-120.668886'
                  |  Latitude: '35.258143'
                  |  Altitude: '46.100000'
  -------------------------
  CDMA BS         | Not available
Controlling the ModemManager service:
- Ubuntu 16.04 (use systemctl)
# stop ModemManager
systemctl stop ModemManager
# disable ModemManager at boot
systemctl disable ModemManager
# enable ModemManager at boot
systemctl enable ModemManager
# start ModemManager
systemctl start ModemManager
Debugging with ModemManager can be done by running ModemManager with the '--debug' flag. For example, on Ubuntu 16.04:
# stop ModemManager
systemctl stop ModemManager
# run manually with debug
ModemManager --debug --log-level=DEBUG
# set logging level to max
mmcli -G DEBUG
# set logging level to minimum
mmcli -G ERR
# AT commands can be sent when in debug mode
mmcli --modem 0 --timeout=120 --command="ATI" # Ident
References:
NetworkManager
NetworkManager is a package containing a background service/daemon and a command-line-interfalce (nmcli) that can be used to configure and connect network interfaces. It is often used in conjunction with ModemManager for Cellular modems.
Notes:
- network-manager-1.2.6 (Ubuntu 16.04) has a different cmdline syntax for nmcli than network-manager-0.9.8.8 (Ubuntu 14.04). The following examples are for network-manager-1.2.6+
Example usage:
- Show version:
root@ventana:~# nmcli --version nmcli tool, version 1.2.6 - Show Device Status:
# show status
root@ventana:~# nmcli device status
DEVICE    TYPE      STATE         CONNECTION
eth0      ethernet  connected     Wired connection 1
cdc-wdm0  gsm       disconnected  --
eth1      ethernet  unavailable   --
can0      can       unmanaged     --
lo        loopback  unmanaged     --
- Bring down Wired Connection 1:
root@ventana:~# nmcli connection down id 'Wired connection 1'
Connection 'Wired connection 1' successfully deactivated
- Add a modem:
- Example: QMI controlled modem with an APN=h2g2 (Google Fi):
root@ventana:~# nmcli connection add type gsm ifname cdc-wdm0 con-name mymodem apn h2g2
Connection 'mymodem ' (6d89ff6e-6eb6-4f0f-80d1-fb081165f710) successfully added.
- Example: AT controlled modem with a Verizon Dynamic IP SIM:
root@ventana:~# nmcli connection add type gsm ifname ttyACM0 con-name mymodem apn vzwinternet
Connection 'mymodem ' (6d89ff6e-6eb6-4f0f-80d1-fb081165f710) successfully added.
- Example: QMI controlled modem with an APN=h2g2 (Google Fi):
- Connect to mymodem device:
root@ventana:~# nmcli connection up id mymodem
Connection successfully activated
Controlling the NetworkManager service:
- Ubuntu 16.04 (use systemctl)
# stop NetworkManager
systemctl stop NetworkManager
# disable NetworkManager at boot
systemctl disable NetworkManager
# enable NetworkManager at boot
systemctl enable NetworkManager
# start NetworkManager
systemctl start NetworkManager
Troubleshooting:
- if you find your modem's primary interface that ModemManager detects is inconsistent you will want to remove the
interface-name=line from the[conneciton]section of your modem configuration in the/etc/NetworkManager/system-connections/file for your modem and add adevice-id=line to the[gsm]section that refers to the unique modem id string that ModemManager defines for the modem shown on the 2nd line output frommmcli -m 0. You can also use dbus to get thedevice-idas such:root@ventana:~# dbus-send --print-reply --system \ --dest=org.freedesktop.ModemManager1 \ /org/freedesktop/ModemManager1/Modem/0 \ org.freedesktop.DBus.Properties.Get \ string:org.freedesktop.ModemManager1.Modem string:DeviceIdentifier method return time=1504221807.956321 sender=:1.3 -> destination=:1.27 serial=41 reply_serial=2 variant string "ce4335fc20b8e7d2bf65f68483b79e78216e0256"
Building libqmi/libmbim/modemmanager from source
You can also build the latest modemmanager, libqmi, libmbim easily from source on an Ubuntu system. It is recommended to use stable releases which you can easily do from the PPA's provided above however if you wish to debug, contribute patches, or try patches from the various mailing lists you will need to build from the git repo sources.
For example the following was done on Ubuntu 16.04 (xenial):
- libqmi:
apt-get install build-essential git pkg-config automake autoconf intltool libtool gtk-doc-tools
apt-get install libglib2.0-dev libgudev-1.0-dev
git clone git://anongit.freedesktop.org/libqmi && cd libqmi && ./autogen.sh
make
make install
ldconfig
cd ..
- you can find the latest 'stable' release from https://www.freedesktop.org/software/libqmi/ (untar and run configure)
- libmbim:
apt-get install build-essential git pkg-config automake autoconf intltool libtool gtk-doc-tools
apt-get install libglib2.0-dev libgudev-1.0-dev
git clone git://anongit.freedesktop.org/libmbim/libmbim && cd libmbim && ./autogen.sh
make
make install
ldconfig
cd ..
- you can find the latest 'stable' release from https://www.freedesktop.org/software/libmbim/ (untar and run configure)
- modemmanager:
git clone git://anongit.freedesktop.org/ModemManager/ModemManager && cd ModemManager && ./autogen.sh
make
make install
ldconfig
cd ..
- you can find the latest 'stable' release from https://www.freedesktop.org/software/ModemManager/ (untar and run configure)
Notes:
- if you are building and installing from source you should remove all other packages that install libmbim or libqmi:
apt-get purge libmbim-glib-dev llibmbim-glib-doc libmbim-glib4 libmbim-glib4-dbg libmbim-proxy libmbim-utils
apt-get purge libqmi-glib-dev libqmi-glib-doc libqmi-glib1 libqmi-glib1-dbg libqmi-proxy libqmi-utils
Troubleshooting Modem support on Ubuntu
Please use this section as well as the Generic Modem Troubleshooting section below.
Because modem technology is constantly changing it is often best to try to get it working on the most modern Linux system possible with up to date kernel drivers and libraries. Often this is easily accomplished with Ubuntu under the following circumstances:
- Use the latest mainline Linux kernel if you can, otherwise use the most recent available Ubuntu kernel
- Use the latest ModemManager, libqmi, and libmbim PPA's (see above)
Use ModemManager to see if your modem is detected and attempt connecting. Querying a modem with ModemManager will also tell you what control interfaces exist and what type of control they use which is critical to understanding the requirements for your modem.
Recommended Tip
- Gateworks recommends connecting the modem and SIM to a Desktop or Laptop running Ubuntu Linux for isolated troubleshooting apart from the Gateworks hardware. To connect a Mini-PCIe modem to a desktop or laptop, please purchase a USB to Mini-PCIe adapter from a third party like Amazon or Newegg, etc.
Troubleshooting steps:
- Determine what devices you have present and what drivers are being used to possibly support them:
root@ventana:~# lsusb
Bus 001 Device 003: ID 1199:9071 Sierra Wireless, Inc.
Bus 001 Device 002: ID 0424:2514 Standard Microsystems Corp. USB 2.0 Hub
Bus 001 Device 001: ID 1d6b:0002 Linux Foundation 2.0 root hub
root@ventana:~# dmesg | egrep -ie qualcom\|mbim\|sierra\|wdm
[   11.253539] usb 1-1.2: Product: Sierra Wireless MC7455 Qualcomm® Snapdragon™ X7 LTE-A
[   11.253546] usb 1-1.2: Manufacturer: Sierra Wireless, Incorporated
[   11.378483] usbcore: registered new interface driver cdc_wdm
[   11.395365] usbserial: USB Serial support registered for Qualcomm USB modem
[   11.397829] qcserial 1-1.2:1.0: Qualcomm USB modem converter detected
[   11.398318] usb 1-1.2: Qualcomm USB modem converter now attached to ttyUSB0
[   11.400563] qcserial 1-1.2:1.2: Qualcomm USB modem converter detected
[   11.402218] usb 1-1.2: Qualcomm USB modem converter now attached to ttyUSB1
[   11.404332] qcserial 1-1.2:1.3: Qualcomm USB modem converter detected
[   11.406082] usb 1-1.2: Qualcomm USB modem converter now attached to ttyUSB2
[   11.408664] qmi_wwan 1-1.2:1.8: cdc-wdm0: USB WDM device
[   11.412510] qmi_wwan 1-1.2:1.10: cdc-wdm1: USB WDM device
- Note that the 'usbcore: registered' messages simply indicate a driver is loaded not that it has detected a supported device
- if qmi_wwan detects your modem it speaks QMI (example above)
- if cdc_mbim detects your modem it speaks MBIM
- you can also look at what driver module is bound to a device (QMI example):
root@ventana:~# ls -l /sys/class/usbmisc/cdc-wdm0/device/driver/ | grep module
lrwxrwxrwx 1 root root    0 Mar  7 22:20 module -> ../../../../module/qmi_wwan
- Note that the 'usbcore: registered' messages simply indicate a driver is loaded not that it has detected a supported device
- Use ModemManager to see what ports and driver are detetcted/supported:
root@ventana:~# mmcli --modem 0 | grep  -i -E ports\|driver
           |        drivers: 'qmi_wwan, qcserial'
           |          ports: 'ttyUSB0 (qcdm), ttyUSB2 (at), cdc-wdm0 (qmi), wwan0 (net), wwan1 (net), cdc-wdm1 (qmi)'
- here we see that the modem in the system is supported by the 'qcserial' driver and the 'qmi_wwan' driver, it speaks 'qcdm', 'at', and 'qmi' control protocols, and it uses the 'wwan0' network device for data
- Check PIN status, power state, registration state, and signal quality by looking at the 'Numbers' and 'Status' section of ModemManager output:
root@ventana:~# mmcli --modem 0
...
  -------------------------
  Numbers  |           own : '18052959083'
  -------------------------
  Status   |           lock: 'sim-pin2'
           | unlock retries: 'sim-pin (3), sim-pin2 (10), sim-puk (10), sim-puk2 (10)'
           |          state: 'registered'
           |    power state: 'on'
           |    access tech: 'umts'
           | signal quality: '31' (recent)
  -------------------------
  Modes    |      supported: 'allowed: 2g, 3g, 4g; preferred: none'
           |        current: 'allowed: 2g, 3g, 4g; preferred: none'
  -------------------------
...
Getting help:
- When asking for help make sure to provide the following details:
- Modem make/model
- Output of lsusb showing modem
- Output of
mmcli --modem 0to show detected modem details - Output of
dmesg | egrep -ie qualcom\|mbim\|sierra\|wdmto show driver messages - Output of
uname -rto show kernel version - Output of
qmicli --versionandmbimcli --versionto show what versions you have
- for QMI: post to libqmi-devel with details
- Add Output of
qmicli --dms-get-{manufacturer,model,revision,capabilities}- revision is firmware
- capabilities shows if SIM is supported
- capabilities shows networks
- Add Output of
- for MBIM: post to libmbim-devel with details
OpenWrt Cellular Modem Support
OpenWrt supports a wide range of cellular modems. Depending on the modem, a different software package / driver will be used:
- comgt : Most GSM / 3G modems : Uses AT commands through the
comgtpackage. - uqmi : Newer modems using Qualcomm chipsets : For modems that speak QMI (Quallcom MSM Interface) such as many of the 4G/LTE modems, use uqmi.
comgt package
The comgt package (http://comgt.sourceforge.net/) supports configuration of various cellular modems that use AT commands such as the Sierra Wireless, Novatel, and Option modems. This package supports startup scripts that are used for network interfaces specified with proto=3g. When a network interface is configured with proto=3g then the following things will occur when that interface is brought up (by virtue of /lib/netifd/proto/3g.sh):
- the
gcomapp is used on the interface 'device' to determine what card is being used. Depending on the card and the service various AT commands may be sent for modem configuration. - the
chatapplication application will run with achatscript (from/etc/chatscripts) which depends on the card type. This script is what connects to the network by using AT commands to specify the APN etc - The
pppddaemon is run on the 'device' which creates a 'point to point' network interface (named 3g-<interface>) over the serial connection
Example configurations
UCI is a configuration system for OpenWrt. More information can be found here
A modem must be configured in OpenWrt. The following uci properties are used by comgt and the 3g proto:
- proto - must be 3g
- device - the serial device (modem dependent) used for both data/control (used by
gcom/chat/pppd). Consult the modem information below to determine what device to use for your modem - service - umts|cdma|evdo - the service type (which dictates the
chatscript used) - apn - the APN of your provider
- pincode - the PIN (if required) to use your SIM
Examples:
- An example configuration for a Sierra Wireless MC9870 3G UMTS modem (ie AT&T Carrier using the ISP.CINGULAR APN):
uci set network.wan=interface
uci set network.wan.proto=3g
uci set network.wan.service=umts
uci set network.wan.apn=ISP.CINGULAR
uci set network.wan.device=/dev/ttyUSB4
uci commit network
- Note that UMTS/GSM providers sometimes require a user and password. In this case the ppp scripts require this information in your network interface. If your user is 'user' and password is 'pass' you can set this via:
uci set network.wan.username=user
uci set network.wan.password=pass
- Note that UMTS/GSM providers sometimes require a user and password. In this case the ppp scripts require this information in your network interface. If your user is 'user' and password is 'pass' you can set this via:
- An example configuration for a Sierra Wireless MC5728 3G CDMA/EVDO modem (ie Sprint/Verizon Carriers):
uci set network.wan=interface
uci set network.wan.proto=3g
uci set network.wan.service=cdma
uci set network.wan.device=/dev/ttyUSB0
uci commit network
- Note that CDMA/EVDO modules need to be 'activated' (one-time) before they can connect to he carrier's network. This is best done using the Windows software from the module vendor (For Verizon this is VZAccess Manager bundled with the CDMA Watcher drivers/application)
- An example configuration for a Sierra Wireless MC9870 3G UMTS modem (ie AT&T Carrier using the ISP.CINGULAR APN):
uci set network.wan=interface
uci set network.wan.proto=3g
uci set network.wan.service=umts
uci set network.wan.apn=ISP.CINGULAR
uci set network.wan.device=/dev/ttyUSB4
uci commit network
- An example configuration for a Sierra Wireless MC7700 LTE/HSPA+ Gobi modem (ie AT&T Carrier using the ISP.CINGULAR APN):
uci set network.wan=interface
uci set network.wan.proto=3g
uci set network.wan.service=umts
uci set network.wan.apn=ISP.CINGULAR
uci set network.wan.device=/dev/ttyUSB3
uci commit network
- An example configuration for an Option Module:
uci set network.wan=interface
uci set network.wan.proto=3g
uci set network.wan.service=umts
uci set network.wan.apn=ISP.CINGULAR
uci set network.wan.device=/dev/ttyHS5
uci commit network
Using gcom to see things like: modem info, SIM state, and signal strength
The comgt package has an application installed to /usr/bin/gcom that uses chat scripts installed in /etc/gcom to perform common tasks with supported 3G devices (assuming /dev/ttyUSB3 is the control channel as in a MC8790):
- report SIM status, connection status, and signal quality:
# gcom -d /dev/ttyUSB3
SIM ready
Waiting for Registration..(120 sec max)
Registered on Home network: "AT&T",2
Signal Quality: 12,99
- for Option GTM671WFS (on ttyHS3)
# gcom -d /dev/ttyHS3
SIM ready
Waiting for Registration..(120 sec max)
Registered on Home network: "AT&T",2
Signal Quality: 17,99
- report just signal strength:
# gcom -d /dev/ttyUSB3 sig
Signal Quality: 12,99
- report card info (mfg strings):
# gcom -d /dev/ttyUSB3 info
##### Wireless WAN Modem Configuration #####
Product text:
====

Manufacturer: Sierra Wireless, Inc.
Model: MC8790
Revision: K1_0_2_8AP C:/WS/FW/K1_0_2_8AP/MSM6290/SRC 2008/09/17 14:00:22
IMEI: 352974021856935
IMEI SV: 3
FSN: D661380183210
3GPP Release 6
+GCAP: +CGSM,+DS,+ES
OK
====
Manufacturer:           Sierra Wireless, Inc.
IMEI and Serial Number: 352974021856935
Manufacturer's Revision:
K1_0_2_8AP C:/WS/FW/K1_0_2_8AP/MSM6290/SRC 2008/09/17 14:00:
Hardware Revision:

Network Locked:         0
Customisation:

Band settings:          (
)
APN:                    1,"IP","ISP.CINGULAR","0.0.0.0",0,0
##### END #####
uqmi package
Modems that speak the QMI protocol for configuration/connection require a driver such as qcserial that exposes the modem's serial interfaces, as well as the qmi_wwan driver, which exposes a network interface and a QMI interface, along with userspace tools that speak to the QMI interface.
- qcserial driver exposes the modem's serial interfaces
- qmi_wwan driver which exposes a network interface
OpenWrt has a written the uqmi application from scratch which replaces the more bulky (~1.4MB) libqmi and also includes netifd protocol handler support (meaning you can use UCI for configuration).
Known devices that use QMI (Note that some of these support both QMI or AT control via different firmware from Carriers):
- Sierra Wireless MC77xx series
- Sierra Wireless MC7354
OpenWrt Packages:
- kmod-usb-serial-qualcomm - qcserial.ko
- kmod-usb-net-qmi-wwan - qmi_wwan.ko
- uqmi
Notes:
- There is no luci web-admin protocol support for QMI currently which means you cannot configure a QMI modem via the web-admin
Example QMI modem configurations
- An example configuration for a Sierra Wireless MC7354 modem configured for AT&T UMTS (which is the 2nd wwan device):
uci set network.wan=interface
uci set network.wan.ifname=wwan1
uci set network.wan.proto=qmi
uci set network.wan.apn=ISP.CINGULAR
uci set network.wan.device=/dev/cdc-wdm1
uci set network.wan.delay=90
uci commit network
- The GSM/UMTS modem is the 2nd device (
/dev/wwan1,/dev/cdc/wdm1) - This modem needed a 90 second delay before trying to connect
- Example
/etc/config/networkcontent for uqmi modemconfig interface 'wan' option ifname 'wwan1' option proto 'qmi' option apn 'ISP.CINGULAR' option device '/dev/cdc-wdm1' option delay '90'
uqmi usage and troubleshooting
Examples:
- Check SIM status:
root@OpenWrt:/# uqmi -d /dev/cdc-wdm0 --get-pin-status
{
        "pin1_status": "disabled",
        "pin1_verify_tries": 3,
        "pin1_unblock_tries": 10,
        "pin2_status": "not_verified",
        "pin2_verify_tries": 10,
        "pin2_unblock_tries": 10
}
- if you see a 'UIM uninitialized' you have a SIM issue such as SIM not inserted
- Check for available networks:
root@OpenWrt:/# uqmi -d /dev/cdc-wdm0 --get-serving-system
{
        "registration": "registered",
        "plmn_mcc": 310,
        "plmn_mnc": 260,
        "plmn_description": "Project Fi",
        "roaming": false
}
- above shows we are registered on the providers network (in this case Google Fi)
- Check data status:
root@OpenWrt:/# uqmi -d /dev/cdc-wdm0 --get-data-status "connected" - Get signal info:
root@OpenWrt:/# uqmi -d /dev/cdc-wdm0 --get-signal-info
{
        "type": "hdr",
        "rssi": -125,
        "ecio": 5,
        "io": -106,
        "type": "wcdma",
        "rssi": -99,
        "ecio": 19
}
- Scan networks:
root@OpenWrt:/# uqmi -d /dev/cdc-wdm0 --network-scan
{
        "network_info": [
                {
                        "mcc": 310,
                        "mnc": 260,
                        "description": "T-Mobile",
                        "status": [
                                "available",
                                "home",
                                "not_forbidden",
                                "preferred"
                        ]
                },
                {
                        "mcc": 310,
                        "mnc": 260,
                        "description": "Project Fi",
                        "status": [
                                "current_serving",
                                "home",
                                "not_forbidden",
                                "preferred"
                        ]
                },
                {
                        "mcc": 310,
                        "mnc": 260,
                        "description": "T-Mobile",
                        "status": [
                                "available",
                                "home",
                                "not_forbidden",
                                "preferred"
                        ]
                },
                {
                        "mcc": 310,
                        "mnc": 410,
                        "description": "AT&T",
                        "status": [
                                "available",
                                "roaming",
                                "not_forbidden",
                                "not_preferred"
                        ]
                },
                {
                        "mcc": 311,
                        "mnc": 480,
                        "description": "Verizon",
                        "status": [
                                "available",
                                "roaming",
                                "forbidden",
                                "not_preferred"
                        ]
                },
                {
                        "mcc": 312,
                        "mnc": 770,
                        "description": "312-770",
                        "status": [
                                "available",
                                "roaming",
                                "forbidden",
                                "not_preferred"
                        ]
                }
        ],
        "radio_access_technology": [
                {
                        "mcc": 310,
                        "mnc": 260,
                        "radio": "lte"
                },
                {
                        "mcc": 310,
                        "mnc": 260,
                        "radio": "umts"
                },
                {
                        "mcc": 310,
                        "mnc": 260,
                        "radio": "gsm"
                },
                {
                        "mcc": 310,
                        "mnc": 410,
                        "radio": "lte"
                },
                {
                        "mcc": 310,
                        "mnc": 410,
                        "radio": "umts"
                },
                {
                        "mcc": 311,
                        "mnc": 480,
                        "radio": "lte"
                },
                {
                        "mcc": 312,
                        "mnc": 770,
                        "radio": "lte"
                }
        ]
}
- Get current IP settings:
root@OpenWrt:/# uqmi -d /dev/cdc-wdm0 --get-current-settings
{
        "pdp-type": "ipv4",
        "ip-family": "ipv4",
        "mtu": 1430,
        "ipv4": {
                "ip": "25.232.251.49",
                "dns1": "10.177.0.34",
                "dns2": "10.177.0.210",
                "gateway": "25.232.251.50",
                "subnet": "255.255.255.252"
        },
        "ipv6": {

        },
        "domain-names": {

        }
}
- note that some QMI modems use raw-ip and thus DHCP will not work. This command can be used to determine the IP settings provided by the provider
If all is well, you will see your wwan interface with an IP address via ifconfig. If things don't work examine the logs to see what failed:
logread | grep qmi
You you see 'Unable to connect, check APN and authentication' in the log, then you either have an invalid APN or auth credentials or you need to increase the delay config parameter.
Additional init scripts for some devices
Note that some devices require some additional manipulation to be used for cellular communications which the comgt scripts may not handle. In these cases you can create an init script to configure the device properly:
- typically USB dongles, require the 'setmode' application to be used to switch the devices from a USB Mass Storage device configuration to a 3G modem configuration
- some devices have AT commands that are required to take them out of low-power modes. For example, Sierra Wireless modems are shipped configured in low-power (airplane) mode. A startup script can be used to always set full power mode on bootup (Note: it appears this is just the way they are shipped - this setting is persistent so you should only need to set it once).
The following shell commands will create an init script that will ensure a sierra wireless modem is taken out of 'Airplane' mode on bootup (assuming 'modem control' device is /dev/ttyUSB3 - change appropriately for your device):
# set Modem data/control device in /etc/config/network
uci set network.wan.ctrl_device=/dev/ttyUSB3
uci commit

# create an init script that enables full power on bootup for all 3g devices
cat << EOF > /etc/init.d/3g_power_enable
#!/bin/sh /etc/rc.common

START=80
DEV=0

start(){

        include /lib/network
        scan_interfaces

        local ifc
        for ifc in \$interfaces; do
                local proto
                config_get proto "\$ifc" proto
                [ "\$proto" == "3g" ] && {
                        local device
                        config_get device "\$ifc" ctrl_device
                        [ "\$device" -a -c "\$device" ] && {
                                logger -t "3g" "Enabling full power mode for \$device"
                                echo -e -n "at+cfun=1\r" > \$device
                        }
                }
        done
}
chmod +x /etc/init.d/3g_power_enable
/etc/init.d/3g_power_enable enable
CollapsibleStart(OpenWrt LuCI WebAdmin for Cellular Cards)
LuCI Web-Admin Configuration for Cellular Cards
The following instructions detail how to configure a cellular card using the LuCI web-admin:
- Access the board's web interface. For instructions: Accessing the Web Interface
- Go to the Network tab, then the Interfaces tab.

- Click on "Add new interface..." at the bottom left of the screen.
- Name the interface. Here it is named "wan"
- Check "Custom Interface" with nothing entered in the text box.

- Under the Protocol field, select "UMTS/3G from the drop down menu.
- Continue to fill out the remaining fields.

- Click on Save & Apply at the bottom right of the screen.
- Reboot the board. The modem should be woken up from the
/etc/init.d/3gscript a few seconds after the board boots.

USB Routing Notes for Gateworks products
Some of the Gateworks boards have options to physically route USB signals to either front-panel connectors (the default configured by the bootloader and/or kernel) or a PCI slot for use with a PCI-to-PCIe carrier for PCIe USB products like cellular modems.
Please refer to the Gateworks USB Device Table and USB Steering pages for details for each board.
Sending a SMS / Text Message
Depending on the carrier and plan, SMS messages can be sent from Gateworks boards via a Cellular Modem.
Gateworks has tested and verify this works sending to a normal handset.
The example shown is using AT commands which could be turned into a script if desired.
- Connect to the modem where you can send AT commands. For AT Command instructions, see here: AT Commands
- Verify that your modem supports SMS messages by typing the following AT command. If you see +CMGF: (0-1) then it is supported.
at+cmgf=?
+CMGF: (0-1)

OK
- Switch the modem into SMS Message Sending mode:
AT+CMGF=1
OK
- Enter the cellular number to send the SMS to as well as the message:
AT+CMGW="0661326109"

> This is a test message from a Gateworks Single Board Computer sending SMS.
>                    # hit ctrl+z to end SMS here

+CMGW: 9
- Note that after hitting ctrl+z CMGW shows a numerical number. This number is the ID of the SMS to be sent.
- Send the SMS message with the following command, where the number matches the ID from Step 4&5
AT+CMSS=9
OK
- OK Should appear after hitting enter for the send command. If ok appears, please check receiving handset. The 'from' number will be from whatever number is registered with the SIM.
Specific Modem Notes
Telit FN980 / FN980M 5G Modem
This is a 5G Modem by Telit that comes in the M.2 form factor.
View official Telit datasheet here
- The FN980 supports 5G FR1 and the FN980M supports 5G FR1 & FR2
- Support of 5G Sub-6 FDD and TDD and mmWave, support of SA & NSA operations, 5G core network Opt. 3a/3x and Option 2
- Made for North America, EMEA, APAC
- Use with Gateworks GW16140 or GW16141 M.2 Adapter. https://www.gateworks.com/products/mini-pcie-expansion-cards/gw1614x-mini-pcie-to-m2-adapter-card/
- Approvals: FCC, PTCRB, RED, GCF & More (consult datasheet)
- Supports USB 2.0, 3.0 and PCIe Gen3
- USB 3.0 is not supported on most Venice SBCs.
- USB 3.0 requires software configuration for some Newport SBCs newport/bootloader
- PCIe on the Qualcomm X55 chipset require a new MHI driver which is expected to be only ready in 5.13 kernels or newer
- PCIe ID: 17cb:0306
- Requires USB 2.0 to switch modem to PCIe mode with the following AT command: AT#USBPCISWITCH=1,<GPIO>,2 where GPIO is the GPIO assigned active low (tied to ground) pin used to select PCI Express enable.
- Theoretical throughput 5G up to 5.5 DL/1.5 UL Gbps
- Temperature -40 °C to +85 °C
- GNSS
- Uses QTY 4 MHP4 IPEX antenna ports. Can be used with GW16065
- No pinout concerns when using Gateworks GW16140/GW16141 M.2 adapters
- Ports: cdc-wdm0 (qmi), ttyUSB0 (unknown), ttyUSB1 (unknown), ttyUSB2 (at), ttyUSB3 (at), ttyUSB4 (unknown), wwan0 (net)
- Drivers:
- qmi_wwan, option1
- Board support
- Best used with modern kernel, 5.4 or newer and something like Ubuntu
- Venice SBCs (GW71xx, GW72xx, GW73xx) - Tested and validated working with USB 2.0 and GW16140 M.2 Adapter
- Newport SBCs (GW61xx, GW62xx, GW63xx, GW64xx) - Tested and validated with USB 2.0 (GW16140) and USB 3.0 (GW16141 Adapter)
- Ventana SBCs (GW5xxx) - Tested and validated working with USB 2.0 and GW16140 M.2 Adapter and Ubuntu Focal using 5.4 kernel
To start using this modem, connect it to a Gateworks SBC with the GW16140/GW16141 adapter in a Mini-PCIe slot that supports the preferred interface method (USB 2.0, USB 3.0, PCIe). Note that the SIM needs to be placed in the SIM1 slot on the GW1614x adapter. Do not place the SIM in the SIM slot on the SBC itself.
Verify the modem is detected with the lsusb command. Then use modem manager to bring the modem up with the following example:
mmcli -m 0 # Look for a large output of information about the modem
mmcli -m 0 enable
mmcli --modem 0 --simple-connect="apn=h2g2" #replace h2g2 with actual APN for SIM used
mmcli -m 0 -b 0 #review IP / gateway issued by ISP
ifconfig wwan0 30.33.135.135 #set IP for wwan0 from previous step
ifconfig wwan0 netmask 255.255.255.0 #confirm netmask
route add default gw 30.58.33.135 #set default gateway
echo "nameserver 8.8.8.8" > /etc/resolv.conf
echo "nameserver 8.8.4.4" > /etc/resolv.conf
CollapsibleStart(Full mmcli output example)
root@focal-newport:~# mmcli -m 0
  --------------------------------
  General  |            dbus path: /org/freedesktop/ModemManager1/Modem/0
           |            device id: 6c87fb8c02276464f83820b60feed1fce6f
  --------------------------------
  Hardware |         manufacturer: Telit
           |                model: FN980m
           |    firmware revision: M0H.020001
           |       carrier config: default
           |         h/w revision: 1.00
           |            supported: cdma-evdo, gsm-umts, lte, 5gnr
           |              current: gsm-umts, lte, 5gnr
           |         equipment id: xxxyyy
  --------------------------------
  System   |               device: /sys/devices/platform/soc@0/848000000000.pci/pci0000:00/0000:00:10.0/usb1/1-1/1-1.3
           |              drivers: qmi_wwan, option1
           |               plugin: telit
           |         primary port: cdc-wdm0
           |                ports: cdc-wdm0 (qmi), ttyUSB0 (unknown), ttyUSB1 (unknown),
           |                       ttyUSB2 (at), ttyUSB3 (at), ttyUSB4 (unknown), wwan0 (net)
  --------------------------------
  Status   |                 lock: sim-pin2
           |       unlock retries: sim-pin (3), sim-puk (10), sim-pin2 (3), sim-puk2 (10)
           |                state: connected
           |          power state: on
           |          access tech: lte
           |       signal quality: 97% (recent)
  --------------------------------
  Modes    |            supported: allowed: 2g; preferred: none
           |                       allowed: 3g; preferred: none
           |                       allowed: 4g; preferred: none
           |                       allowed: 2g, 3g; preferred: 3g
           |                       allowed: 2g, 3g; preferred: 2g
           |                       allowed: 2g, 4g; preferred: 4g
           |                       allowed: 2g, 4g; preferred: 2g
           |                       allowed: 3g, 4g; preferred: 4g
           |                       allowed: 3g, 4g; preferred: 3g
           |                       allowed: 2g, 3g, 4g; preferred: 4g
           |                       allowed: 2g, 3g, 4g; preferred: 3g
           |                       allowed: 2g, 3g, 4g; preferred: 2g
           |                       allowed: 5g; preferred: none
           |                       allowed: 2g, 5g; preferred: 5g
           |                       allowed: 2g, 5g; preferred: 2g
           |                       allowed: 3g, 5g; preferred: 5g
           |                       allowed: 3g, 5g; preferred: 3g
           |                       allowed: 4g, 5g; preferred: 5g
           |                       allowed: 4g, 5g; preferred: 4g
           |                       allowed: 2g, 3g, 5g; preferred: 5g
           |                       allowed: 2g, 3g, 5g; preferred: 3g
           |                       allowed: 2g, 3g, 5g; preferred: 2g
           |                       allowed: 2g, 4g, 5g; preferred: 5g
           |                       allowed: 2g, 4g, 5g; preferred: 4g
           |                       allowed: 2g, 4g, 5g; preferred: 2g
           |                       allowed: 3g, 4g, 5g; preferred: 5g
           |                       allowed: 3g, 4g, 5g; preferred: 4g
           |                       allowed: 3g, 4g, 5g; preferred: 3g
           |                       allowed: 2g, 3g, 4g, 5g; preferred: 5g
           |                       allowed: 2g, 3g, 4g, 5g; preferred: 4g
           |                       allowed: 2g, 3g, 4g, 5g; preferred: 3g
           |                       allowed: 2g, 3g, 4g, 5g; preferred: 2g
           |              current: allowed: 3g, 4g, 5g; preferred: 5g
  --------------------------------
  Bands    |            supported: utran-1, utran-3, utran-4, utran-6, utran-5, utran-8,
           |                       utran-9, utran-2, eutran-1, eutran-2, eutran-3, eutran-4, eutran-5,
           |                       eutran-7, eutran-8, eutran-12, eutran-13, eutran-14, eutran-17,
           |                       eutran-18, eutran-19, eutran-20, eutran-25, eutran-26, eutran-28,
           |                       eutran-29, eutran-30, eutran-32, eutran-34, eutran-38, eutran-39,
           |                       eutran-40, eutran-41, eutran-42, eutran-43, eutran-46, eutran-48,
           |                       eutran-66, eutran-71, utran-19
           |              current: utran-1, utran-3, utran-4, utran-6, utran-5, utran-8,
           |                       utran-9, utran-2, eutran-1, eutran-2, eutran-3, eutran-4, eutran-5,
           |                       eutran-7, eutran-8, eutran-12, eutran-13, eutran-14, eutran-17,
           |                       eutran-18, eutran-19, eutran-20, eutran-25, eutran-26, eutran-28,
           |                       eutran-29, eutran-30, eutran-32, eutran-34, eutran-38, eutran-39,
           |                       eutran-40, eutran-41, eutran-42, eutran-43, eutran-46, eutran-48,
           |                       eutran-66, eutran-71, utran-19
  --------------------------------
  IP       |            supported: ipv4, ipv6, ipv4v6
  --------------------------------
  3GPP     |                 imei: 3xxyy44
           |          operator id: 310410
           |        operator name: AT&T
           |         registration: roaming
  --------------------------------
  3GPP EPS | ue mode of operation: csps-2
  --------------------------------
  SIM      |            dbus path: /org/freedesktop/ModemManager1/SIM/0
  --------------------------------
  Bearer   |            dbus path: /org/freedesktop/ModemManager1/Bearer/0
root@focal-newport:~#
Troubleshooting
If a new modem is not detecting the SIM card, please try the following:
- Ensure the SIM is in SIM1 slot on the GW16140/GW16141 adapter
- Ensure the SIM is put in the SIM slot with the angle on the SIM card inserted first
- Ensure the SIM is activated and in a known working state with a stable and known working modem
- Run the following AT commands to disable the modem for SIM detection and hot swap (GW1614x does not have a SIM detect pin)
AT#SIMDET=0
AT#HSEN=0,0
AT#HSEN=0,1
Review other troubleshooting and examples on this wiki page. Also contact Gateworks technical support.
U-Blox Modems
GW16126 CATM1 Sara
This is a low bandwidth modem for IoT designs that Gateworks has created. Please read more on the GW16126 Wiki Page
Toby L2
Gateworks has tested the Toby MPCI-L201 in USA (Mini-PCIe form factor) (GW17046) https://www.u-blox.com/en/product/mpci-l2-series
- LTE Cat 4 - Up to 150Mb/s throughput
- Multiple countries supported with different model variants
- Industrial Temperature -40 to +85C Operation
- FOTA Support
- Drivers required
- cdc_acm driver provides ttyACM0(at) (/dev/ttyACM0)
- rndis_host driver provides usb0(net)
- Will create a network interface shown from the command: ifconfig -a
- No pinout concerns - PERST# and WLAN_DIS# are used and are 3.3V compliant, VDD is 3.0 to 3.6V
- Toby L2 Documentation: https://www.u-blox.com/en/product-resources?f%5B0%5D=property_file_product_filter%3A2451
- Purchasing:
- GW17046 - Gateworks Shop: https://shop.gateworks.com/index.php?route=product/product&product_id=228
- Antenna suggestion & adapter cable: GW16065 & GW10036
Ubuntu Notes:
- Tested on Gateworks Xenial and Bionic (Bionic requires installing network-manager)
- Uses modem manager and network manager
- Sample set of commands:
mmcli --modem 0 --enable
mmcli --modem 0 --simple-connect="apn=yourapnname"
dhclient usb0
- There will be an IP address assigned, something such as 192.168.1.100 to usb0. Test this using the ifconfig command (do not expect a WAN IP)
- Try first to ping an actual IP address, like 8.8.8.8 (in case DNS isn't working....)
- Then try a domain name, like www.yahoo.com
- If a domain name doesn't work, try adding a DNS like the Google DNS as follows and try the ping again:
echo "nameserver 8.8.8.8" > /etc/resolv.conf
- If a domain name doesn't work, try adding a DNS like the Google DNS as follows and try the ping again:
OpenWrt Notes:
- OpenWrt 16.02 and 18.02 have been tested
- OpenWrt 16.02 will show both usb0 and usb1 enumerated. usb1 should be used for the internet.
- Must set the APN via AT commands (Read more in the AT Command Manual)
Steps to establish connection using OpenWrt:
- Verify USB device is present:
lsusb |grep U-Blox
- Verify serial interface is present:
dmesg |grep ttyACM0
- Verify virtual adapter usb0 is present.
ls /sys/class/net
- Use UCI commands to configure interface:
uci set network.lan= # remove br-lan to avoid routing conflict
uci set network.wan=interface
uci set network.wan.proto=dhcp
uci set network.wan.ifname=usb0
uci commit network
- Refresh network interfaces
/etc/init.d/network restart
Using STTY/cat/echo enter these AT commands, more details here:
- Configure STTY echo:
stty -F /dev/ttyACM0 ignbrk -brkint -icrnl -opost -onlcr -isig -icanon -iexten -echo -echoe -echok -echoctl -echoke
- Configure STTY cat:
cat /dev/ttyACM0 & - Verify you can communicate with modem using AT commands:
echo -n -e "ATI\r" > /dev/ttyACM0
- Verify modem IP configuration
echo -n -e "at+uipconf?\r" > /dev/ttyACM0
# Example output: +UIPCONF: "192.168.1.1","255.255.255.0","192.168.1.100","192.168.1.100","fe80::fce7:5fff:fe5b:34e/64"
- Detach the modem from the network:
echo -n -e "AT+CFUN=4\r" > /dev/ttyACM0
- Set APN (default IOT device APN used in this example):
echo -n -e "AT+UCGDFLT=1,"IP","m2m.com.attz"\r" > /dev/ttyACM0
echo -n -e "AT+UCGDFLT?\r" > /dev/ttyACM0 #to verify
- Re-connect to network:
echo -n -e "AT+CFUN=1\r" > /dev/ttyACM0
- Verify network parameters, a dynamically assigned IP address should be displayed:
echo -n -e "at+cgdcont?\r" > /dev/ttyACM0
This completes the configuration process, you may need to reset you device, otherwise perform ping test. Name resolution may need to be set.
Sierra Wireless Modems
Please check with Sierra Wireless for availability and EOL status
Nimbelink NL-SW-LTE-TSVG / Telit LE910-SVG
* Still in testing, contact support@… *
- Details
- 4G LTE CAT 3
- Pre-Certified Verizon Modem
- 100Mbps download and 50Mbps upload speeds
- Carriers
- USA : Verizon
- USB ID 1bc7:1201 Telit Wireless Solutions
Drivers:
- option.ko (CONFIG_USB_SERIAL_OPTION) exposes 5 serial ports:
/dev/ttyUSB0- qcdm/dev/ttyUSB1- at/dev/ttyUSB2- f/dev/ttyUSB3- at/dev/ttyUSB4-
- qmi_wwan (USB_NET_QMI_WWAN) exposes network interface and QMI interface:
/dev/cdc-wdm0- control (QMI)
Links:
Nimbelink Module
Mini-PCIe Carrier Board for Nimbelink Module
Troubleshooting
Here are some troubleshooting tips with regards to cellular modems:
- Make sure your modem is being recognized on the USB bus with
lsusb- if not, check that the USB bus is correctly steered to the miniPCIe socket the modem is installed in (see the USB Steering wiki page)
- Make sure the modem supports USB 2.0
- Check the modem pinout and ensure that it is compatible with PCIe signalling if used on a miniPCIe socket with PCIe (Sierra Wireless -V modems can not have the PERST# signal at 3p3V - see here)
- Does your modem require a driver or driver update that is not available in the Linux kernel version you are using?
- A
lsusbwill show the Vendor ID and Product ID of your device which typically need to match known ID's in drivers (some newer devices match USB class ID's and are more forgiving) - Look at the kernel messages from the
dmesgcommand for messages that might indicate a modem is not supported or lack of a known driver supporting that device. Most modem drivers will create a number of 'tty' devices in /dev/tty* - if you see no messages about this you may be missing driver support.
- A
- Make sure no other processes are interacting with your M2M device communication ports (ie mis-configured
gpsd) - Is your GSM module locked to a Carrier/Network/SIM/PIN? - if so you have to unlock it (if possible/allowed)
- Is your module in low-power / airplane mode?
- Can you not send AT commands to a card? Try hotswapping the card
- Is your modem a Sierra Wireless *-V modem with Voice audio capabilities? See below
- Have you specified the correct APN for your GSM module? - Your carrier can provide you with the proper APN
- Are you using the correct serial device? - most modules provide several, not all of which can be used with
pppd/chat/gcom - Is your CDMA/EVDO module 'activated'? - you may need to do this on a Windows system with vendor-supplied application/drivers
- Issue a reset command to the card when starting up (varies by card)
[ -e /dev/ttyUSBX ] && echo -e -n "AT~RESET\r" > /dev/ttyUSBX
- There cannot be two routes to the internet. This means if the modem is connecting to the internet, and eth0 is also connected to a network with an internet, this will cause conflict. Only one interface in the routing table can connect to the internet. Thus, it can be important to check other interfaces, such as eth0, and ensure they are not configured to connect to a WAN / or to a gateway.
For low level troubleshooting it may be useful to use a serial comm program (such as screen) to connect to the M2M device control port and issue AT commands directly:
- AT+CREG? will return your network registration state: 0 - registered to home network, 1 - roaming, -1 not registered
- AT+COPS? will return the operator selection: <mode>[,<format>,<operator>
See http://ernstagn.home.xs4all.nl/GPRS-HOWTO/GPRS-HOWTO.html for more info
General Reference:
- AT Commands (Note GSM 07.07, GSM 07.05, V.25ter and T.32 specifications can be obtained from http://www.etsi.org or http://www.3gpp.org)
- http://www.sierrawireless.com/Support/Downloads/AirPrime/SL_Series/~/media/Support_Downloads/AirPrime/Software/2130617%20AirCard-AirPrime%20Supported%20AT%20Commands%20v4.ashx AT Command Reference for AirCard-AirPrime Modems
- http://www.canarysystems.com/nsupport/CDMA_AT_Commands.pdf
AT Commands
Many cellular modems use AT commands for control. Examples shown on this page are a quick and easy way to issue commands, however, no responses can be seen. While many model and brands use similar AT commands you need to contact the modem vendor or search the Internet for a complete list for that particular brand and model.
To get to a console where AT commands and their responses can be seen, a serial program needs to be used, such as minicom or screen.
For AT commands, the correct port must be used. It will be one of the enumerated ports such as /dev/ttyUSB0, /dev/ttyUSB1, /dev/ttyUSB2, /dev/ttyUSB3, etc
screen /dev/ttyUSB3
This will open a window where one can start typing AT commands. Example shown below:
at+cgmi
Sierra Wireless, Incorporated

OK
at+cgmm
MC7700

OK
at+csq
ERROR
To send AT Commands from the Linux Shell, use echo with -e -n and terminate with \r. Example below:
echo -e -n "at+cfun=1\r" > /dev/ttyUSB3
Resetting a Modem with AT Commands
The following AT commands can be used to perform a soft reset on particular modems:
- ZTE:
AT+ZRST
- Sierra Wireless:
or
AT!RESET
AT+CFUN=1,1
- Huawei and others:
AT+CFUN=4
AT+CFUN=6
Consult your modem documentation for AT commands for that device and firmware.
Reset for SIM Read
Most Modem firmware will only check a SIM on power-up. If a SIM is activated or inserted after the cellular card is powered, the cellular may need to be re-powered or re-initialized to recognize the SIM. While each modem likely has a unique way to do this via an AT command, a QMI command, or an MBIM command resetting the modem is always another option.
Refer to the USB reset wiki page for details on how to do this on various boards and miniPCIe sockets.
Testing a Connection
A quick way to verify the module has connected up to the cellular carrier and has received an IP address is to run the ifconfig command from the Linux console. The following is an example output, note the 3g-wan entry, this will not show up if a connection has not been established. In this example 32.177.140.183 is the IP address. Once a connection is established, you should also be able to ping to the internet.
root@OpenWrt:/# ifconfig
3g-wan    Link encap:Point-to-Point Protocol
          inet addr:32.177.140.183  P-t-P:10.64.64.64  Mask:255.255.255.255
          UP POINTOPOINT RUNNING NOARP MULTICAST  MTU:1500  Metric:1
          RX packets:70 errors:0 dropped:0 overruns:0 frame:0
          TX packets:72 errors:0 dropped:0 overruns:0 carrier:0
          collisions:0 txqueuelen:3
          RX bytes:5842 (5.7 KiB)  TX bytes:5000 (4.8 KiB)

br-lan    Link encap:Ethernet  HWaddr 00:0C:E3:70:DA:17
          inet addr:192.168.1.1  Bcast:192.168.1.255  Mask:255.255.255.0
          inet6 addr: fe80::20c:e3ff:fe70:da17/64 Scope:Link
          UP BROADCAST RUNNING MULTICAST  MTU:1500  Metric:1
          RX packets:0 errors:0 dropped:0 overruns:0 frame:0
          TX packets:4 errors:0 dropped:0 overruns:0 carrier:0
          collisions:0 txqueuelen:0
          RX bytes:0 (0.0 B)  TX bytes:408 (408.0 B)

eth0      Link encap:Ethernet  HWaddr 00:D0:12:56:EE:6A
          UP BROADCAST MULTICAST  MTU:1500  Metric:1
          RX packets:0 errors:0 dropped:0 overruns:0 frame:0
          TX packets:2 errors:0 dropped:0 overruns:0 carrier:0
          collisions:0 txqueuelen:1000
          RX bytes:0 (0.0 B)  TX bytes:168 (168.0 B)

lo        Link encap:Local Loopback
          inet addr:127.0.0.1  Mask:255.0.0.0
          inet6 addr: ::1/128 Scope:Host
          UP LOOPBACK RUNNING  MTU:16436  Metric:1
          RX packets:61 errors:0 dropped:0 overruns:0 frame:0
          TX packets:61 errors:0 dropped:0 overruns:0 carrier:0
          collisions:0 txqueuelen:0
          RX bytes:6044 (5.9 KiB)  TX bytes:6044 (5.9 KiB)

mon.wlan0 Link encap:UNSPEC  HWaddr 00-0C-E3-70-DA-17-00-00-00-00-00-00-00-00-00-00
          UP BROADCAST RUNNING MULTICAST  MTU:1500  Metric:1
          RX packets:1 errors:0 dropped:0 overruns:0 frame:0
          TX packets:0 errors:0 dropped:0 overruns:0 carrier:0
          collisions:0 txqueuelen:32
          RX bytes:145 (145.0 B)  TX bytes:0 (0.0 B)

wlan0     Link encap:Ethernet  HWaddr 00:0C:E3:70:DA:17
          UP BROADCAST RUNNING MULTICAST  MTU:1500  Metric:1
          RX packets:0 errors:0 dropped:0 overruns:0 frame:0
          TX packets:7 errors:0 dropped:0 overruns:0 carrier:0
          collisions:0 txqueuelen:32
          RX bytes:0 (0.0 B)  TX bytes:772 (772.0 B)

root@OpenWrt:/# ping google.com
PING google.com (74.125.224.71): 56 data bytes
64 bytes from 74.125.224.71: seq=0 ttl=51 time=176.596 ms
64 bytes from 74.125.224.71: seq=1 ttl=51 time=166.074 ms
64 bytes from 74.125.224.71: seq=2 ttl=51 time=155.902 ms
^C
--- google.com ping statistics ---
3 packets transmitted, 3 packets received, 0% packet loss
round-trip min/avg/max = 155.902/166.190/176.596 ms
SIM Card use on PCI Express form-factor modems
PCI Express form-factor GSM Modems require SIM (Subscriber Identity Module) cards in order to connect to the providers network. There are several different methods for accessing SIM cards depending on hardware:
- Most Ventana and Newport boards have SIM slots on the boards, see example here for how to insert, including pictures.
- Some modems have a SIM slot on them (Gateworks GW16126)
- Others use sideband signals on the PCIe connector that route to an external SIM slot:
- The GW16103 Mini-PCIe SIM, uSD and USB expansion board can be used to provide SIM support for boards with Mini-PCIe sockets.
- The GW16038/GW16062 carriers can be used in specific slots of the Gateworks Laguna product families.
Other important notes about SIM:
- Given limited data plans, consider turning off automatic updates. This will vary depending on the OS, but for example some discussion on Ubuntu happens here
- SIMs are available for many carriers. In the USA this includes AT&T, Verizon, etc. Some modems are carrier dependent.
CollapsibleStart(MiniPCI Information)
MiniPCI to Mini-PCIe Multiple SIM Card Access
Gateworks has several mini-PCI to PCI Express Mini Card adapters specifically designed for PCI Express Mini Card Standard GSM/GPRS/EDGE/UMTS/HSPA wireless radio modules on the Laguna platforms:
- GW16049 - USB routed, No SIM connectors (Can't be used for GSM Modules)
- GW16038 - USB routed, has SIM connectors
- GW16059 - PCIe and USB routed, No SIM connectors (Can't be used for GSM Modules)
- GW16062 - PCIe and USB routed, has SIM connectors
- GW17005 - SIM carrier for cellular cards without SIM or boards with PCIe slots (ie. GW2380, GW23882, GW2383, GW2391)
The GW16038/GW16062 carriers have 3 SIM connector sites (labeled USIMA, USIMB, USIMC) which can be selected depending on jumper position and software controlled GPIO steering. Jumper block W1 can set SEL0/SEL1 signals low/high or GPIO controlled. The card selection is shown in a table on the PCB silkscreen. You can set the jumpers to a specific SIM connector or allow 2 GPIO signals from the baseboard to select the location (useful for example in a product that needs to select a specific SIM based on other criteria such as geographic location).
Note that the GSMSEL0 and GSMSEL1 GPIO's differ per board which can be found in the board's User Manual but are summarized here for convenience:
- Laguna GW2388-x (Bottom MiniPCI socket J4):
- GPIO7 - GSMSEL0
- GPIO8 - GSMSEL1
- Laguna 2382
- Turn on USB by enabling GPIO10 as noted in the troubleshooting section above #Troubleshooting:
Examples:
- Laguna GW2388 using bottom-right miniPCI socket for GSM radio - select SIM site:
echo 1 > /sys/class/gpio/gpio7/value; echo 1 > /sys/class/gpio/gpio8/value  ;# sel SELE1/SEL0 1,1 for SIMC
echo 1 > /sys/class/gpio/gpio7/value; echo 0 > /sys/class/gpio/gpio8/value  ;# sel SELE1/SEL0 1,0 for SIMB
echo 0 > /sys/class/gpio/gpio7/value; echo 1 > /sys/class/gpio/gpio8/value  ;# sel SELE1/SEL0 0,1 for SIMA
echo 0 > /sys/class/gpio/gpio7/value; echo 0 > /sys/class/gpio/gpio8/value  ;# sel SELE1/SEL0 0,0 for None
Images:
- GW16062 showing SIM card insertion

- GW16038 showing SIM card selection jumper block

Other Helpful Links
USB to Mini-PCIe Modem Adapters
These can be very useful for debugging with a desktop or laptop.
They can be acquired from third parties such as Amazon, Newegg, etc
Be mindful to look to see if the adapter also has a SIM slot.


Mini-PCIe to M.2 Modem Adapters
Many modems of the future are coming in the M.2 form factor. Gateworks uses Mini-PCIe slots, but M.2 adapters can be used, as described on the M.2 Wiki Page
Linux USB Auto-suspend
USB autosuspend is problematic with several embedded SoC's due to host controller chip errata. This is the case for both the i.MX6 on Ventana and the CN80XX on Newport. To work around these errata we find it safest to just disable USB autosuspend with a kernel command-line argument of 'usbcore.autosuspend=-1'. This is done in several of our bootscripts.
USB Modems are especially susceptible to USB auto-suspend issues as they can detach from the USB bus automatically once or twice while powering up.
Attachments (17)
- 16062.JPG (113.2 KB ) - added by 8 years ago.
- 20131029_083627.jpg (2.6 MB ) - added by 8 years ago.
- 3ggraphic.png (136.8 KB ) - added by 8 years ago.
- Option_SIM.jpg (55.8 KB ) - added by 8 years ago.
- gw17005.jpg (53.8 KB ) - added by 8 years ago.
- modem1.jpg (118.6 KB ) - added by 8 years ago.
- modem2.jpg (155.9 KB ) - added by 8 years ago.
- modem3.jpg (219.8 KB ) - added by 8 years ago.
- modem4.jpg (133.2 KB ) - added by 8 years ago.
- usbtominipcietop.jpg (310.2 KB ) - added by 7 years ago.
- usbtominipciebottom.jpg (315.7 KB ) - added by 7 years ago.
- modem-tape-small.png (387.4 KB ) - added by 6 years ago.
- modemresistors.png (144.0 KB ) - added by 6 years ago.
- small-select-cellular.jpg (77.3 KB ) - added by 4 years ago.
- CELLULAR-wiki-slide-banner.jpg (144.6 KB ) - added by 2 years ago.
- CELLULAR-wiki-slide-bannerv2.jpg (144.5 KB ) - added by 18 months ago.
-
ATT_Approval.pdf
(73.0 KB
) - added by 7 weeks ago.
ATT PTCRB Approval
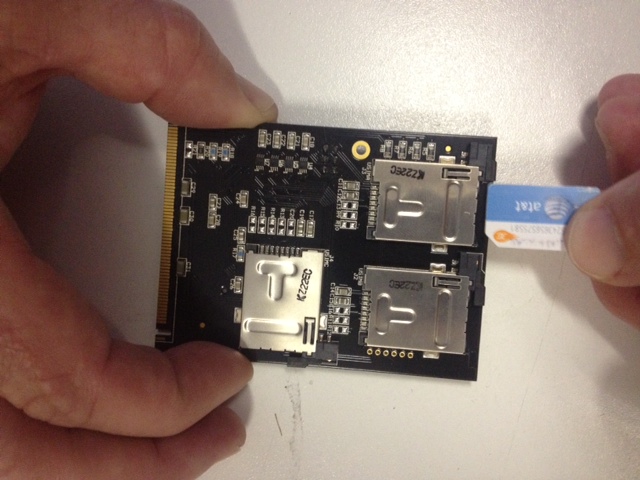
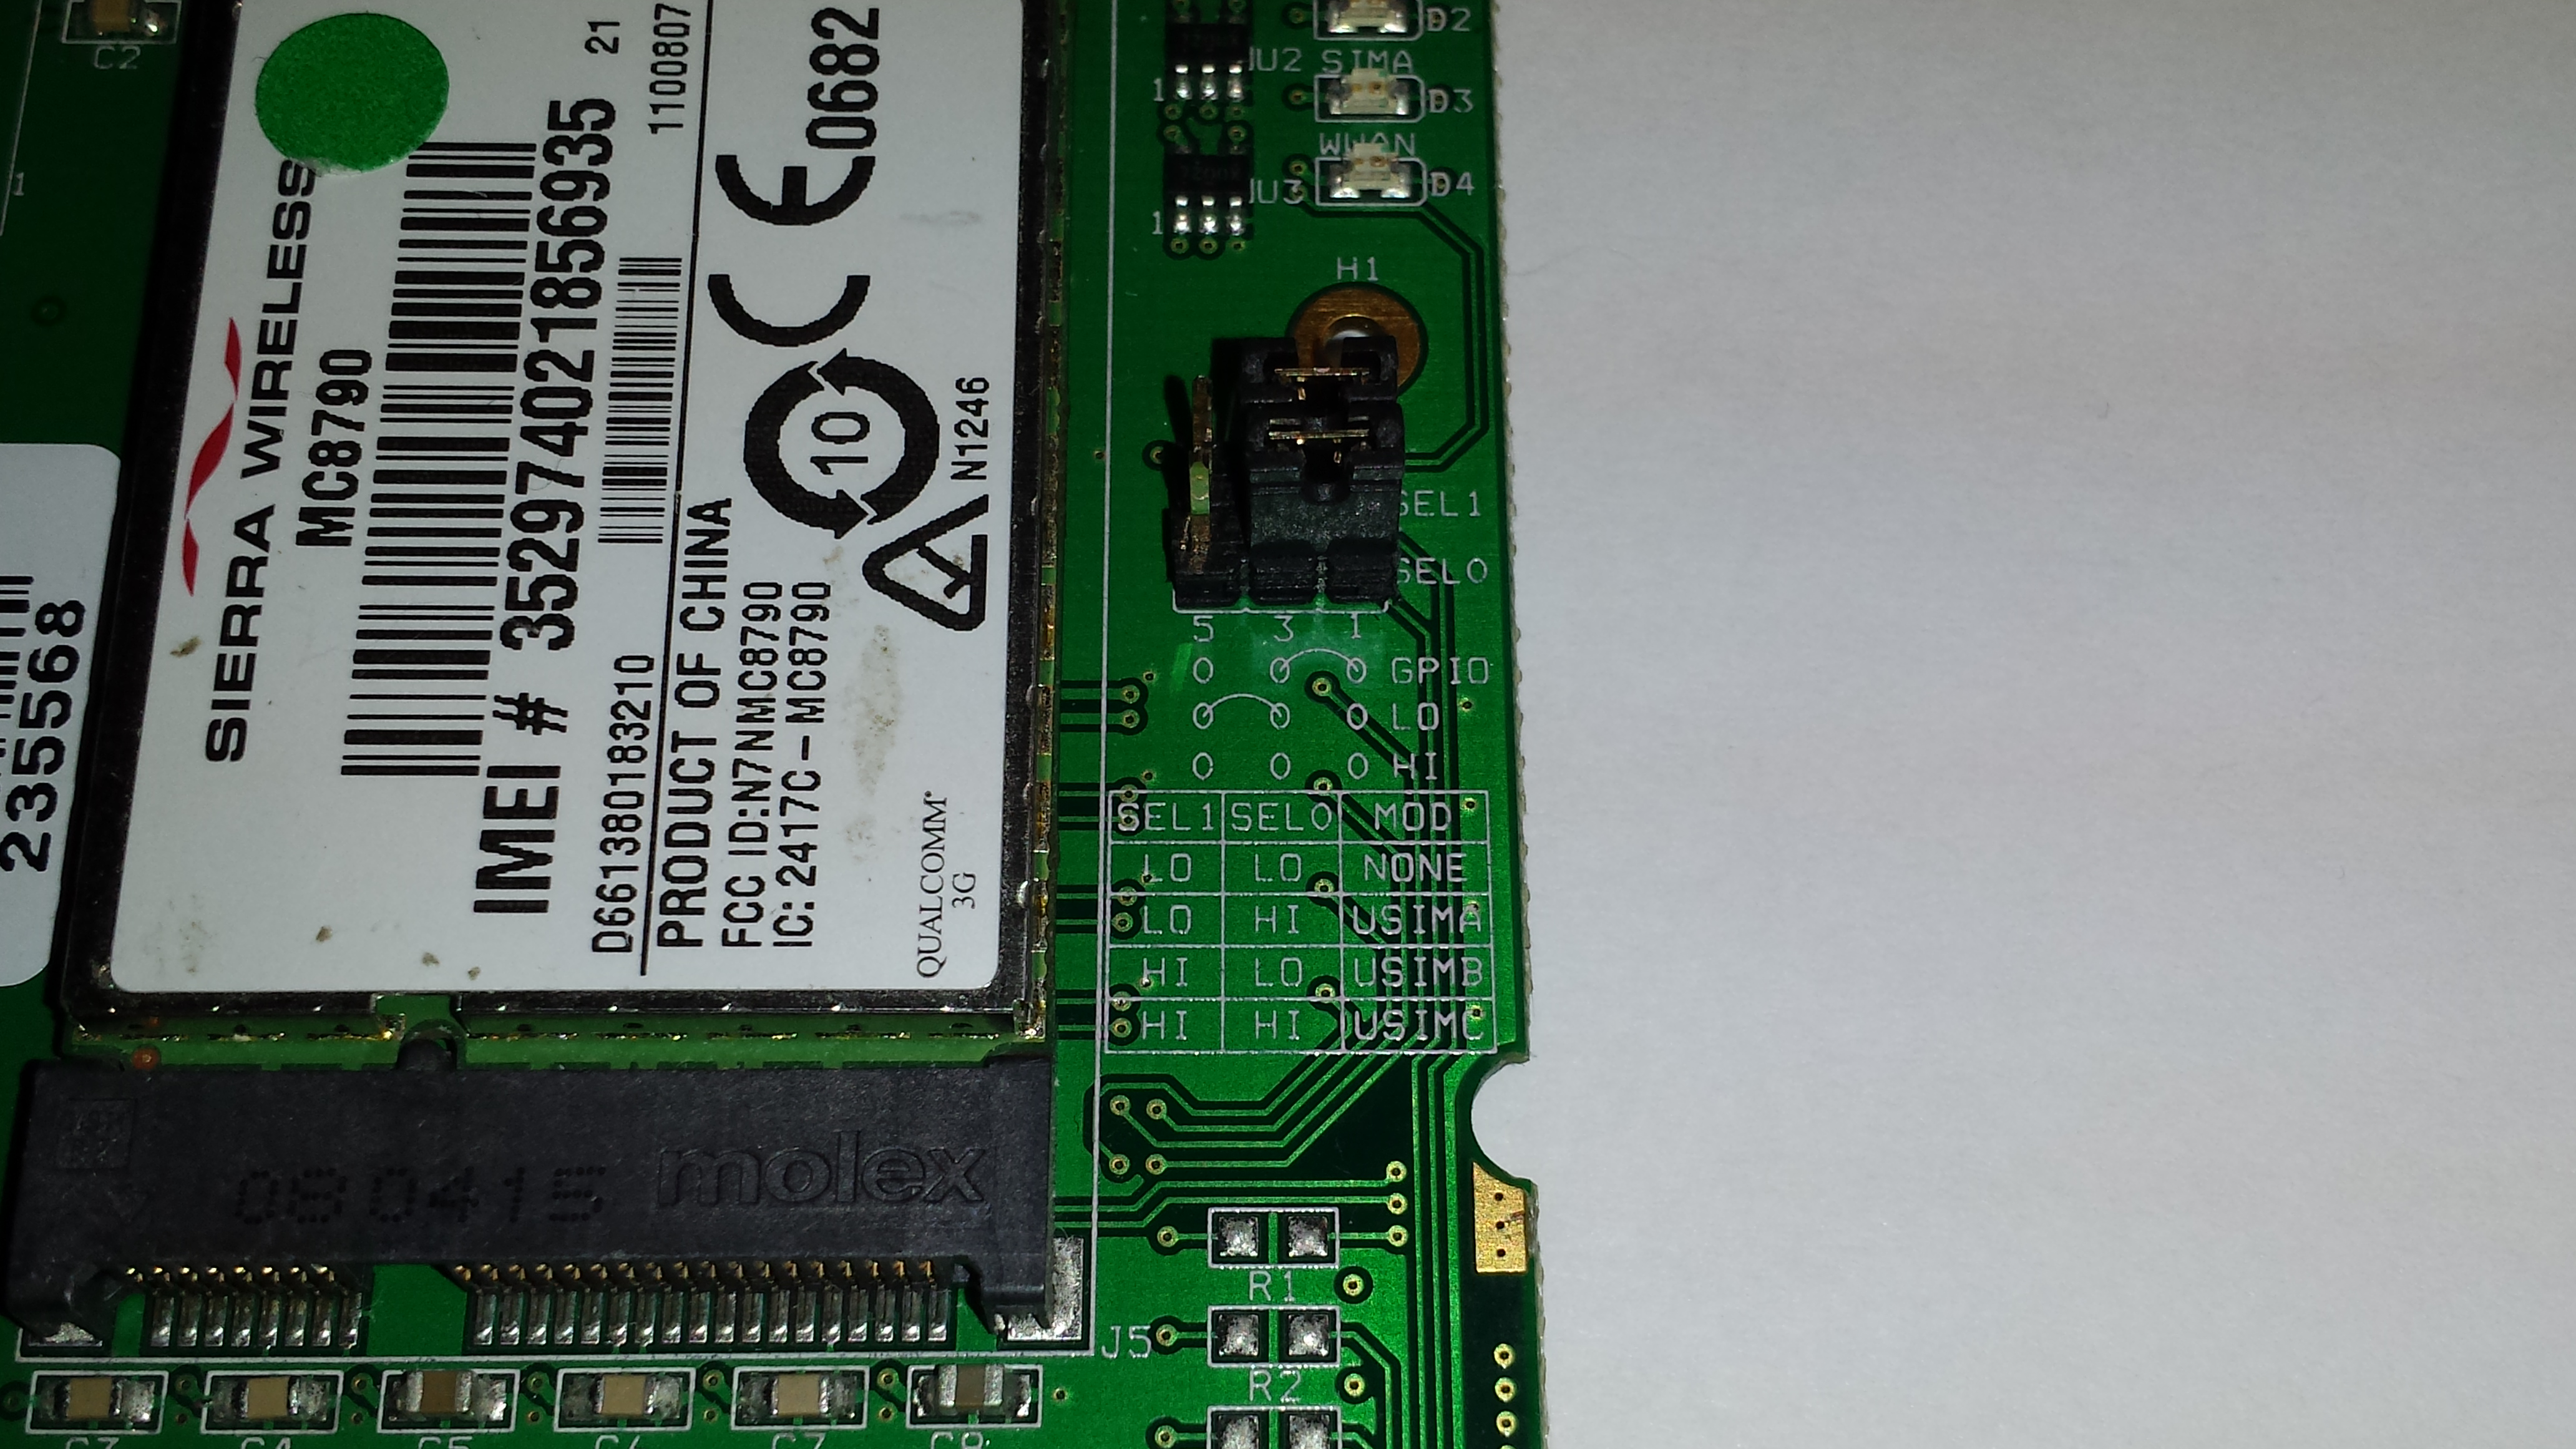
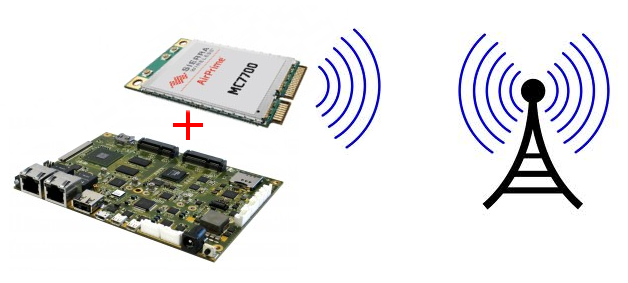
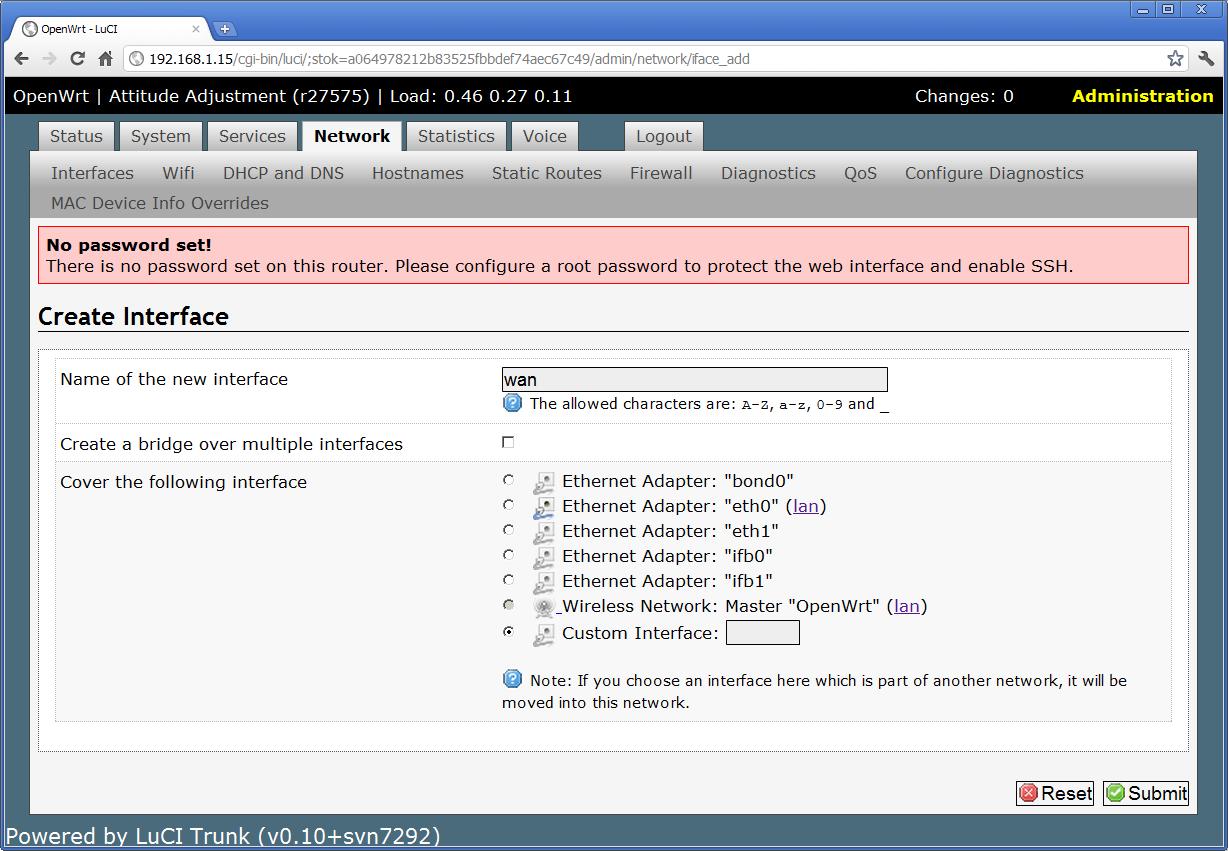
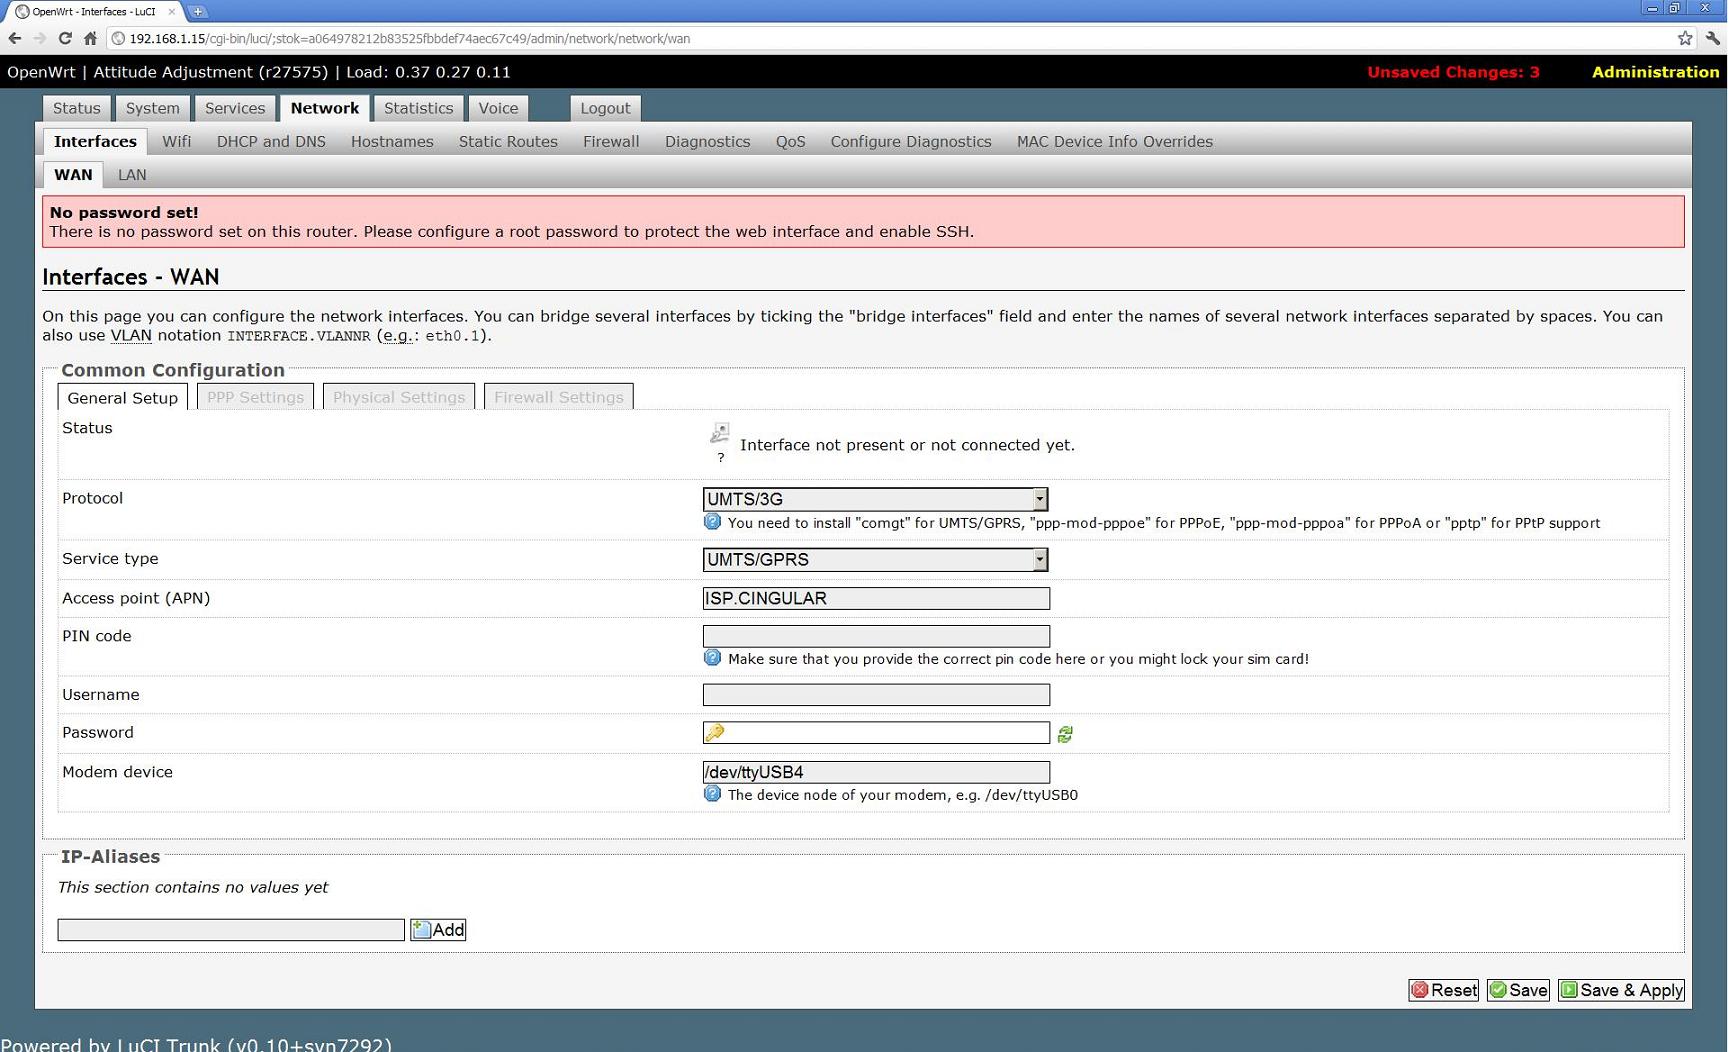
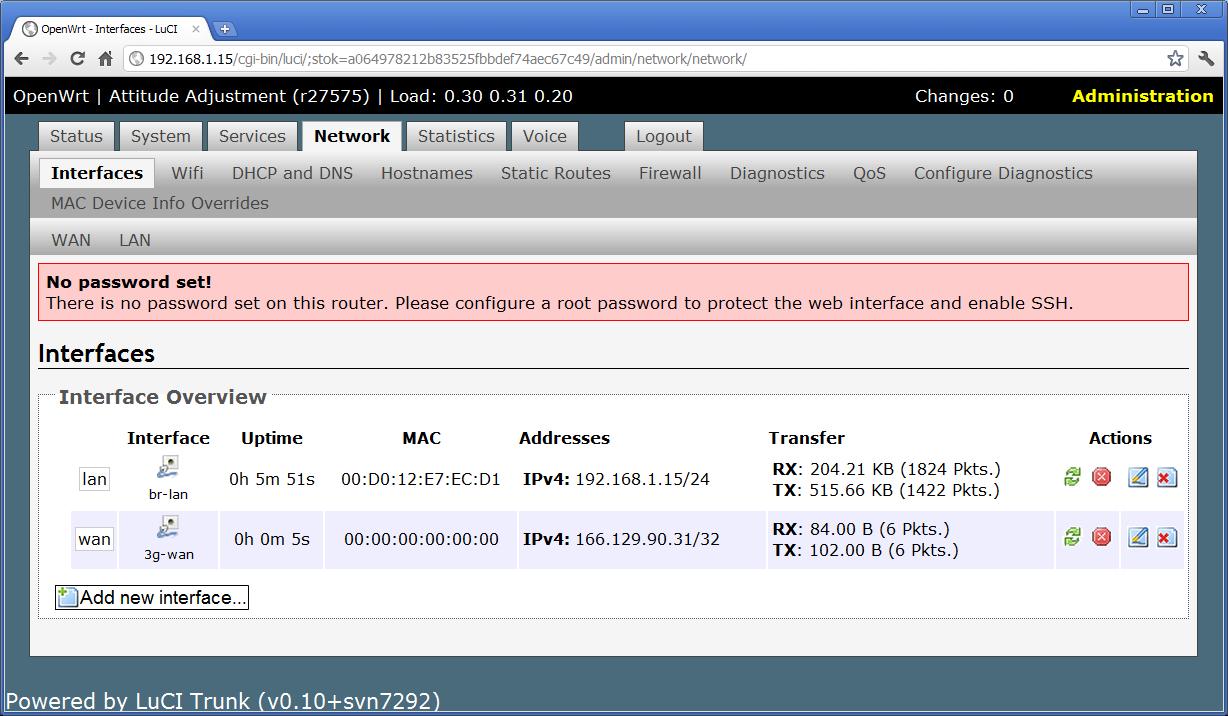
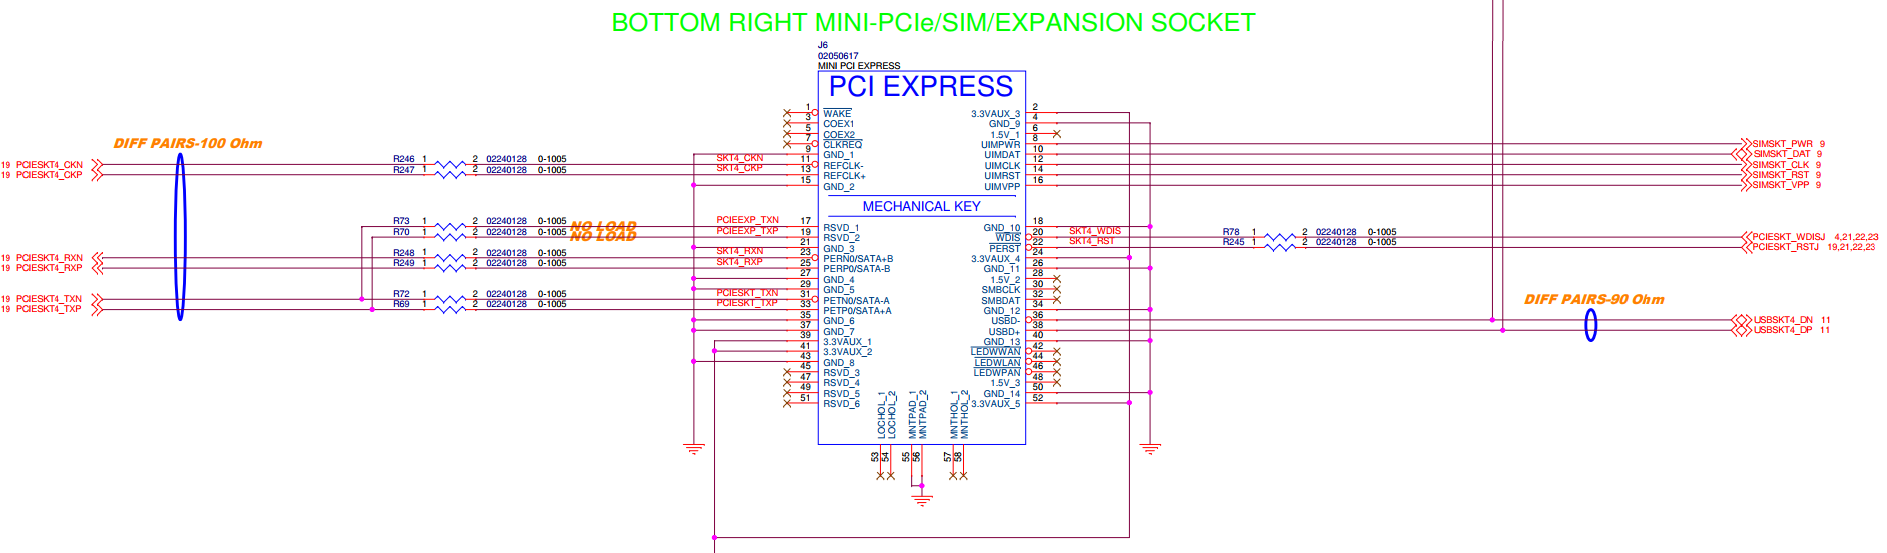
Download all attachments as: .zip