| Version 9 (modified by , 6 years ago) ( diff ) |
|---|
Enclosures
Gateworks sells a variety of enclosures on their online shop seen here: http://shop.gateworks.com/index.php?route=product/category&path=76
Indoor Ventana Enclosures
Installation Instructions
- Heatsink
- The enclosures are designed to heatsink the processor on the SBC to the metal enclosure for better heat dissipation. This is optional and a choice of the customer. The enclosure is supplied with a solid aluminum block. To use this, remove any heatsink currently on the processor and replace with the aluminum block heatsink as shown in the picture below:

- Mounting SBC
- Remove front plate of enclosure and pull out bottom plate that has standoffs on it.
- Place the board 'upside down' on the standoffs and screw in 4 screws as shown below

- Remove front plate of enclosure and slide in bottom plate and board as shown below:
- Re-attach front plate and see the final product:
Din Rail Clip
The Ventana Indoor enclosures can be fitted with a DIN Rail clip
Two holes have been slightly punched to allow for customer drilling.
Din Rail Clip: GW10092
Screws to mount to enclosure are DIN74-Am4 which means a 90Deg countersink, with 4mm Metric screw. These can be seen here: Example Screw
Drill bit size: 11/64th or #18 drill bit
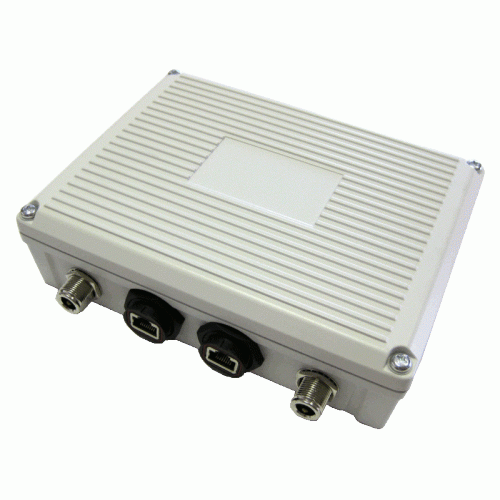
Gateworks GW3021 IP67 Outdoor Enclosure
The GW3021 enclosure is IP67 rated enclosure for outdoor installations of Gateworks 4x4 and 4x6 Laguna, Newport and Ventana network processing boards. The GW3021 provides complete protection against the ingress of dust (6) and water when immersed to 1m for up to 30 minutes (7). The enclosure includes four antenna connectors and two shielded weatherproof RJ-45 Ethernet connectors. The antenna connectors are located at the four corners to increase spatial diversity and decrease RF grounding to the mounting mast. Power is supplied to the unit through the Ethernet connector using a passive PoE injector or PoE power supply. The enclosure includes a pole mount bracket, processor heat sink and a long life, ball bearing fan to reduce thermal hot spots by circulating the air inside the enclosure. The enclosure comes fully assembled and ready to go with all mounting hardware.
- Note fan connector was designed for Laguna SBCs. For other board families, please cut wires and install appropriate connector. The fan is a standard 5V DC fan and can be used with PWM or just directly powered by 5.0V. The fan will require around 50mA so just connecting to a DIO with PWM ability will not work, one would need to add in a FET if they are going to PWM the fan. The alternative is to just connect the fan directly to 5V. Contact Gateworks support to find out if and where 5V is available on the SBC that is being used.
- Note: GW10091 Adapter plate required for Ventana/Newport SBCs, shown below
Gateworks IP67 Outdoor Enclosure with Ventana / Newport GW10091 Adapter Plate
Below is the GW10091 adapter plate mounted in the Outdoor Enclosure.
A few items to note:
- The holes drilled closest to the edge on the far right are on the opposite side as the fan
- The holes drilled closest to the edge on the bottom face the ethernet ports.
- There is no spacer to be used between the GW10091 mounting plate and the actual enclosure.
- The Gateworks board should be mounted with ethernet ports on the bottom
Labels
There are scenarios where a label / sticker can be applied to the standard Gateworks indoor enclosures for company branding.
In the past, Gateworks customers have used labels with the following properties:
- Label Material: Textured Polycarbonate Laminate - scratch resistant, scuff resistance and UV resistance.
- Adhesive: Permanent Adhesive
- Thickness: 6mm total
- Corners: Square, NON-Rounded
- Size: Measured to fit on top panel of enclosures. Size will vary depending on enclosure size, taken into account the corner pieces.
- Vendor: https://www.lolareddesign.com/
Attachments (10)
- enclosure.jpg (88.3 KB ) - added by 8 years ago.
- enclosuredinholes.jpg (78.4 KB ) - added by 8 years ago.
- enclosurefront.jpg (335.8 KB ) - added by 8 years ago.
- enclosureheatsink.jpg (130.7 KB ) - added by 8 years ago.
- enclosureopencase.jpg (120.9 KB ) - added by 8 years ago.
- enclosuresplitopen.jpg (380.4 KB ) - added by 8 years ago.
- enclosurestandoffs.jpg (352.2 KB ) - added by 8 years ago.
- gw3021.gif (71.9 KB ) - added by 8 years ago.
- mountplate.jpg (149.1 KB ) - added by 8 years ago.
- ventanamountingplate.png (621.7 KB ) - added by 8 years ago.
Download all attachments as: .zip


