| Version 16 (modified by , 4 years ago) ( diff ) |
|---|
Amit MDG100 and MGD200
MDG100 and MGD200 are designed as a socket modem using a mini-PCIe form factor via USB 2.0 interface, perfect for use with Gateworks SBC's. This product has cellular capability with WCDMA and LTE Cat4 and also support GNSS receiver for location information. The device offers an OS-ready NIC interface (Option1 driver in Linux) and a friendly web-based GUI for parameter setting and status checking. Best of all it's PTCRB certified as an end device so no additional testing is required by ATT/Verizon!
Please consult sales for specific certifications and part SKUs. The MDG100 and MDG200 are the same systems with the following differences:
- The MDG100 has only Verizon certification. It's available in mPCIe and PCIe form factor.
- *Recommended* The MDG200 has AT&T, Verizon, PTCRB certification. It's available in mPCIe, M.2, and PCIe form factor.
- Gateworks sells the MDG200 as a GW17050 (Purchase Here)
- MDG200 Amit Manufacturer Page - Datasheet and more
Certification
- AT&T Visit URL Here
- Verizon Visit URL Here
Materials
To follow this wiki you will need the following materials:
- AMIT MDG100 Modem, or the AMIT MGD200 Modem
- A SIM card (a Hologram SIM is used in the examples) Hologram Page
- At least 1 antenna (In the example Pulse W3907XXXX was used) Pulse Page
- A Gateworks single board computer (SBC)
Hardware setup
MDG100
Install the SIM on the backside of the modem, the bracket slides then opens like a book. Pads on the SIM face contacts on the carrier, close then slide to lock in place. Attach your antennas, the modem PCB is labeled next to the U.FL connectors, look for the box labeled "CON1" (a jewelers loop may be required to read).
Connect the board to your Gateworks SBC, preferably in a modem designated slot.
Configure your SBC with the latest Ubuntu image (in the example Newport-Focal was used).
MDG200
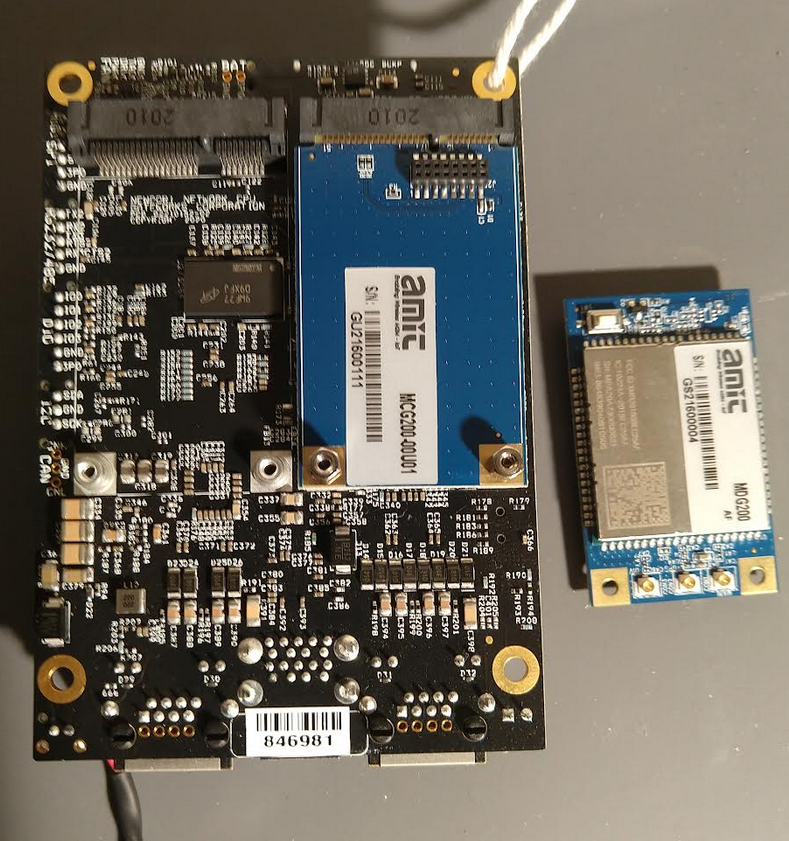
This Modem consists of two pieces, a mPCI-e adapter board, and the modem itself.
To install, insert your SIM into the bottom side of the modem.
Attach the adapter board to your SBC with the hex screws as shown below:
Plug the modem into the connector and screw it down to the baseboard:
Finally attach your antennas.
Antennas
- QTY 2 I-PEX connector for external LTE antenna
- QTY 1 I-PEX connector for external GPS antenna
Gateworks sells the GW16065 cellular antenna and the GW10036 pigtail.
Software configuration
The Gateworks board is incapable of displaying when used in a headless configuration. The Amit modem requires some configuration using it's webUI, in order to do this from the board port forwarding is required.
Gain Access to the Amit webUI
Install nftables:
apt-get update
apt install nftables -y
Enable port forwarding:
systemctl enable nftables.service
systemctl start nftables.service
sysctl net.ipv4.ip_forward
sed -i 's/#net.ipv4.ip_forward=1/net.ipv4.ip_forward=1/g' /etc/sysctl.conf
Verify port forwarding is now enabled:
sysctl -p
Configure nftables to pass traffic from modem webUI to Gateworks SBC port so it can be interfaced with on a desktop:
nft flush ruleset
nft add table nat
nft 'add chain nat postrouting { type nat hook postrouting priority 100 ; }'
nft 'add chain nat prerouting { type nat hook prerouting priority -100; }'
nft 'add rule nat prerouting iif eth0 tcp dport { 0-9000 } dnat 172.16.0.1'
nft add rule nat postrouting masquerade
Bring the modem interface up:
ifconfig usb0 up
dhclient usb0
Configure the modem using the WebUI
Acquire the ip address of eth0 (not the modem). Using a workstation on the same subnet, open a browser then enter the ip address of eth0 on the Gateworks SBC. Login using username "admin", password "admin".
To enable AT/NEMA select administrator>manager, "at/nema", tick the enable box then save.
Set mode to NAT, setup>network>device-mode use the drop-down then select NAT then save.
http://trac.gateworks.com/attachment/wiki/wireless/modem/AMITMDG100/amitbaseboard.png
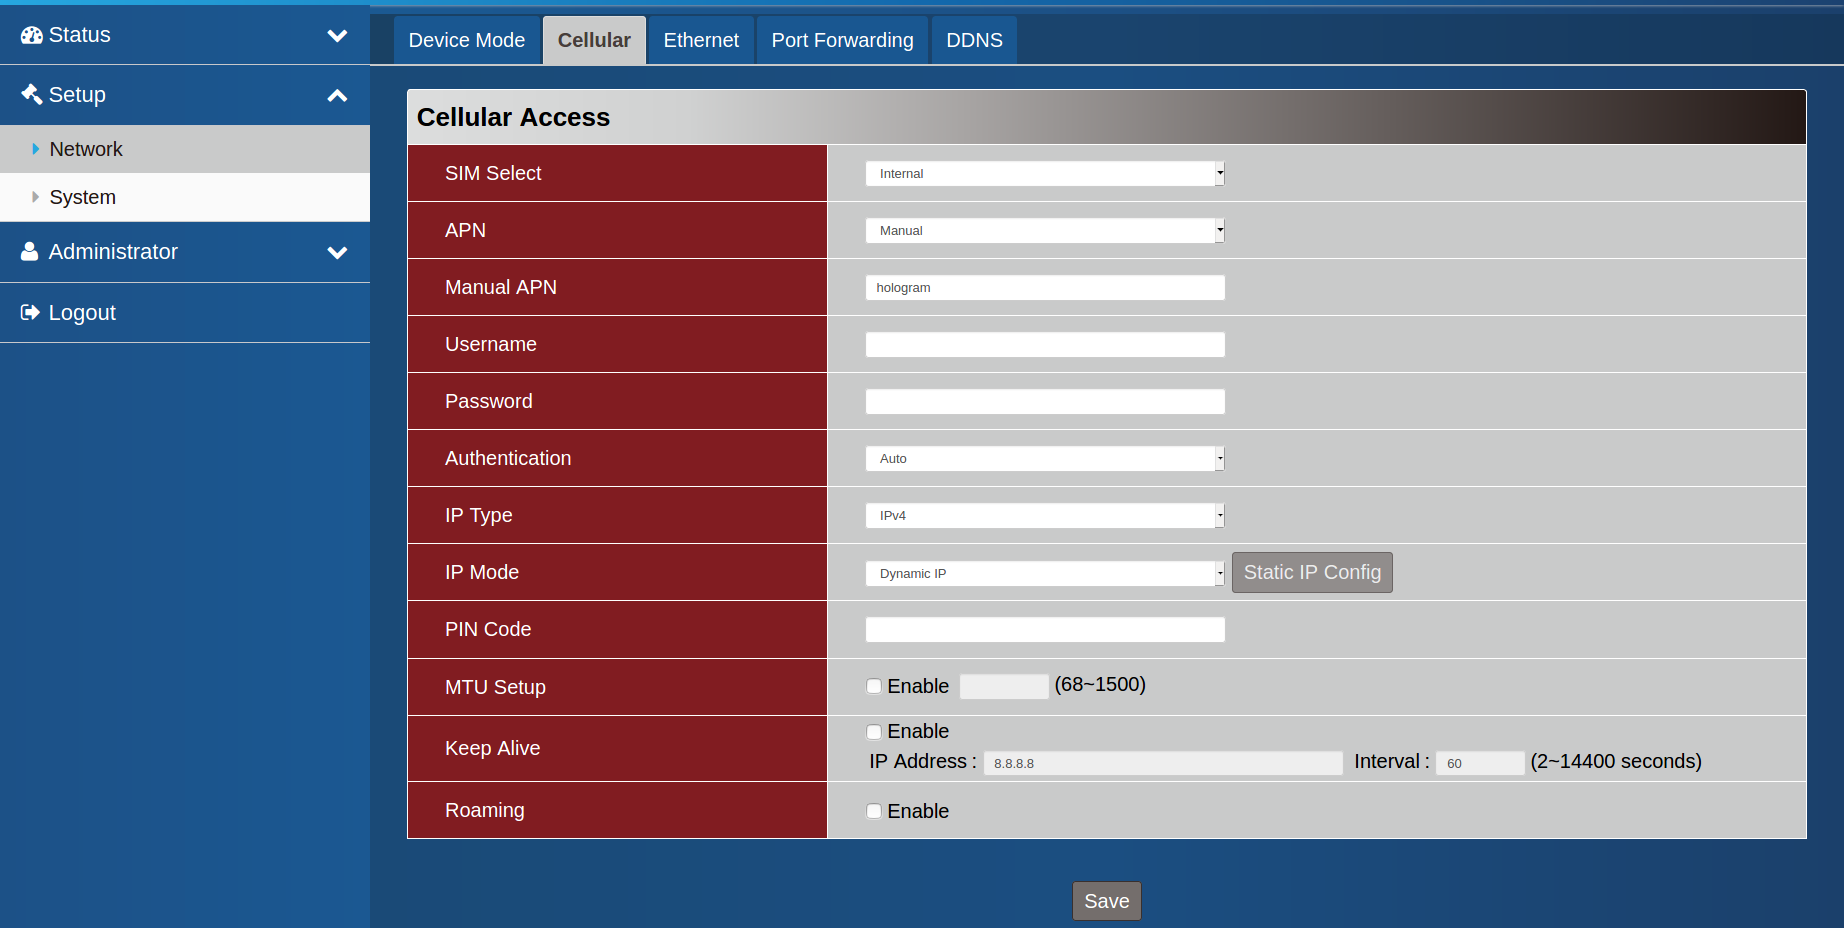
Configure cellular options (setup>network>cellular):
- sim select - internal
- apn - manual
- manual apn - "hologram" (or your apn)
- authentication - auto
- ip type - ipv4
- ip modem - dynamic ip
Save.
Verify ethernet settings:
Save and logout.
Get a connection
Back on the Gateworks SBC...
Configure the driver:
modprobe option
echo 0x5c6 0x90b3 > /sys/bus/usb-serial/drivers/option1/new_id
Use modem manager to establish a connection:
mmcli -m 0 --enable
This should return "successfully enabled the modem"
mmcli -m 0 --simple-connect="apn=hologram"
This should return "successfully connected the modem"
If these steps are not working check that your SIM card is activated and your antennas are connected. A scan can be used to verify that your desired network is aviable
mmcli --modem 0 --3gpp-scan --timeout=300
For example this will return:
---------------------
3GPP scan | networks: 310410 - AT&T (umts, available)
          |           311490 - 311 490 (lte, forbidden)
          |           310260 - T-Mobile (lte, available)
          |           313100 - FirstNet (lte, forbidden)
          |           310410 - AT&T (lte, current)
          |           311480 - Verizon (lte, available)
          |           310260 - T-Mobile (umts, available)
Configure the nameserver to use 8.8.8.8
echo "nameserver 8.8.8.8" > /etc/resolv.conf
Make your default gateway the modem:
route add default gw 172.16.0.1 dev usb0
Verify the connection is established:
root@focal-newport:~# ping -I usb0 www.google.com
PING www.google.com (216.58.201.228) from 172.16.0.6 usb0: 56(84) bytes of data.
64 bytes from par10s33-in-f4.1e100.net (216.58.201.228): icmp_seq=1 ttl=110 time=639 ms
64 bytes from par10s33-in-f4.1e100.net (216.58.201.228): icmp_seq=2 ttl=110 time=641 ms
AT Commands
This document explains how to use the AMIT modem with AT commands if you prefer to avoid the WebUI.
Attachments (11)
-
atnema.png
(47.8 KB
) - added by 5 years ago.
adnema
-
nat.png
(39.6 KB
) - added by 5 years ago.
nat
-
cellular.png
(84.3 KB
) - added by 5 years ago.
cellular
-
ethernet.png
(48.1 KB
) - added by 5 years ago.
ethernet
-
mdg100.png
(670.8 KB
) - added by 5 years ago.
mdg100
-
amitbaseboard.png
(1.0 MB
) - added by 4 years ago.
amit base board
-
amitmounted.png
(994.8 KB
) - added by 4 years ago.
amit mounted
- amitmodem.jpg (13.5 KB ) - added by 4 years ago.
-
MDG100 work on Linux.pdf
(1.2 MB
) - added by 4 years ago.
At command enable for Amit
- init_mdg200.txt (2.9 KB ) - added by 3 years ago.
- 20220831-MDG100-200-CLI_Command_list_V3.docx (101.1 KB ) - added by 3 years ago.
Download all attachments as: .zip


